Welcome to the mischievous and lovable world of amigurumi! 🧡✨ Today, I’m excited to share my free crochet pattern for an Amigurumi Garfield—a sassy and cuddly creation perfect for comic strip fans, cat lovers, or anyone who enjoys crafting expressive and humorous plush designs! 🧶 Whether you love stitching up iconic characters, experimenting with textured details, or simply want to add a lazy yet lovable Garfield to your handmade lineup, this pattern will guide you through crafting a beautifully sculpted plush with his signature half-lidded eyes, plump belly, and unmistakable stripes! 🍝
This design embraces bright oranges, deep blacks, and rounded shaping to bring a cheeky and nostalgic presence to your crochet projects! 🧶✨ I’ve carefully outlined each step to ensure your Amigurumi Garfield turns out just right—ready to lounge in your collection or become a treasured handmade gift! 🎁 So grab your hooks, pick out classic Garfield hues, and let’s stitch up a fantastic Garfield! 🧡
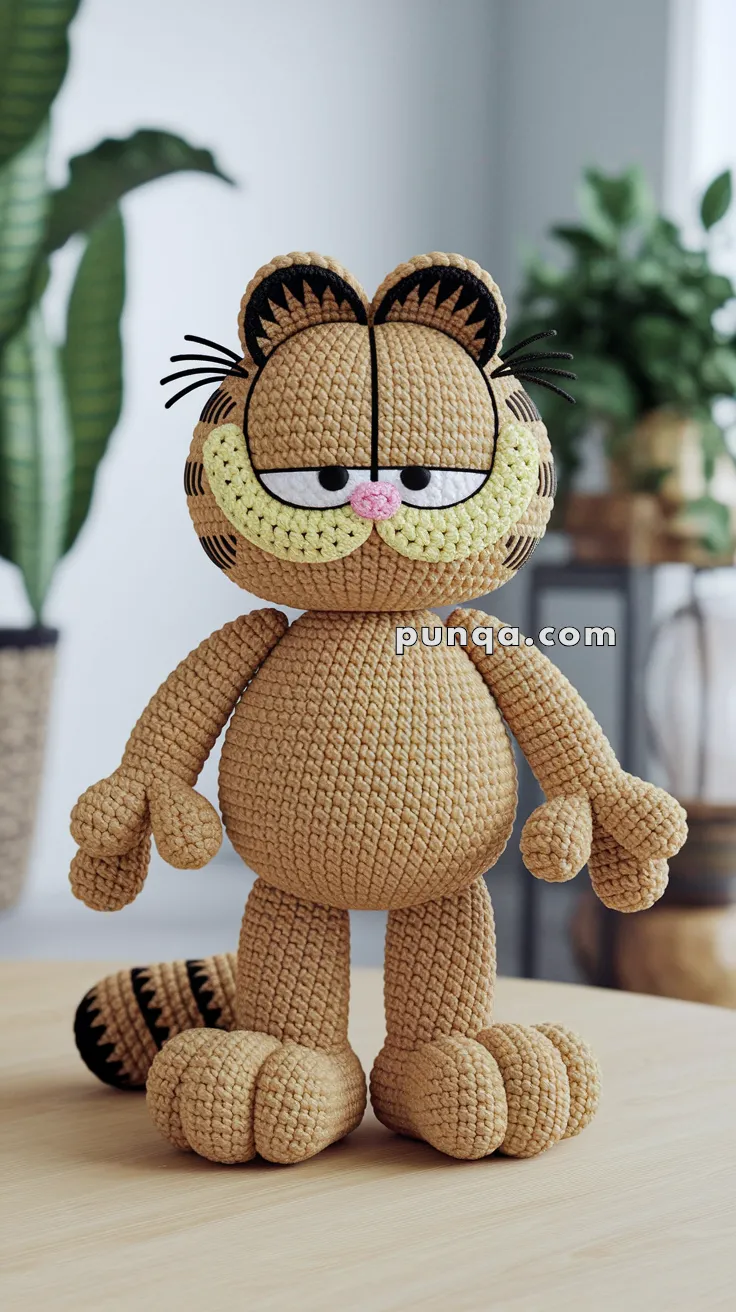
🧡 Amigurumi Garfield Crochet Pattern
Bring the famously grumpy, lasagna-loving orange cat to life with this detailed amigurumi project! 😼
This design features an oversized rounded head, sleepy half-lidded eyes, full yellow cheeks, fan-shaped ear markings, long whiskers, chunky paws, and a striped tail. His tall pear-shaped body and exaggerated cartoon proportions give him the unmistakable lazy charm that makes him such a beloved character.
The finished doll is designed to stand upright with large, stable feet and relaxed arms hanging at the sides. It makes a fun collectible, nostalgic handmade gift, or playful addition to a desk, bookshelf, or craft room. 🧶✨
✨ Skill Level
Intermediate
This pattern includes:
- 🧠 Large shaped head
- 😼 Layered facial appliqués
- ✋ Three-part cartoon hands
- 🐾 Oversized segmented feet
- 👂 Decorative ear embroidery
- 🌀 Striped tail construction
- 🪡 Detailed multi-piece assembly
📏 Finished Size
Using DK cotton yarn and a 3.0 mm crochet hook, the finished doll measures approximately:
28–31 cm (11–12¼ inches) tall
The final size may vary depending on yarn choice, hook size, tension, and stuffing.
🧶 Yarn Requirements
DK-weight cotton or cotton-blend yarn is recommended for crisp stitch definition.
🧡 Honey Orange — 155 g
💛 Pale Yellow — 38 g
🤍 White — 18 g
🖤 Black — 22 g
🩷 Dusty Pink — 4 g
Small amount of dark brown yarn, optional for subtle shading
🧵 Materials
- 3.0 mm crochet hook
- 10 mm black safety eyes or crocheted pupils
- Polyester fiberfill
- Tapestry needle
- Stitch markers
- Pins for positioning
- Scissors
- Black nylon thread, fishing line, or thin coated craft wire for whiskers
- Optional plastic canvas or thin cardboard for stabilizing the feet
🔤 Abbreviations (US Terms)
MR – Magic Ring
sc – Single Crochet
inc – Increase
dec – Invisible Decrease
sl st – Slip Stitch
ch – Chain
hdc – Half Double Crochet
BLO – Back Loop Only
FLO – Front Loop Only
FO – Fasten Off
Work in continuous rounds unless otherwise stated.
🧠 Head
The head is oversized, broad, and slightly flattened at the front. This creates enough surface area for the large eyes, muzzle, and distinctive cheek markings.
Using honey-orange yarn:
R1
MR 6
(6)
R2
inc ×6
(12)
R3
(1 sc, inc) ×6
(18)
R4
(2 sc, inc) ×6
(24)
R5
(3 sc, inc) ×6
(30)
R6
(4 sc, inc) ×6
(36)
R7
(5 sc, inc) ×6
(42)
R8
(6 sc, inc) ×6
(48)
R9
(7 sc, inc) ×6
(54)
R10–22
sc around
(54)
Do not insert safety eyes directly into the head. The pupils will be attached to the separate eye pieces later.
R23
(7 sc, dec) ×6
(48)
R24
(6 sc, dec) ×6
(42)
R25
(5 sc, dec) ×6
(36)
Begin stuffing firmly.
R26
(4 sc, dec) ×6
(30)
R27
(3 sc, dec) ×6
(24)
Continue stuffing, keeping the face broad and the back of the head rounded.
R28
(2 sc, dec) ×6
(18)
R29
(1 sc, dec) ×6
(12)
R30
dec ×6
(6)
FO and close.
Gently press the front of the head to create a slightly flatter facial plane.
🐾 Body
The body is tall and pear-shaped, with narrow shoulders and a wide rounded lower belly.
Using honey-orange yarn:
R1
MR 6
(6)
R2
inc ×6
(12)
R3
(1 sc, inc) ×6
(18)
R4
(2 sc, inc) ×6
(24)
R5
(3 sc, inc) ×6
(30)
R6
(4 sc, inc) ×6
(36)
R7
(5 sc, inc) ×6
(42)
R8
(6 sc, inc) ×6
(48)
R9–20
sc around
(48)
Stuff firmly as you work.
R21
(6 sc, dec) ×6
(42)
R22–24
sc around
(42)
R25
(5 sc, dec) ×6
(36)
R26–28
sc around
(36)
R29
(4 sc, dec) ×6
(30)
R30–31
sc around
(30)
R32
(3 sc, dec) ×6
(24)
Continue stuffing firmly, especially around the lower belly.
R33
(2 sc, dec) ×6
(18)
FO, leaving a long tail for sewing.
The finished body should have a wide lower half and a narrower upper section with no visible neck once assembled.
💪 Arms (Make 2)
The arms are long and slightly tapered, ending in oversized cartoon hands.
Using honey-orange yarn:
R1
MR 6
(6)
R2
inc ×6
(12)
R3–8
sc around
(12)
R9
(4 sc, dec) ×2
(10)
R10–22
sc around
(10)
Stuff lightly, leaving the top few rounds soft.
Flatten the opening.
FO, leaving a long sewing tail.
✋ Hand Pieces
Each hand has one broad palm, two rounded fingers, and one smaller thumb.
Palm (Make 2)
Using honey-orange yarn:
R1
MR 6
(6)
R2
inc ×6
(12)
R3–5
sc around
(12)
R6
(2 sc, dec) ×3
(9)
Lightly stuff.
FO, leaving a long tail.
Fingers (Make 4)
Using honey-orange yarn:
R1
MR 6
(6)
R2–4
sc around
(6)
Lightly stuff.
FO.
Make two fingers for each hand.
Thumbs (Make 2)
Using honey-orange yarn:
R1
MR 5
(5)
R2–3
sc around
(5)
FO.
🪡 Assembling the Hands
Sew two rounded fingers side by side at the lower end of each palm.
Attach one thumb to the inner side of each hand.
The fingers should point slightly downward while the thumb angles inward toward the body.
Sew the completed hand securely to the end of each arm.
🦵 Legs (Make 2)
The legs are thick, straight cylinders positioned directly beneath the body.
Using honey-orange yarn:
R1
MR 6
(6)
R2
inc ×6
(12)
R3
(1 sc, inc) ×6
(18)
R4–20
sc around
(18)
Stuff firmly, especially near the bottom.
Flatten the top opening slightly.
FO, leaving a long sewing tail.
🐾 Oversized Feet
Each foot is built from a main base and three rounded toe lobes, creating the broad, exaggerated cartoon paw shape.
Foot Base (Make 2)
Using honey-orange yarn:
R1
Ch 8.
Starting in the second chain:
6 sc
3 sc in the final chain
Continue along the opposite side:
5 sc
inc
(16)
R2
inc
5 sc
3 inc
5 sc
2 inc
(22)
R3
sc around
(22)
R4
inc, 9 sc, inc, 10 sc
(24)
R5–7
sc around
(24)
Stuff firmly.
Flatten the back opening slightly.
FO, leaving a long tail.
Toe Lobes (Make 6)
Using honey-orange yarn:
R1
MR 6
(6)
R2
inc ×6
(12)
R3–5
sc around
(12)
R6
dec ×6
(6)
Stuff firmly.
FO.
🪡 Assembling the Feet
Sew three toe lobes side by side across the front of each foot base.
The center toe should sit slightly farther forward than the outer toes.
Attach each completed foot to the bottom of a leg.
Make sure the feet remain broad and flat enough to support the finished doll.
Optional: insert a small plastic canvas or cardboard oval inside each foot before closing for added stability.
🧷 Preliminary Body Assembly
Before adding the face and final details, assemble the main doll shape.
Attach the Legs
Position the legs beneath the lower body, leaving a small gap between them.
The feet should point forward and sit completely flat.
Sew securely around the upper edge of each leg.
Attach the Head
Center the head directly on top of the body.
The face should tilt slightly downward, creating the familiar sleepy posture.
Sew securely around the opening with several passes of yarn.
Position the Arms
Pin the arms high on the sides of the body.
Angle them slightly outward and downward.
Do not sew permanently until the facial pieces and tail are positioned, as small adjustments may be needed for balance.
✨ Shaping the Main Figure
Before continuing:
- Massage the head until the front is broad and gently flattened.
- Shape the lower body into a rounded pear silhouette.
- Check that both legs are the same length.
- Make sure all six toe lobes touch the display surface.
- Turn the hands slightly inward.
- Confirm that the head sits centered without a visible neck.
At this stage, the doll should already have its recognizable oversized head, tall body, chunky feet, and relaxed standing pose.
🌀 Striped Tail
The tail is thick, gently curved, and weighted toward the tip. It rests on the floor behind the feet rather than standing upright.
Begin with black yarn.
R1
MR 6
(6)
R2
inc ×6
(12)
R3–5
sc around
(12)
Switch to honey orange.
R6–9
sc around
(12)
Switch to black.
R10–13
sc around
(12)
Switch to honey orange.
R14–17
sc around
(12)
Switch to black.
R18–21
sc around
(12)
Switch to honey orange.
R22–30
sc around
(12)
Stuff lightly as you work.
Leave the final several rounds almost unstuffed so the tail can bend naturally.
FO, leaving a long sewing tail.
Curve the tail into a relaxed horizontal shape before attaching it low on the back.
👂 Outer Ears (Make 2)
The ears are rounded at the top with a broad base rather than sharply pointed.
Using honey-orange yarn:
R1
MR 6
(6)
R2
inc ×6
(12)
R3
(1 sc, inc) ×6
(18)
R4
(2 sc, inc) ×6
(24)
R5–7
sc around
(24)
R8
(2 sc, dec) ×6
(18)
Do not stuff.
Flatten each ear.
FO, leaving a long sewing tail.
Pin the ears close together near the top of the head, angling them slightly outward.
🖤 Inner Ear Panels (Make 2)
Using black yarn:
R1
MR 6
(6)
R2
inc ×6
(12)
R3
(1 sc, inc) ×6
(18)
Flatten into a half-circle.
FO.
Sew one black panel inside each ear, leaving a narrow orange border visible.
🧡 Ear Fan Markings
Using honey-orange yarn, embroider five to six triangular rays across each black inner-ear panel.
Begin near the lower center of the ear and stitch outward toward the upper edge.
Keep the rays evenly spaced.
💛 Muzzle Cheeks (Make 2)
The pale-yellow cheeks form a wide double-lobed muzzle and extend beneath the eyes.
Using pale-yellow yarn:
R1
Ch 9.
Starting in the second chain:
7 sc
3 sc in the last chain
Continue along the opposite side:
6 sc
inc
(18)
R2
inc
6 sc
3 inc
6 sc
2 inc
(24)
R3
sc around
(24)
R4
inc, 10 sc, inc, 12 sc
(26)
R5–6
sc around
(26)
Lightly stuff.
Flatten the back opening.
FO, leaving a long sewing tail.
Make a second identical cheek.
🪡 Positioning the Muzzle
Place the cheeks side by side across the lower face.
The inner edges should overlap slightly beneath the nose.
The outer edges should extend wider than the eye pieces.
Pin both cheeks before sewing.
Attach around the outer edges, leaving the inner overlapping section softly raised.
🤍 Eye Whites (Make 2)
The eye whites are long horizontal ovals rather than round circles.
Using white yarn:
R1
Ch 9.
Starting in the second chain:
7 sc
3 sc in the last chain
Continue along the opposite side:
6 sc
inc
(18)
R2
inc
6 sc
3 inc
6 sc
2 inc
(24)
R3
sc around
(24)
FO, leaving a sewing tail.
Flatten each oval.
🖤 Pupils (Make 2)
Using black yarn:
R1
MR 6
(6)
R2
inc ×6
(12)
FO.
Sew each pupil low and slightly inward on its eye white.
This placement creates the tired, half-lidded expression.
💛 Eyelids (Make 2)
Using pale-yellow yarn:
Row 1
Ch 10.
Starting in the second chain, hdc across.
(9)
Row 2
Ch 1, turn, hdc across.
(9)
Row 3
Ch 1, turn, dec, 5 hdc, dec.
(7)
FO, leaving a long sewing tail.
Curve each piece gently.
😼 Assembling the Eyes
Sew the eye whites side by side above the muzzle.
Their inner edges should nearly touch.
Place one eyelid over the upper half of each eye white.
Angle the outer corners slightly downward.
Sew along the upper and side edges only, leaving the lower edge softly raised.
🩷 Nose
Using dusty-pink yarn:
R1
MR 6
(6)
R2
inc ×6
(12)
R3
sc around
(12)
R4
(2 sc, dec) ×3
(9)
Lightly stuff.
FO, leaving a long sewing tail.
Sew between the two cheeks, slightly overlapping the lower inner edges of the eye whites.
🖤 Vertical Facial Line
Using black embroidery yarn:
Begin at the top center of the head between the ears.
Work a straight line down the middle of the forehead.
Continue between the eyes and stop at the top of the nose.
Keep the line narrow and centered.
😼 Mouth
Using black embroidery yarn:
Work a short vertical stitch from the bottom of the nose to the point where the cheeks meet.
From that point, embroider a shallow curved line toward each side.
The mouth should remain small and understated.
🖤 Cheek Stripes
Embroider three curved black stripes along the outer edge of each cheek.
Place the stripes in graduated lengths, with the longest stripe closest to the middle of the face.
Curve them gently backward.
🖤 Side Head Stripes
Add three short curved black stripes on each side of the head near the lower temples.
Keep them parallel and evenly spaced.
🖤 Whiskers
Cut six lengths of black nylon thread, coated craft wire, or stiff black yarn, each measuring approximately 8–10 cm.
Insert three whiskers into each side of the muzzle.
Angle them slightly upward.
Secure firmly from the inside or stitch them in place beneath the cheek pieces.
Trim until both sides are even.
👂 Attaching the Ears
Pin the ears at the top of the head.
Their inner edges should nearly meet at the center.
Angle the outer edges slightly outward.
Sew securely around the lower edge.
The ears should sit behind the vertical forehead stripe.
🌀 Attaching the Tail
Position the tail low on the back, slightly to one side.
The striped tip should rest on the floor behind the feet.
Sew securely around the base.
Use one or two hidden stitches farther along the tail if needed to hold its curved pose.
✨ Face Shaping Tips
Before weaving in the ends:
- Press the cheeks gently upward toward the eyes.
- Make sure the pupils sit low and inward.
- Angle both eyelids evenly.
- Center the nose beneath the forehead stripe.
- Curve the whiskers outward.
- Check that the ears remain symmetrical.
The completed face should look sleepy, unimpressed, and slightly mischievous.
🧵 Assembly
Now it’s time to bring every piece together and give your cat its unmistakable personality. Take your time with this stage—careful placement makes all the difference. 🧡
Attach the Head
Sew the head securely to the body using the long yarn tail.
The head should tilt slightly forward, giving the relaxed, sleepy posture that makes this design so recognizable.
Add a little extra stuffing into the neck before closing if needed for stability.
Attach the Legs
Pin both legs to the lower front of the body.
The feet should:
- Sit flat on the table
- Point slightly outward
- Support the rounded tummy
- Keep the body balanced without leaning
Sew completely around each leg for a sturdy join.
Attach the Arms
Position the arms about 2 rounds below the neckline.
Angle them naturally downward.
The oversized mitten-shaped hands should rest near the sides of the belly.
Avoid attaching them too high, as the relaxed pose is an important part of the finished look.
Attach the Tail
Sew the striped tail low on the back.
Curve it gently around one side of the body so it rests on the surface instead of standing upright.
A few hidden tacking stitches underneath help maintain the curve.
😼 Final Facial Details
These finishing details bring the expression to life.
Eyebrows
Using black embroidery thread, stitch thick curved eyebrows above each eye.
The inner ends should sit slightly lower than the outer ends to create the classic bored expression.
Eyelids
Check that both eyelids cover roughly the upper half of each eye.
If needed, tack the corners down with a few invisible stitches.
Nose
The small pink nose should sit exactly between the two cheeks.
Keep it centered beneath the forehead stripe.
Mouth
Embroider a short vertical stitch beneath the nose.
From the bottom of this stitch, work two gentle curves outward to form a subtle smile.
The mouth should remain understated rather than exaggerated.
Whiskers
Insert three whiskers on each side.
Trim them evenly to approximately 7–8 cm.
Slightly curve them forward for a lively appearance.
Head Stripes
Complete the facial markings by embroidering:
- three curved stripes on each cheek
- three shorter stripes on each temple
- fan-shaped markings inside both ears
- the bold vertical stripe down the center of the forehead
Keep all embroidery neat and symmetrical.
✨ Optional Shaping
For an even more polished finish:
- Lightly steam the ears to help them hold their curve.
- Massage the stuffing to smooth any uneven areas.
- Roll the feet gently on a flat surface to create flat standing bases.
- Adjust the cheeks so they appear evenly rounded.
- Bend the tail slightly until you’re happy with its shape.
🌟 Display Tips
This finished cat looks wonderful displayed:
- 📚 on a bookshelf
- 🛋️ beside your favorite reading chair
- 🧶 in a craft room
- 🎁 as a handmade gift for cartoon lovers
- 🎄 as part of a nostalgic holiday display
It also pairs beautifully with lasagna-themed accessories or other classic cartoon-inspired amigurumi.
🧼 Care Instructions
To keep your handmade friend looking its best:
- Hand wash gently in cool water.
- Do not wring or twist.
- Lay flat on a towel to dry.
- Brush the whiskers lightly back into place if needed.
- Store away from direct sunlight to prevent fading.
💡 Customization Ideas
Want to make your version unique?
Try adding:
- 🍝 a tiny crocheted lasagna pan
- 🛏️ a miniature pillow for lounging
- 📖 a tiny comic book
- ❤️ a heart appliqué for Valentine’s Day
- 🎄 a Santa hat for Christmas
- 🎃 a pumpkin accessory for Halloween
Small accessories can completely change the character while keeping the same base doll.
🧶 Helpful Crochet Tips
- Use invisible decreases for smoother shaping.
- Stuff firmly as you go instead of waiting until the end.
- Pin all facial pieces before sewing permanently.
- Count stitches often to keep the face symmetrical.
- Embroider facial markings after the cheeks are attached for perfect alignment.
- Use locking stitch markers whenever changing colors.
🎉 Final Thoughts
This charming crochet cat combines bold cartoon styling with soft amigurumi construction to create a fun collectible full of personality. From the oversized sleepy eyes and rounded muzzle to the striped tail and chunky paws, every detail works together to capture a delightfully grumpy expression that’s instantly recognizable.
Whether you’re making it for yourself, surprising a fellow crochet enthusiast, or creating a nostalgic handmade gift, this project is sure to become a favorite in your amigurumi collection. Take your time with the facial features and finishing touches—they’re what give this lovable cat its unmistakable charm.
Happy crocheting! 🧡🧶😸