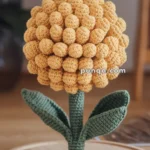
Bring the delicate beauty of a Geranium to life with this Amigurumi Geranium crochet pattern! 🌸✨ With its lush petals, soft textures, and vibrant colors, this design captures the essence of this beloved flower in yarn form. Whether you’re crafting for a botanical décor piece, a heartfelt gift, or simply love floral-themed amigurumi, this FREE pattern is a fantastic addition to your collection.
Designed for intermediate crocheters, this pattern allows for customization in petal shapes, leaf details, and even tiny accessories like embroidered veins or a miniature flower pot to enhance its personality. Choose classic reds, pinks, or whites for a realistic look or experiment with whimsical hues for a unique twist! Whether displayed as part of a garden-inspired setup or gifted to a fellow crochet enthusiast, this amigurumi geranium is sure to brighten any space.
Grab your hook, select your favorite yarn, and let’s bring this charming bloom to life—one stitch at a time! 🧶✨
🌺 Amigurumi Geranium Crochet Pattern
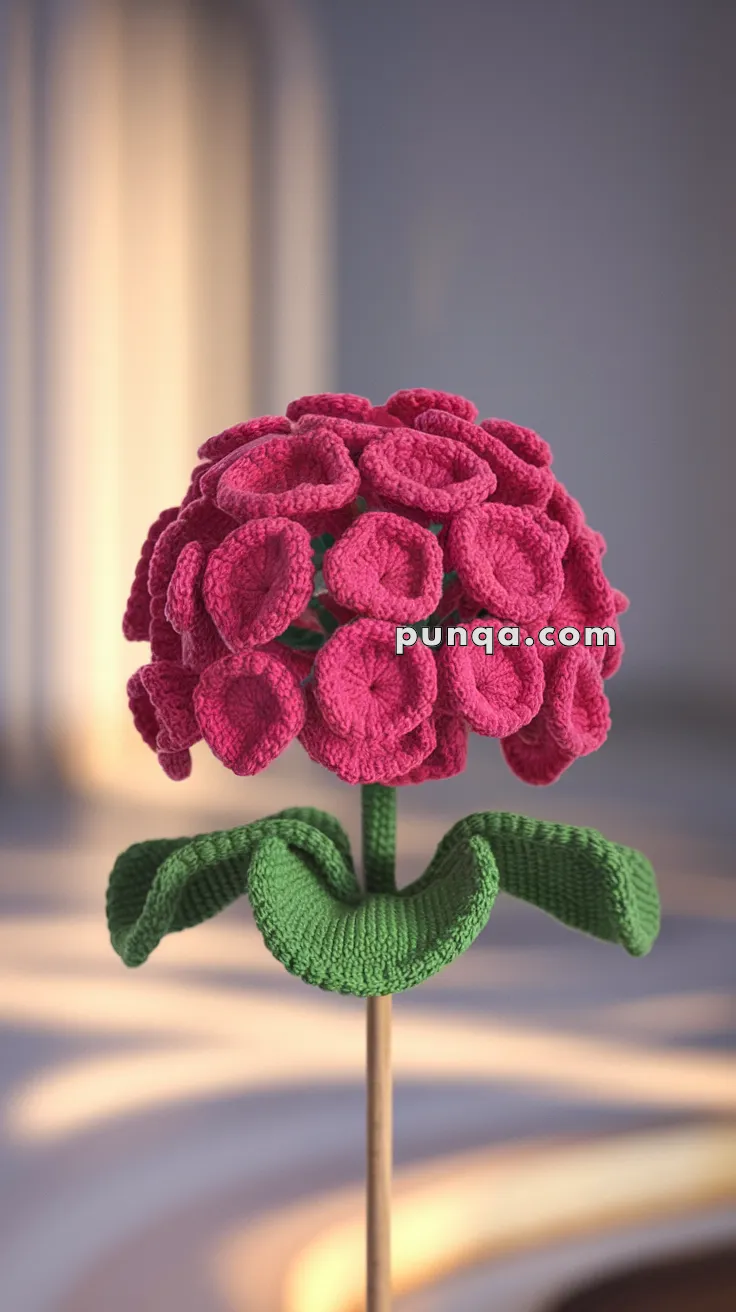
Bring everlasting garden charm indoors with this lush amigurumi geranium! Featuring a realistic cluster of trumpet-shaped flowers and wide curled leaves, this plant is perfect for decor, gifts, or handmade bouquets that never wilt.
✨ Skill Level
Intermediate – Involves flower shaping, assembly of multiple parts, and light sewing.
📏 Finished Size
Approx. 10–12 inches (25–30 cm) tall using sport or worsted weight yarn and a 2.5–3.5 mm crochet hook.
🧶 Yarn Requirements
- Deep pink / raspberry: 65–75 g (flower cluster)
- Green: 35–45 g (stem + leaves)
🧵 Materials
- 2.5–3.0 mm crochet hook
- Floral wire or wooden stick
- Tapestry needle
- Stitch marker
- Scissors
- Optional: hot glue for reinforcement
🔤 Abbreviations (US Terms)
MR – magic ring
sc – single crochet
inc – increase
dec – decrease
sl st – slip stitch
ch – chain
hdc – half double crochet
dc – double crochet
FO – fasten off
🌸 FLOWER CUPS (Make 40–50)
Each blossom is a deep rounded cup, not a flat petal.
With deep pink:
R1: MR, 6 sc (6)
R2: (sc, inc) ×3 (9)
R3: sc around (9)
R4: (2 sc, inc) ×3 (12)
R5: sc around (12)
R6: (3 sc, inc) ×3 (15)
R7–R8: sc around (15)
Shape the opening:
R9: (sl st, ch 1, 1 hdc, 2 dc, 1 hdc) in each stitch around
FO, leave tail
👉 Gently press the center inward so each piece forms a deep cup / bell shape
👉 Do not flatten — volume is essential
🌺 INNER CLUSTER CORE
With green:
R1: MR, 6 sc
R2: inc ×6 (12)
R3: (sc, inc) ×6 (18)
R4: (2 sc, inc) ×6 (24)
R5: (3 sc, inc) ×6 (30)
R6: (4 sc, inc) ×6 (36)
FO
This rounded base supports the dense flower arrangement.
🌸 BUILDING THE FLOWER HEAD
- Begin attaching cups around the outer edge
- Sew tightly with minimal gaps
- Add additional layers above, angling cups slightly outward
- Continue filling inward and upward
👉 Use 40–50 cups total for a full dome
👉 Keep the top slightly rounded, not flat
👉 Slight overlap creates a natural clustered effect
🌿 STEM (Straight & Covered)
With green:
R1: MR, 6 sc
R2–R40: sc around (6)
Insert floral wire or stick inside while crocheting
FO
🍃 LEAVES (Wide & Gently Curved – Make 2–3)
With green:
Ch 18
Row 1: sc in 2nd ch, sc across (17)
Row 2: ch 1, turn, inc, sc 15, inc (19)
Row 3: ch 1, turn, inc, sc 17, inc (21)
Row 4: ch 1, turn, inc, sc 19, inc (23)
Row 5: sc across (23)
Edge shaping:
Work around entire leaf:
(sc, hdc, dc, hdc, sc) repeatedly
FO
👉 Lightly curl edges inward by hand for a natural droop
🌱 LEAF BASE (Shallow Cup Shape)
With green:
R1: MR, 6
R2: inc ×6 (12)
R3: (sc, inc) ×6 (18)
R4: sc around (18)
FO
Slightly shape into a curved base and attach leaves here.
🧩 ASSEMBLY
- Attach stem to the center underside of the flower cluster
- Secure leaf base around the stem just below flowers
- Arrange leaves evenly and slightly downward
- Adjust flower cups to maintain a full rounded silhouette
✨ FINISHING TOUCHES
- Rotate cups so openings face outward and slightly upward
- Fill any visible gaps with additional cups if needed
- Keep cluster dense and symmetrical
- Lightly steam or shape by hand
💖 FINAL RESULT
This design creates a rich, botanical look with a dense dome of layered cup-shaped flowers, supported by a clean stem and softly curved leaves.
The repeating forms build a natural rhythm, giving the piece depth and realism while keeping the process enjoyable and meditative.
A beautiful handmade bloom that stays vibrant forever 🌿🌺✨