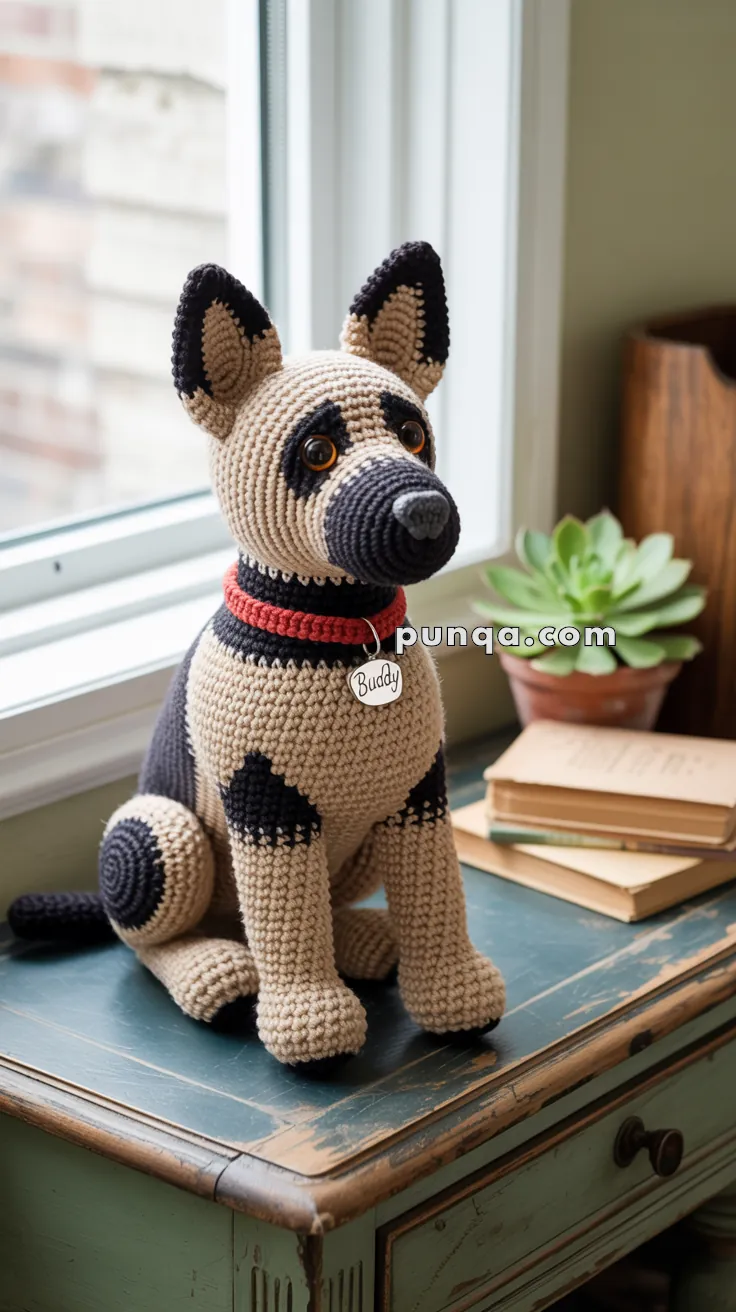
Bring home a loyal handmade companion with this Amigurumi German Shepherd crochet pattern! With its alert ears, noble stance, and signature black-and-tan coat, this pup captures the proud and protective spirit of the beloved breed in the most huggable way. Whether you’re crafting a tribute to your furry best friend, making a gift for a dog lover, or simply adding to your amigurumi kennel, this pattern lets you stitch up a faithful friend full of charm and character. 🐾🧶🐕
Designed for detail and personality, this pattern invites you to play with rich yarn tones, expressive features, and fun extras like a tiny collar, name tag, or even a mini bone. Customize the markings to match a real-life pup or add a playful twist with accessories like a police vest or service dog badge. Whether perched on a shelf, gifted with love, or guarding your craft corner, this German Shepherd Amigurumi is a heartwarming and satisfying project—perfect for bringing a touch of handmade devotion to every stitch! 💖✨🐶
🐾 Amigurumi German Shepherd “Buddy” Crochet Pattern
Create a loyal crochet companion with an alert expression, upright shepherd ears, a long charcoal muzzle, strong front legs, rounded seated haunches, and classic black-and-tan markings. ❤️🐕
Buddy is constructed in a proud seated pose. His torso is deliberately substantial enough to balance the broad head, while the large hind legs, long forelegs, curved tail, red collar, and personalized tag complete his recognizable shepherd silhouette.
✨ Skill Level
Intermediate to Advanced
This pattern includes:
- Sculpted head and elongated muzzle
- Double-layered pointed ears
- Crocheted eye-mask appliqués
- A large pear-shaped seated body
- Separate chest, shoulder, and back markings
- Long weight-bearing front legs
- Rounded rear haunches and feet
- Curved two-color tail
- Collar and optional name tag
- Detailed multi-piece assembly
📏 Finished Size
Using worsted-weight yarn with a 3.25 mm hook, the finished dog measures approximately:
- 31–34 cm (12¼–13½ in) tall while seated
- 19–22 cm (7½–8¾ in) wide across the haunches
- 24–27 cm (9½–10½ in) from chest to tail
Finished dimensions may vary with yarn, hook size, stuffing, and tension.
🧶 Yarn Requirements
Use smooth worsted-weight cotton, cotton-blend, or acrylic yarn.
- Warm tan or camel for the head, chest, legs, and haunches: 230–260 g
- Charcoal or very dark brown for the muzzle, markings, back, neck, and tail: 95–115 g
- Black for the nose, eye details, and claws: 15–20 g
- Red for the collar: 12–15 g
- Pale beige or cream for the tag: 5 g
- Gray for the nose highlight, optional: 2 g
Polyester fiberfill: approximately 280–350 g
🧵 Materials
- 3.25 mm crochet hook
- Two 12–14 mm amber or brown safety eyes
- Polyester fiberfill
- Tapestry needle
- Fine embroidery needle
- Stitch markers
- Pins for positioning
- Scissors
- Black and tan embroidery thread
- Optional small metal jump ring for the tag
- Optional plastic pellets for sitting stability
- Optional plastic canvas for reinforcing the front paws
Safety eyes and detachable tags are not suitable for children under three. Embroider the eyes and sew the tag directly to the collar when necessary.
🔤 Abbreviations — US Terms
- MR — Magic Ring
- sc — Single Crochet
- inc — Increase: 2 sc in one stitch
- dec — Invisible Decrease
- sl st — Slip Stitch
- ch — Chain
- hdc — Half Double Crochet
- BLO — Back Loop Only
- FLO — Front Loop Only
- FO — Fasten Off
Work in continuous rounds unless stated otherwise.
🐶 Head
The head is a tall oval with a broad forehead and a narrower lower section. It should remain slightly larger than the upper torso but not larger than the complete seated body.
Using warm tan yarn:
R1
MR 6. (6)
R2
inc ×6. (12)
R3
(1 sc, inc) ×6. (18)
R4
(2 sc, inc) ×6. (24)
R5
(3 sc, inc) ×6. (30)
R6
(4 sc, inc) ×6. (36)
R7
(5 sc, inc) ×6. (42)
R8
(6 sc, inc) ×6. (48)
R9
(7 sc, inc) ×6. (54)
R10–20
sc around. (54)
Do not insert the eyes directly into the head yet. They will pass through the separate black eye-mask pieces.
R21
(7 sc, dec) ×6. (48)
R22
(6 sc, dec) ×6. (42)
R23
(5 sc, dec) ×6. (36)
Begin stuffing firmly.
R24
(4 sc, dec) ×6. (30)
R25
(3 sc, dec) ×6. (24)
Continue stuffing. Keep the crown rounded and the lower face slightly narrower.
R26
(2 sc, dec) ×6. (18)
R27
(1 sc, dec) ×6. (12)
R28
dec ×6. (6)
FO and close.
Shape the head into a tall oval. Lightly flatten the front where the eye masks and muzzle will sit.
👀 Eye Masks — Make 2
The black eye markings are tall, tapered appliqués framing the amber eyes.
Using charcoal yarn:
R1
Ch 7.
Starting in the second chain:
5 sc, 3 sc in the final chain.
Continue along the opposite side:
4 sc, inc. (14)
R2
inc, 4 sc, 3 inc, 4 sc, 2 inc. (20)
R3
sc around. (20)
FO, leaving a sewing tail.
Flatten each piece and pinch the upper edge into a soft point.
Insert one safety eye through the lower-middle area of each mask.
Position the masks between Head Rounds 13 and 18, leaving approximately 7 stitches between the eye posts.
The pointed ends should angle upward toward the center of the forehead.
Secure the safety-eye washers inside the head, then sew around the mask edges.
🖤 Eyebrow Markings
Using charcoal yarn or embroidery thread, work one thick curved stitch above each eye mask.
Angle the inner ends slightly downward to create an alert, attentive expression.
🐽 Long Muzzle
The muzzle has a dark front section and a tan base. It is longer than a simple round snout and projects clearly from the face.
Begin at the nose end using charcoal yarn:
R1
MR 6. (6)
R2
inc ×6. (12)
R3
(1 sc, inc) ×6. (18)
R4–6
sc around. (18)
R7
(2 sc, inc) ×6. (24)
R8–11
sc around. (24)
Switch to warm tan.
R12
(3 sc, inc) ×6. (30)
R13–18
sc around. (30)
R19
(3 sc, dec) ×6. (24)
Lightly stuff the final opening.
FO, leaving a long sewing tail.
Stuff the muzzle firmly at the nose end and slightly more softly at the head end.
Sew the tan opening to the lower front of the head. Keep the muzzle level or angle it very slightly downward.
👃 Nose
Using black yarn:
R1
MR 6. (6)
R2
inc ×6. (12)
R3
(1 sc, inc) ×6. (18)
R4–5
sc around. (18)
R6
(1 sc, dec) ×6. (12)
Stuff firmly.
R7
dec ×6. (6)
FO.
Shape the nose into a softly rounded triangle and sew it to the end of the muzzle.
Add a few short gray stitches across the lower center for a subtle highlight if desired.
👄 Mouth Detail
Using black embroidery thread, stitch a short vertical line beneath the nose.
Add one shallow curved line on each side.
Keep the mouth understated so the long muzzle remains the main facial feature.
👂 Outer Ears — Make 2
The ears are tall, broad at the base, and sharply tapered at the top.
Begin at the tip using charcoal yarn:
R1
MR 4. (4)
R2
(1 sc, inc) ×2. (6)
R3
(2 sc, inc) ×2. (8)
R4
(3 sc, inc) ×2. (10)
R5
(4 sc, inc) ×2. (12)
Switch to warm tan.
R6
(5 sc, inc) ×2. (14)
R7
(6 sc, inc) ×2. (16)
R8
(7 sc, inc) ×2. (18)
R9–14
sc around. (18)
Do not stuff.
Flatten each ear and FO, leaving a long sewing tail.
The charcoal section should form the pointed upper tip while the lower base remains tan.
🤎 Inner Ears — Make 2
Using warm tan yarn:
R1
Ch 10.
Starting in the second chain:
8 sc, 3 sc in the final chain.
Continue down the opposite side:
7 sc, inc. (20)
R2
sc around. (20)
FO.
Flatten each inner ear into a long pointed oval.
Sew one inner panel to the front of each outer ear, leaving a charcoal border visible around the upper and outer edges.
Pinch the lower ear bases inward slightly to create a natural cup.
🪡 Attaching the Ears
Position the ears high on the crown between approximately Head Rounds 3 and 9.
The ears should:
- Stand upright
- Angle slightly outward
- Have a small gap between their bases
- Show the tan inner panels from the front
- Retain clearly visible charcoal tips
Sew through both layers around the flattened bases.
Reinforce the inner base of each ear so it does not collapse.
🐕 Large Seated Body
The body is substantial, pear-shaped, and large enough to support the head, shoulders, front legs, and rounded haunches.
Begin at the lower body using charcoal yarn:
R1
MR 6. (6)
R2
inc ×6. (12)
R3
(1 sc, inc) ×6. (18)
R4
(2 sc, inc) ×6. (24)
R5
(3 sc, inc) ×6. (30)
R6
(4 sc, inc) ×6. (36)
R7
(5 sc, inc) ×6. (42)
R8
(6 sc, inc) ×6. (48)
R9
(7 sc, inc) ×6. (54)
R10
(8 sc, inc) ×6. (60)
R11–22
sc around. (60)
Switch to warm tan.
R23–27
sc around. (60)
Begin stuffing firmly.
R28
(8 sc, dec) ×6. (54)
R29–31
sc around. (54)
R32
(7 sc, dec) ×6. (48)
R33–35
sc around. (48)
R36
(6 sc, dec) ×6. (42)
R37–39
sc around. (42)
R40
(5 sc, dec) ×6. (36)
R41–43
sc around. (36)
R44
(4 sc, dec) ×6. (30)
R45–46
sc around. (30)
R47
(3 sc, dec) ×6. (24)
Finish stuffing firmly, concentrating extra stuffing in the lower belly and rear.
FO, leaving a long tail.
The charcoal lower rounds form the back and rump marking. Most of the front will later be covered by the tan chest patch.
🤎 Chest Patch
The large tan chest patch begins below the collar and extends over most of the front torso.
Using warm tan yarn:
R1
Ch 15.
Starting in the second chain:
13 sc, 3 sc in the final chain.
Continue down the opposite side:
12 sc, inc. (30)
R2
inc, 12 sc, 3 inc, 12 sc, 2 inc. (36)
R3
sc around. (36)
R4
(5 sc, inc) ×6. (42)
R5–12
sc around. (42)
R13
(5 sc, dec) ×6. (36)
R14
sc around. (36)
FO, leaving a long sewing tail.
Flatten the piece into a broad vertical oval.
Position it from the base of the neck to the lower front belly.
Sew around the edge, allowing it to overlap the charcoal body color and create a broad tan chest.
🖤 Neck Marking
The dark neck marking sits beneath the head and behind the red collar.
Using charcoal yarn:
Ch enough stitches to wrap around the upper body, approximately 34–38 chains.
Join without twisting.
R1–4
sc around.
FO.
Place the band around the upper torso and sew it flat.
The red collar will sit over the center of this dark section, leaving charcoal visible above and below.
🖤 Shoulder Patches — Make 2
The black shoulder markings begin high on the chest and curve down behind the front legs.
Using charcoal yarn:
R1
Ch 8.
Starting in the second chain, sc across. (7)
Rows 2–5
Ch 1, turn, sc across. (7)
Row 6
dec, 3 sc, dec. (5)
Row 7
dec, 1 sc, dec. (3)
FO.
Sew one patch to each side of the upper chest, directly behind the front legs.
Angle the narrow end upward toward the shoulder.
🖤 Back Saddle Patch
The dark body section should rise over the back and shoulders rather than ending as a straight horizontal band.
Using charcoal yarn:
Row 1
Ch 24.
Starting in the second chain, sc across. (23)
Rows 2–8
Ch 1, turn, sc across. (23)
Row 9
dec, 19 sc, dec. (21)
Row 10
dec, 17 sc, dec. (19)
FO.
Position this piece over the upper back, beginning behind the neck and extending toward the rump.
Sew it down with the longer edge running horizontally.
Blend its lower corners into the existing charcoal lower-body section.
🐾 Front Legs — Make 2
The forelegs are long, straight, and thick enough to support the proud sitting pose.
Begin with warm tan yarn:
R1
Ch 7.
Starting in the second chain:
5 sc, 3 sc in the final chain.
Continue down the opposite side:
4 sc, inc. (14)
R2
inc, 4 sc, 3 inc, 4 sc, 2 inc. (20)
R3
(3 sc, inc) ×5. (25)
R4–8
sc around. (25)
R9
(3 sc, dec) ×5. (20)
R10–27
sc around. (20)
Stuff the paw firmly and the upper leg slightly more softly.
Flatten the upper opening.
FO, leaving a long sewing tail.
🖤 Front-Leg Markings — Make 2
Using charcoal yarn:
Row 1
Ch 8.
Starting in the second chain, sc across. (7)
Rows 2–4
sc across. (7)
Row 5
dec, 3 sc, dec. (5)
FO.
Sew one patch high on the outer side of each front leg.
The patch should appear to connect visually with the shoulder marking.
🐾 Front Claws
Using black embroidery thread, stitch three short vertical lines at the front of each paw.
Pull each line slightly tight to create shallow toe grooves.
🦵 Rear Haunches — Make 2
The large rounded haunches sit beside the body and create the seated posture.
Using warm tan yarn:
R1
MR 6. (6)
R2
inc ×6. (12)
R3
(1 sc, inc) ×6. (18)
R4
(2 sc, inc) ×6. (24)
R5
(3 sc, inc) ×6. (30)
R6
(4 sc, inc) ×6. (36)
R7–12
sc around. (36)
R13
(4 sc, dec) ×6. (30)
R14
(3 sc, dec) ×6. (24)
Stuff firmly.
FO, leaving a long tail.
Sew one haunch to each lower side of the body, slightly behind the front legs.
🐾 Rear Feet — Make 2
Using warm tan yarn:
R1
Ch 8.
Starting in the second chain:
6 sc, 3 sc in the final chain.
Continue along the opposite side:
5 sc, inc. (16)
R2
inc, 5 sc, 3 inc, 5 sc, 2 inc. (22)
R3
(3 sc, inc) ×5, 2 sc. (27)
R4–7
sc around. (27)
R8
(7 sc, dec) ×3. (24)
Stuff firmly.
FO.
Sew each rear foot horizontally in front of a haunch.
Angle the toes slightly outward.
🖤 Rear Paw Pads — Make 2
Using charcoal yarn:
R1
MR 6. (6)
R2
inc ×6. (12)
R3
(1 sc, inc) ×6. (18)
FO.
Flatten and sew one pad to the front-facing end of each rear foot.
Add three short black claw stitches above each pad if desired.
🐕 Tail
The tail is long, gently curved, and mostly charcoal with a tan base.
Begin with charcoal yarn:
R1
MR 6. (6)
R2
(1 sc, inc) ×3. (9)
R3
(2 sc, inc) ×3. (12)
R4
(3 sc, inc) ×3. (15)
R5–20
sc around. (15)
Switch to warm tan.
R21–27
sc around. (15)
R28
(3 sc, dec) ×3. (12)
R29–31
sc around. (12)
Stuff lightly as you work.
FO, leaving a long tail.
Sew the tan end to the lower back.
Curve the charcoal section around one side so the tip rests beside the rear foot.
❤️ Red Collar
Using red yarn:
Ch enough stitches to fit around the neck, approximately 38–42 chains.
Join without twisting.
R1–3
sc around.
FO.
Place the collar over the charcoal neck marking.
Sew it securely at several points.
🏷️ Name Tag
Using pale beige yarn:
R1
MR 6. (6)
R2
inc ×6. (12)
FO.
Shape the circle into a small oval while sewing.
Using dark-brown embroidery thread, add a name or initial.
Attach the tag to the front of the collar with a small jump ring or several strong yarn stitches.
🪡 Assembly
Attach the Head
Center the head on the upper body.
Add a little extra stuffing between the pieces if needed.
Sew firmly around the opening several times.
The head should sit upright with the muzzle pointing slightly forward and down.
Attach the Front Legs
Position the front legs beneath the shoulder patches.
The legs should remain nearly vertical and parallel.
Sew securely around each flattened upper opening.
Attach the Haunches
Place one haunch on each lower side of the body.
Angle them slightly outward.
Attach the Rear Feet
Sew one foot in front of each haunch.
The paws should rest flat on the display surface.
Attach the Tail
Position the tail low on the back and curve it along one side.
Add one hidden tacking stitch near the tip if needed.
Add the Collar and Tag
Wrap the collar over the charcoal neck marking and center the tag beneath the muzzle.
✨ Final Shaping
- Keep the torso large and pear-shaped.
- Make sure the body is visibly broader than the lower half of the head.
- Stand the ears tall with clear pointed tips.
- Keep the inner ears cupped and facing forward.
- Angle the eye-mask points upward.
- Shape the muzzle into a long tapered cylinder.
- Keep the front legs straight and evenly spaced.
- Position the rear haunches wide enough for sitting stability.
- Blend the shoulder patches into the dark back marking.
- Curve the tail gently along the floor.
- Center the collar and tag.
💡 Stability Tips
- Place plastic pellets in the lower rear body before stuffing.
- Stuff the front paws and haunches firmly.
- Reinforce the head-to-body seam several times.
- Tack the front legs to the lower chest if they spread outward.
- Insert a plastic-canvas oval inside each front paw for a flatter base.
- Check the dog from the front, back, and both sides before finishing the seams.
🧼 Care Instructions
Spot clean gently with a damp cloth.
Allow the dog to air dry completely.
Avoid machine washing when safety eyes, pellets, plastic canvas, or a metal tag ring are used.
Store upright to protect the ears and muzzle.
🐾 Final Thoughts
Your loyal German Shepherd companion is ready to stand guard. ❤️🐕
With his tall black-tipped ears, warm tan face, dark eye masks, long charcoal muzzle, broad chest, substantial seated body, black shoulder and saddle markings, straight front legs, rounded rear haunches, curved tail, bright red collar, and personalized tag, Buddy has all the character of an alert and faithful shepherd.
Happy Crocheting! 🧶🐾