Get ready for a spooky-sweet treat with the Amigurumi Halloween Ghost Puppies, a hauntingly adorable twist on festive crochet fun! 🐶👻 These little pups are all dressed up in ghostly costumes, complete with floppy ears, expressive eyes peeking through their ghost hoods, and tiny pumpkin baskets ready for trick-or-treating. Whether you’re crafting them for Halloween décor, gifting to dog-loving friends, or adding a playful touch to your seasonal display, these ghost puppies are sure to charm their way into your heart.
This pattern is perfect for crocheters who love mixing cuteness with a dash of spooky flair. You can customize each puppy’s costume with different ghostly shapes, add blushy cheeks or embroidered names, and even stitch up a whole ghostly pack for extra fun. From their asymmetrical ears to their tiny paws, the Halloween Ghost Puppies are a delightful way to celebrate the season—one stitch and wag at a time! 🧶🎃
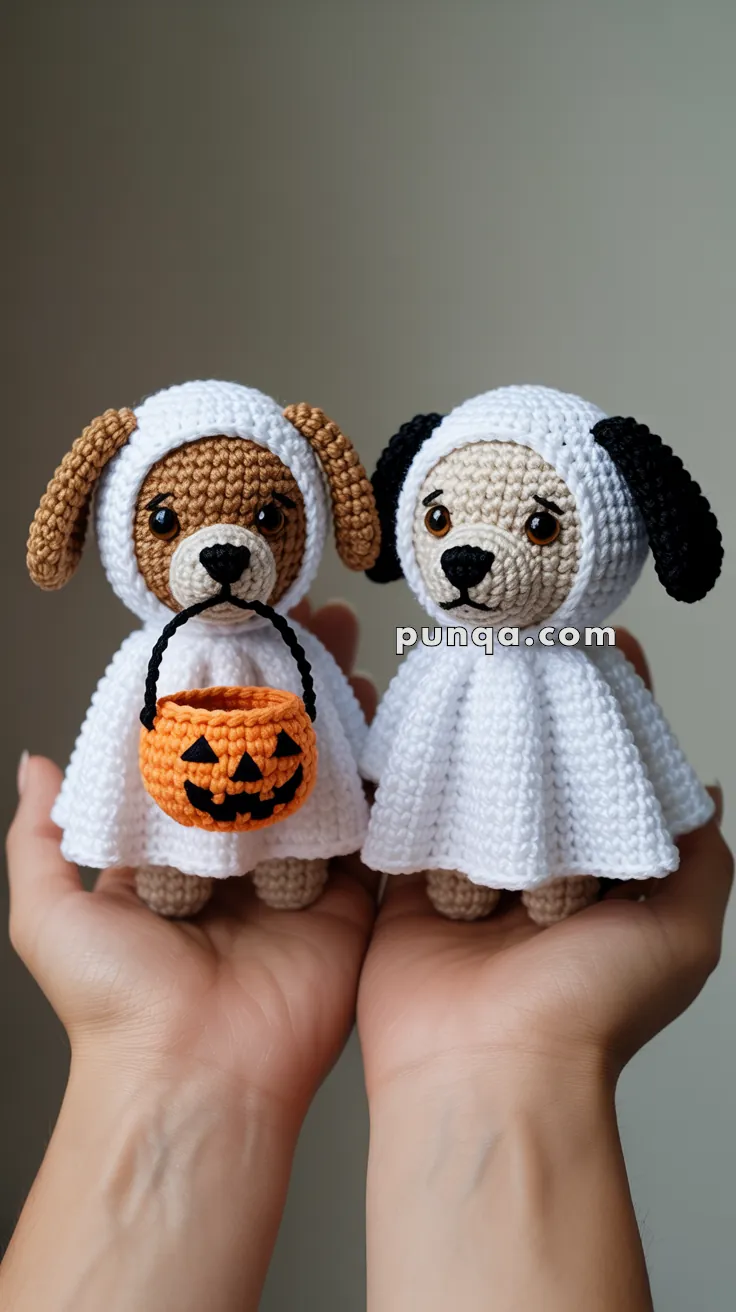
👻 Amigurumi Halloween Ghost Puppy Crochet Pattern
Get ready for the cutest Halloween project ever! These adorable puppies dressed up as little ghosts will steal your heart. One has floppy brown ears, the other has black ears, and they’re both wearing white ghost costumes. The best part? One even carries a tiny pumpkin bucket for trick-or-treating! 🎃
These make perfect Halloween decorations, gifts for dog lovers, or a fun seasonal crochet challenge. Let’s get started!
✨ What You’ll Need
Yarn (DK/Light Worsted Weight):
- Cream/beige: 50g for body, head, and muzzle
- Brown: 15g for ears (puppy 1)
- Black: 15g for ears (puppy 2)
- White: 80g for ghost cloak and hood
- Orange: 10g for pumpkin bucket
- Black: small amount for nose, details, and embroidery
Other Supplies:
- 2.5–3.0 mm crochet hook
- 10–12 mm safety eyes (2 pairs)
- Polyester fiberfill stuffing
- Yarn needle
- Stitch markers
- Scissors
- Pink blush or felt for cheeks (optional)
Skill Level: Intermediate – You’ll be working with shaping, creating ear slots in the hood, and sewing multiple pieces together.
Finished Size: Approximately 14–16 cm tall (depends on your yarn and tension)
📖 Crochet Abbreviations
- MR – Magic Ring
- sc – Single crochet
- inc – Increase (2 sc in same stitch)
- dec – Decrease (sc2tog)
- ch – Chain
- sl st – Slip stitch
- hdc – Half double crochet
- st(s) – Stitch(es)
- R – Round
- FO – Fasten off
🐶 Making the Puppy
Head
Start with cream/beige yarn.
R1: MR 6 (6) R2: inc x6 (12) R3: (sc, inc) x6 (18) R4: (2 sc, inc) x6 (24) R5: (3 sc, inc) x6 (30) R6: (4 sc, inc) x6 (36) R7–14: sc around (36) — work 8 rounds even R15: (4 sc, dec) x6 (30) R16: (3 sc, dec) x6 (24)
👁️ Eye Placement: Insert safety eyes between R8 and R9, spacing them about 7–8 stitches apart. Position them slightly angled downward for that sweet puppy expression.
R17: (2 sc, dec) x6 (18) R18: (sc, dec) x6 (12)
Stuff the head firmly. FO, leaving a long tail for sewing.
Muzzle
Start with cream/beige yarn.
R1: MR 6 (6) R2: inc x6 (12) R3: (sc, inc) x6 (18) R4–6: sc around (18) — work 3 rounds even R7: (sc, dec) x6 (12)
Stuff lightly. FO, leaving a long tail. Sew the muzzle centered below the eyes on the face.
Nose
With black yarn, ch 4. Starting in 2nd ch from hook: sc, hdc, 3 sc in last ch. Continue on opposite side of chain: hdc, sc (8 sts total) FO, leaving a tail for sewing.
Sew the nose to the top center of the muzzle.
Mouth
Using black yarn, embroider a small smile below the nose. Make two short diagonal stitches that curve upward at the corners—this gives that happy puppy face! 😊
Ears (make 2 for each puppy)
For Puppy 1: Use brown yarn For Puppy 2: Use black yarn
R1: MR 6 (6) R2: inc x6 (12) R3: (sc, inc) x6 (18) R4–15: sc around (18) — work 12 rounds even for long, floppy ears
Flatten the ear opening and sc across to close (9 sc). FO, leaving a tail for sewing.
Sew ears to the sides of the head, angled slightly downward so they flop naturally past the muzzle.
Body
Start with cream/beige yarn.
R1: MR 6 (6) R2: inc x6 (12) R3: (sc, inc) x6 (18) R4: (2 sc, inc) x6 (24) R5–10: sc around (24) — work 6 rounds even R11: (2 sc, dec) x6 (18) R12–14: sc around (18) — work 3 rounds even
Stuff the body firmly. FO, leaving a long tail for sewing to the head.
Legs (make 4)
Start with brown or black yarn (matching ear color).
R1: MR 6 (6) R2: inc x6 (12) R3: sc around (12) R4–6: Change to cream yarn, sc around (12) — work 3 rounds even
Stuff lightly. FO, leaving a tail for sewing. Don’t close the opening yet.
👻 Making the Ghost Costume
You can make this costume in two ways: permanently attached or removable like a poncho. I’ll give you both options!
Option 1: Permanent Sewn-On Costume
Ghost Cloak
Start with white yarn.
R1: MR 6 (6) R2: inc x6 (12) R3: (sc, inc) x6 (18) R4: (2 sc, inc) x6 (24) R5: (3 sc, inc) x6 (30) R6: (4 sc, inc) x6 (36) R7: (5 sc, inc) x6 (42) R8: (6 sc, inc) x6 (48) R9: (7 sc, inc) x6 (54) R10–21: sc around (54) — work 12 rounds even
The wider base creates that beautiful flowing, draped look! FO, leaving a long tail.
Ghost Hood (with ear slots)
Start with white yarn.
R1: MR 6 (6) R2: inc x6 (12) R3: (sc, inc) x6 (18) R4: (2 sc, inc) x6 (24) R5: (3 sc, inc) x6 (30) R6: (4 sc, inc) x6 (36) R7–8: sc around (36) — work 2 rounds even
Creating the Ear Slots:
This is where the ears will poke through the hood!
R9: sc 6, ch 5 (this creates the first ear opening), skip the next 5 sts, sc 12, ch 5 (this creates the second ear opening), skip the next 5 sts, sc 3 (you’ll have 21 sc + 10 chains = 31 total positions)
R10: sc into all stitches and chains, treating each chain as one stitch (31)
R11–13: sc around (31) — work 3 rounds even
FO, leaving a long tail for sewing.
Option 2: Removable Poncho-Style Costume
Ghost Cloak with Neck Opening
Start with white yarn.
Ch 36, join with sl st to form a ring (be careful not to twist).
R1: sc around (36) R2: (5 sc, inc) x6 (42) R3: (6 sc, inc) x6 (48) R4: (7 sc, inc) x6 (54) R5–12: sc around (54) — work 8 rounds even
FO. This creates a poncho that slips on and off!
Ghost Hood
Make the hood exactly the same as the permanent version above. Instead of sewing it directly to the puppy, you’ll attach it to the cloak neckline with whipstitch.
🎃 Making the Pumpkin Bucket
Bucket Base
Start with orange yarn.
R1: MR 6 (6) R2: inc x6 (12) R3: (sc, inc) x6 (18) R4–6: sc around (18) — work 3 rounds even R7: (sc, dec) x6 (12)
FO, leaving a tail. Stuff lightly to keep the bucket shape.
Bucket Handle
With black yarn, ch 18. FO, leaving tails on both ends. Attach the ends inside the bucket on opposite sides.
Pumpkin Face
Using black yarn, embroider:
- Two small triangle eyes
- One triangle nose
- A jagged smile with 4–5 points
Loop the handle over one puppy’s muzzle so it looks like they’re carrying it! 🎃
🧵 Putting It All Together
Step 1: Assemble the Puppy Body
- Sew the muzzle to the front of the head, centered below the eyes.
- Sew the black nose to the top of the muzzle.
- Embroider the smiling mouth below the nose.
- Attach the ears to the sides of the head, letting them flop down naturally.
- Sew the head to the body securely.
- Sew two legs to the front of the body (these will be visible).
- Sew two legs toward the back/underneath (these will be hidden by the cloak).
Step 2: Add the Costume
For Permanent Costume:
- Slip the hood over the puppy’s head from the top.
- Gently pull each ear through its slot from the inside of the hood. The ears should poke out and drape down naturally.
- Position the hood so it frames the face nicely.
- Sew the bottom edge of the hood (R13) to the top opening of the cloak (R1), working all the way around. This connects the hood to the cloak.
- Now slip the entire costume (hood + cloak as one piece) over the puppy’s body from the head down.
- Sew the top edge of the cloak to the neck area where the head meets the body, working around in a circle.
For Removable Costume:
- First, whipstitch the hood to the cloak neckline to make one complete costume piece.
- Slip the costume over the puppy’s head like a poncho.
- Pull each ear through its slot from inside the hood.
- Adjust the cloak so it drapes nicely around the body.
- You can now take the costume on and off whenever you want!
Finishing Touches:
Add a little pink blush to the cheeks or cut small circles from pink felt and glue/sew them on for rosy cheeks. You can also gently steam the white cloak with an iron (hover above, don’t touch the yarn) to help it drape smoothly.
Attach the pumpkin bucket to one of your ghost puppies by looping the handle over the muzzle!
🎨 Make More Holiday Puppies!
Once you’ve mastered the ghost costume, you can easily create other holiday versions using the same puppy base and poncho pattern:
🎅 Santa Puppy: Use red yarn for the cloak and add white fuzzy yarn trim around the edges. Embroider a black belt with a yellow buckle. Make a tiny wrapped present for them to hold!
🧙 Witch Puppy: Crochet the cloak in black or purple. Extend the hood rounds to create a pointed witch hat, or make a separate pointy hat. Add a mini broomstick accessory!
🦌 Reindeer Puppy: Use brown yarn for the cloak with white edging. Instead of ear slots in the hood, add small crocheted antlers (brown tube shapes with branches). Give them a red pom-pom nose!
🎉 Your Ghost Puppies Are Ready!
Now you have two adorable Halloween ghost puppies ready to guard your home or make someone smile! They’re perfect for display during spooky season, as a handmade gift for a dog lover, or even as a cute photo prop.
The combination of sweet puppy faces peeking out from ghost costumes is absolutely irresistible. Which ear color will you make first—brown or black? Maybe make both so they have a friend! 👻🐕✨
Happy crocheting, and have a spook-tacular Halloween! 🎃


Wonderfull