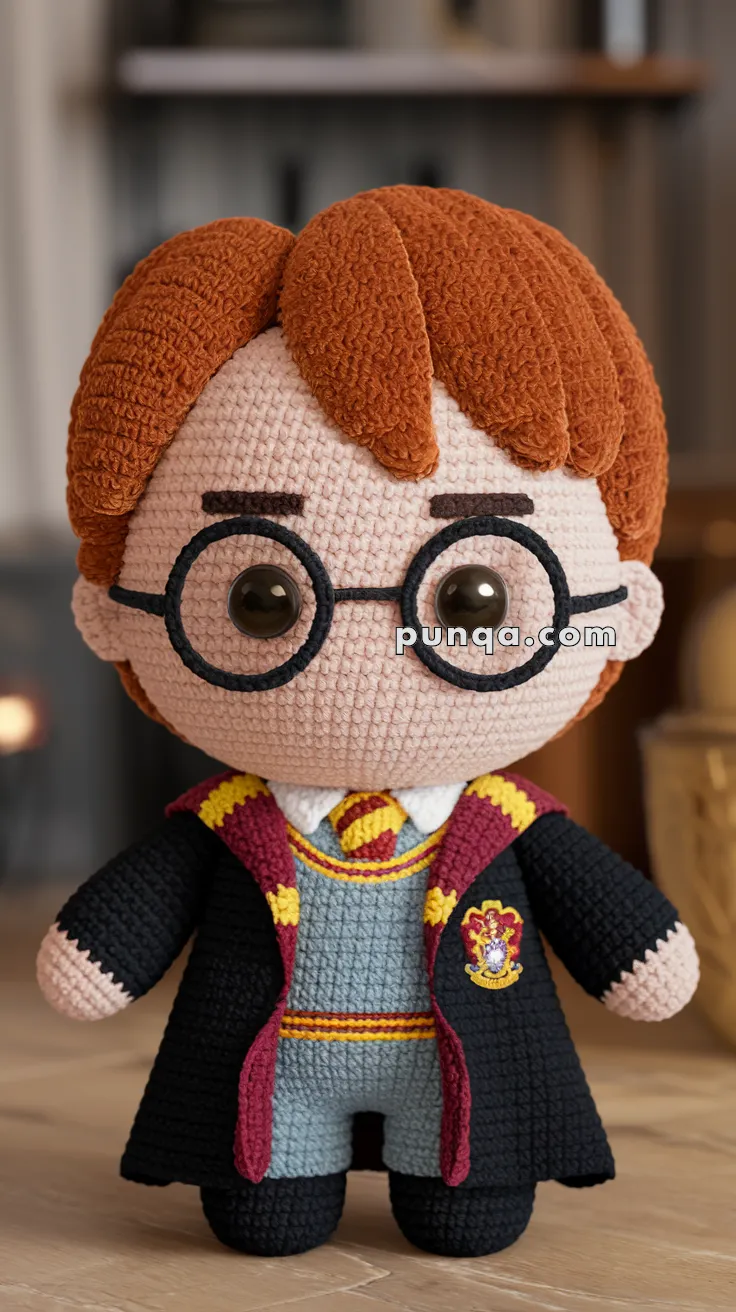
✨ Skill Level
Intermediate – includes color changes, layered clothing, hair shaping, and embroidered details.
📏 Finished Size
Approximately 23–25 cm (9–10 inches) tall, standing, using DK or light worsted yarn with a 3.0 mm hook.
🧶 Materials
Yarn (DK / light worsted cotton or acrylic):
-
Skin tone – head, hands
-
Black – robe, pants, shoes
-
Burgundy – robe lining & trim
-
Gold/yellow – trim accents
-
Grey – sweater
-
White – shirt collar
-
Warm brown / auburn – hair
Notions & tools:
-
3.0 mm crochet hook
-
Safety eyes: 10–12 mm
-
Black embroidery thread or thin yarn (glasses, eyebrows, mouth)
-
Polyester fiberfill
-
Stitch marker, tapestry needle, scissors
🪡 Abbreviations (US Terms)
MR – magic ring
sc – single crochet
inc – increase (2 sc in one stitch)
dec – invisible decrease
sl st – slip stitch
ch – chain
FO – fasten off
All parts are worked in continuous rounds unless stated otherwise.
😊 Head (Skin Tone)
R1: MR, 6 sc (6)
R2: inc ×6 (12)
R3: (1 sc, inc) ×6 (18)
R4: (2 sc, inc) ×6 (24)
R5: (3 sc, inc) ×6 (30)
R6–13: sc around (30)
Insert safety eyes between R9–10, spaced 7 stitches apart.
R14: (3 sc, dec) ×6 (24)
R15: (2 sc, dec) ×6 (18)
Stuff firmly.
R16: (1 sc, dec) ×6 (12)
R17: dec ×6 (6)
FO and close.
✍️ Facial Details
-
Eyebrows: Straight, short stitches in dark brown or black, placed low and relaxed
-
Mouth: Tiny curved stitch, centered and subtle
-
Scar: Omitted in the photo version (do not add unless customizing)
🧡 Hair (Auburn / Brown)
Hair Cap
R1: MR, 6 sc
R2: inc ×6 (12)
R3: (1 sc, inc) ×6 (18)
R4: (2 sc, inc) ×6 (24)
R5: (3 sc, inc) ×6 (30)
R6–7: sc around (30)
FO. Do not stuff.
Front Fringe (Make 3 panels)
Each panel:
Ch 7, sc in 2nd ch and across (6)
FO.
Sew one panel centered, two slightly angled to the sides for the soft parted fringe visible in the photo.
👓 Glasses (Embroidered)
Using black yarn or thread:
-
Stitch two round outlines around each eye
-
Connect with a straight stitch bridge
-
Extend thin lines slightly toward the sides of the head for arms
👕 Body & Sweater (Worked Top-Down)
Sweater (Grey)
R1: MR, 6 sc (6)
R2: inc ×6 (12)
R3: (1 sc, inc) ×6 (18)
R4: (2 sc, inc) ×6 (24)
R5–9: sc around (24)
Pants (Switch to Black)
R10–14: sc around (24)
Stuff firmly.
FO, leaving opening for legs.
🦵 Legs (Make 2 – Black)
R1: MR, 6 sc (6)
R2: inc ×6 (12)
R3–8: sc around (12)
Stuff lightly, flatten slightly at top.
FO and sew to body base so the doll stands evenly.
💪 Arms (Make 2)
Hands (Skin Tone)
R1: MR, 6 sc (6)
R2: (1 sc, inc) ×3 (9)
R3–4: sc around (9)
Sleeves (Switch to Black)
R5–10: sc around (9)
Stuff lightly only in upper arm.
FO and attach just below head seam, angled slightly forward.
🎓 Robe (Black with Burgundy & Gold)
Main Panels (Make 2)
Ch 16
Row 1: sc in 2nd ch, sc across (15)
Rows 2–18: ch 1, turn, sc across
Border each panel with burgundy yarn.
Add a thin gold surface stitch near the edge for trim.
Sew panels to body sides, leaving the center open.
👔 Shirt Collar & Tie
Collar (White – Make 2)
Ch 5, sc back (4)
FO. Sew in a shallow V under head.
Tie
Ch 6
Row 1: sc across
Row 2: switch colors for stripes (burgundy/gold), sc across
FO and sew centered.
🪄 Final Assembly
-
Attach head securely to body
-
Sew robe panels so grey sweater remains visible
-
Adjust hair fringe for soft symmetry
-
Shape arms downward as shown in photo
-
Weave in all ends carefully
🌟 Finishing Touches
-
Lightly steam robe edges for crisp drape
-
Ensure glasses sit evenly and symmetrically
-
Keep expression gentle and minimal for a cozy, collectible look
🧵 Closing Thoughts
This wizard doll blends warmth, nostalgia, and handmade charm into a timeless keepsake. With his oversized glasses, soft robe, and calm expression, he’s ready to sit proudly on a shelf, desk, or gift box—quietly reminding us of stories that never lose their magic.