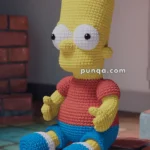
Bring the humor and charm of Springfield to your crochet collection with this Amigurumi Homer Simpson inspired crochet pattern. Inspired by the iconic character from The Simpsons, this design captures Homer’s unmistakable look—from his round belly and simple white shirt to his cheerful personality. It’s a playful project that combines nostalgia with creativity, making it a must-have for fans of the show and lovers of character-inspired amigurumi.
Whether you’re crafting Homer as a gift for a fellow fan, adding him to your handmade character lineup, or simply enjoying a fun crochet challenge, this pattern is both entertaining and rewarding. With easy-to-follow instructions and plenty of personality packed into each stitch, you’ll be able to create a miniature version of everyone’s favorite donut-loving dad. Grab your yarn and hook—it’s time to crochet Homer Simpson in all his quirky glory!
🍩 Amigurumi Homer-Inspired Doll Crochet Pattern
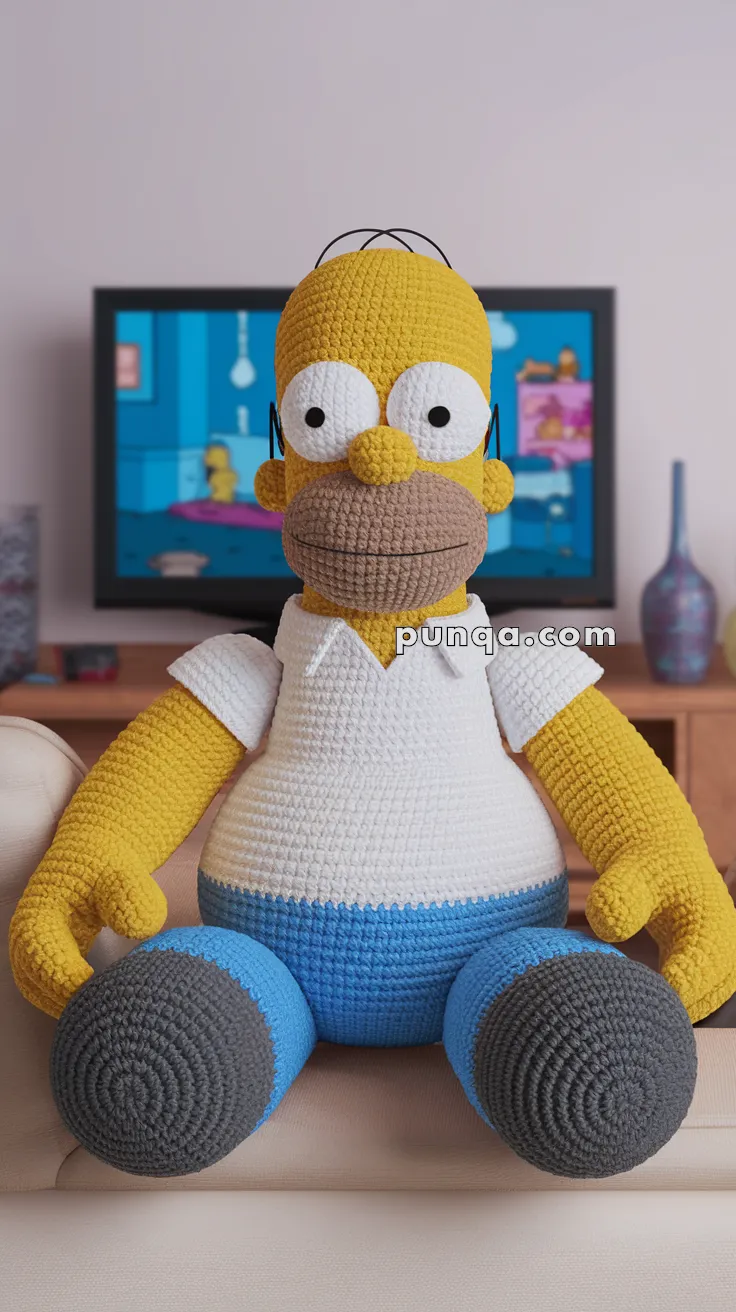
Create a large, cuddly seated cartoon dad with an oversized yellow head, enormous close-set eyes, a prominent rounded muzzle, tiny yellow nose, sparse black hair, white collared shirt, blue pants, long relaxed arms, mitten-style hands, and dramatically oversized shoes. 💛
The proportions are intentionally exaggerated: the head is almost as wide as the body, the muzzle occupies much of the lower face, the eyes sit very close together, and the feet project forward to create the relaxed seated pose.
✨ Skill Level
Intermediate to Advanced
This project includes:
- Oversized head shaping
- Large dimensional muzzle
- Tall oval eye appliqués
- Separate nose and ears
- Embroidered hair
- Pear-shaped torso
- Short-sleeved collared shirt
- Long articulated-looking arms
- Mitten hands with thumbs
- Oversized seated legs and shoes
- Color changes and detailed assembly
📏 Finished Size
Using worsted-weight or light Aran yarn with a 3.25–3.5 mm crochet hook, the finished doll measures approximately:
- 34–38 cm / 13½–15 in tall while seated
- 23–26 cm / 9–10¼ in wide across the feet
- Head approximately 16–18 cm / 6¼–7 in wide
Finished size will vary with yarn, hook, tension, and stuffing.
🧶 Required Yarn Amounts
For one large seated doll:
- 💛 Mustard yellow — approximately 250–290 g
- 🤍 White — approximately 130–155 g
- 💙 Medium blue — approximately 150–180 g
- 🩶 Charcoal gray — approximately 100–120 g
- 🤎 Warm taupe/brown for muzzle — approximately 70–85 g
- 🖤 Black — approximately 8–12 g
Polyester fiberfill — approximately 400–500 g
A little extra yellow is recommended if you crochet tightly or make the arms longer.
🧵 Materials
- 3.25–3.5 mm crochet hook
- Optional 3 mm hook for facial pieces
- Two 12–14 mm black safety eyes, or black yarn for pupils
- Polyester fiberfill
- Tapestry needle
- Long doll-making needle
- Stitch markers
- Pins
- Scissors
- Black embroidery floss or thin yarn
- Optional plastic canvas for the shoe soles
- Optional plastic pellets for seated stability
For a small child’s toy, embroider the pupils rather than using safety eyes.
🔤 Abbreviations — US Terms
MR — Magic Ring
sc — Single Crochet
inc — Increase: 2 sc in one stitch
dec — Invisible Decrease
sl st — Slip Stitch
ch — Chain
hdc — Half Double Crochet
BLO — Back Loop Only
FLO — Front Loop Only
FO — Fasten Off
st — Stitch
Work in continuous rounds unless stated otherwise.
🧠 Oversized Head
The head is very large, smooth, and slightly taller than it is wide.
Using yellow yarn:
R1
MR 6.
(6)
R2
inc ×6.
(12)
R3
(1 sc, inc) ×6.
(18)
R4
(2 sc, inc) ×6.
(24)
R5
(3 sc, inc) ×6.
(30)
R6
(4 sc, inc) ×6.
(36)
R7
(5 sc, inc) ×6.
(42)
R8
(6 sc, inc) ×6.
(48)
R9
(7 sc, inc) ×6.
(54)
R10
(8 sc, inc) ×6.
(60)
R11
(9 sc, inc) ×6.
(66)
R12–24
sc around.
(66)
R25
(9 sc, dec) ×6.
(60)
R26
(8 sc, dec) ×6.
(54)
R27
(7 sc, dec) ×6.
(48)
Begin stuffing firmly.
R28
(6 sc, dec) ×6.
(42)
R29
(5 sc, dec) ×6.
(36)
R30
(4 sc, dec) ×6.
(30)
Continue stuffing. Keep the lower-front face slightly flatter so the muzzle can sit securely.
R31
(3 sc, dec) ×6.
(24)
R32
(2 sc, dec) ×6.
(18)
R33
(1 sc, dec) ×6.
(12)
R34
dec ×6.
(6)
FO and close.
Gently shape the head into a tall rounded oval.
👀 Large Oval Eyes — Make 2
The eyes are enormous, vertically elongated, and nearly touching.
Using white yarn:
R1
Ch 10.
Starting in the second chain:
8 sc, 3 sc in final chain.
Continue down the opposite side:
7 sc, inc.
(20)
R2
inc, 7 sc, 3 inc, 7 sc, 2 inc.
(26)
R3
2 sc, inc, 7 sc, (2 sc, inc) ×3, 7 sc, (2 sc, inc) ×2.
(32)
R4–5
sc around.
(32)
FO, leaving a long sewing tail.
Flatten each piece into a vertical oval.
⚫ Pupils
Insert one black safety eye through each white eye panel.
Position each pupil:
- Slightly below the center
- Slightly toward the inner edge
- At matching height
This gives the wide-eyed cartoon expression.
If embroidering, make a small black circular pupil about 1.5–2 cm across.
🪡 Attaching the Eyes
Pin the eyes high on the front of the head.
Their inner edges should almost touch.
The lower halves should overlap visually with the top of the muzzle.
Sew around the white edges carefully.
Do not stuff the eye panels.
🤎 Large Rounded Muzzle
The muzzle is a broad horizontal oval and should cover most of the lower face.
Using warm taupe or brown yarn:
R1
Ch 14.
Starting in the second chain:
12 sc, 3 sc in final chain.
Continue along opposite side:
11 sc, inc.
(28)
R2
inc, 11 sc, 3 inc, 11 sc, 2 inc.
(34)
R3
2 sc, inc, 11 sc, (2 sc, inc) ×3, 11 sc, (2 sc, inc) ×2.
(40)
R4
(4 sc, inc) ×8.
(48)
R5–10
sc around.
(48)
R11
(6 sc, dec) ×6.
(42)
Add stuffing gradually.
R12
(5 sc, dec) ×6.
(36)
FO, leaving a long sewing tail.
Keep the back opening unclosed.
The finished muzzle should be broad, softly domed, and noticeably wider than it is tall.
🪡 Attaching the Muzzle
Center the muzzle directly beneath the eyes.
Its top edge should tuck slightly underneath the bottom edges of both eye panels.
Pin first.
Sew around the top and side edges.
Add more stuffing through the lower opening if necessary.
Finish sewing the bottom edge.
The muzzle should project clearly forward.
👃 Small Yellow Nose
Using yellow yarn:
R1
MR 6.
(6)
R2
inc ×6.
(12)
R3
(1 sc, inc) ×6.
(18)
R4–5
sc around.
(18)
R6
(1 sc, dec) ×6.
(12)
Stuff lightly.
FO, leaving a long sewing tail.
Sew the nose between the eyes and directly above the center of the muzzle.
It should overlap the muzzle slightly.
😊 Mouth
Using thin black yarn or embroidery floss, stitch one long shallow curve across the lower muzzle.
Do not add a vertical line from the nose.
Keep the mouth thin and understated.
👂 Ears — Make 2
Using yellow yarn:
R1
MR 6.
(6)
R2
inc ×6.
(12)
R3
(1 sc, inc) ×6.
(18)
R4
sc around.
(18)
FO.
Flatten each ear.
Sew one on each side of the head, slightly below eye level and partly behind the muzzle.
Only a small rounded section should project outward.
🖤 Hair
The hair is minimal.
Using thin black yarn:
Top Hair
Create two long curved embroidered loops from the crown:
- One curve leaning slightly left
- One overlapping curve leaning slightly right
Each should be approximately 6–8 cm long.
Side Hair
Add one short curved black strand on each side of the head behind the eyes.
Keep all hair lines thin.
🧍 Pear-Shaped Body
The torso is wide and rounded at the lower belly.
Begin with blue yarn.
R1
MR 6.
(6)
R2
inc ×6.
(12)
R3
(1 sc, inc) ×6.
(18)
R4
(2 sc, inc) ×6.
(24)
R5
(3 sc, inc) ×6.
(30)
R6
(4 sc, inc) ×6.
(36)
R7
(5 sc, inc) ×6.
(42)
R8
(6 sc, inc) ×6.
(48)
R9
(7 sc, inc) ×6.
(54)
R10–16
sc around.
(54)
Switch to white.
R17–25
sc around.
(54)
R26
(7 sc, dec) ×6.
(48)
R27–29
sc around.
(48)
R30
(6 sc, dec) ×6.
(42)
R31–33
sc around.
(42)
R34
(5 sc, dec) ×6.
(36)
Begin stuffing firmly.
R35
(4 sc, dec) ×6.
(30)
R36
(3 sc, dec) ×6.
(24)
Finish stuffing.
FO, leaving a long tail for attaching the head.
The blue lower section should remain visibly rounded and full beneath the shirt.
👕 Shirt Hem
Join white yarn at the blue-and-white color-change line.
Work one round of loose surface slip stitches around the waist.
This gives the shirt a distinct lower edge rather than a perfectly flat color transition.
👕 Shirt Collar
Make two collar points.
Using white yarn:
Row 1
Ch 9.
Starting in the second chain, sc across.
(8)
Row 2
Ch 1, turn, dec, 4 sc, dec.
(6)
Row 3
Ch 1, turn, dec, 2 sc, dec.
(4)
Row 4
Ch 1, turn, dec twice.
(2)
Row 5
Ch 1, turn, dec.
(1)
FO.
Make a second identical piece.
Sew one collar point on each side of the upper chest, with the points facing downward and slightly outward.
Leave a small yellow triangle visible between them at the neck.
👕 Short Sleeves — Make 2
Using white yarn:
R1
Ch 25, join without twisting.
(24)
R2–6
sc around.
(24)
R7
(2 sc, dec) ×6.
(18)
FO.
Flatten lightly.
The sleeve should flare at the outer opening.
Sew one sleeve to each upper side of the body before attaching the arms.
💪 Long Arms — Make 2
The arms are long, thick, and taper only slightly.
Using yellow yarn:
R1
MR 6.
(6)
R2
inc ×6.
(12)
R3
(1 sc, inc) ×6.
(18)
R4–18
sc around.
(18)
R19
(4 sc, dec) ×3.
(15)
R20–23
sc around.
(15)
Stuff moderately.
Do not close yet; continue into the hand.
✋ Hands
R24
(4 sc, inc) ×3.
(18)
R25
(2 sc, inc) ×6.
(24)
R26–29
sc around.
(24)
R30
(2 sc, dec) ×6.
(18)
R31
(1 sc, dec) ×6.
(12)
Stuff the hand firmly.
FO and close.
👍 Thumbs — Make 2
Using yellow yarn:
R1
MR 6.
(6)
R2
inc ×6.
(12)
R3–5
sc around.
(12)
R6
dec ×6.
(6)
Lightly stuff.
FO.
Sew one thumb to the inner side of each hand, angled slightly upward.
🪡 Attaching the Arms
Slide the upper end of each arm partly inside a white sleeve.
Sew the sleeve and arm together securely.
Attach them to the body at shoulder height.
The arms should angle downward and slightly outward, with the hands resting close to the thighs.
🦵 Seated Legs — Make 2
The legs are very large and project forward.
Begin with dark gray yarn for the shoe/sole.
R1
MR 6.
(6)
R2
inc ×6.
(12)
R3
(1 sc, inc) ×6.
(18)
R4
(2 sc, inc) ×6.
(24)
R5
(3 sc, inc) ×6.
(30)
R6
(4 sc, inc) ×6.
(36)
R7
(5 sc, inc) ×6.
(42)
R8–12
sc around.
(42)
This forms the oversized rounded shoe.
R13
(5 sc, dec) ×6.
(36)
Switch to blue.
R14
BLO sc around.
(36)
R15–22
sc around.
(36)
R23
(4 sc, dec) ×6.
(30)
R24–25
sc around.
(30)
Stuff firmly.
Flatten the upper opening.
FO, leaving a long sewing tail.
🦶 Shoe/Sole Shaping
Press each gray shoe end against a flat surface.
The gray section should face forward like a giant rounded sole.
Shape the blue section backward and upward so it resembles a short bent leg.
If desired, insert a circular plastic-canvas piece into the gray sole before final stuffing.
🪡 Attaching the Legs
Position both legs on the lower front of the body.
They should:
- Sit far apart
- Project strongly forward
- Angle slightly outward
- Display most of the gray shoe fronts
- Support the seated pose
Pin both legs before sewing either one permanently.
Sew through the flattened blue upper openings.
Add hidden tacking stitches between each leg and lower belly if needed.
🪡 Head-to-Body Assembly
Center the head over the upper torso.
Because the head is extremely large, reinforce the neck carefully.
Before closing the seam:
- Add extra stuffing to the upper body.
- Insert a tightly rolled cylinder of stuffing into the neck area.
- Pin the head.
- Check that it faces straight forward.
Sew around the neck several times.
Add two or three hidden support stitches from the back of the head into the upper back.
⚖️ Seated Stability
For a stable display doll:
- Stuff the lower body firmly.
- Keep both legs heavily stuffed.
- Position the feet wide apart.
- Add a sealed pouch of plastic pellets to the lower body if desired.
- Allow the oversized shoes to rest fully on the display surface.
- Keep the arms lightly touching the thighs for additional support.
🪡 Recommended Assembly Order
For the cleanest result:
- Crochet and stuff the head.
- Make the eye panels and install the pupils.
- Sew the eyes onto the head.
- Make and attach the muzzle.
- Attach the yellow nose.
- Embroider the mouth.
- Sew on the ears.
- Add the hair strands.
- Crochet and stuff the body.
- Add the shirt hem and collar.
- Make the sleeves.
- Crochet the arms and hands.
- Add the thumbs.
- Attach arms through the sleeves.
- Crochet the seated legs and shoes.
- Attach both legs.
- Sew the head to the body.
- Make final posture adjustments.
✨ Final Shaping
For the correct finished proportions:
- Keep the head dramatically oversized.
- Place the eyes close together and vertically tall.
- Position the pupils small and low.
- Make the muzzle broad enough to dominate the lower face.
- Keep the yellow nose small compared with the muzzle.
- Leave only tiny ears visible at the sides.
- Keep the black hair extremely sparse.
- Make the white shirt loose and broad over the belly.
- Position the collar points clearly.
- Keep the arms unusually long.
- Make the hands large and rounded.
- Keep the blue pants visible below the shirt.
- Make the shoes enormous and strongly forward-facing.
- Sit the legs wide apart.
💡 Helpful Crochet Tips
Pin all facial pieces before sewing. The relationship between the eyes, nose, and muzzle determines most of the expression.
Do not make the muzzle from yellow yarn—the contrasting taupe/brown lower face is an important part of the finished look.
Keep the white eye panels flat rather than stuffed.
Stuff the arms less firmly than the shoes so they hang naturally.
The legs are intentionally much larger than typical amigurumi legs; reducing them will change the entire seated silhouette.
When changing from gray to blue on the legs, work the first blue round in the back loops only to create a clean ridge between shoe and pant leg.
🧼 Care Instructions
Spot clean gently using a damp cloth.
Allow the doll to air dry completely.
Reshape the muzzle, collar, sleeves, hands, and shoes while damp.
Avoid machine washing if safety eyes, pellets, or plastic-canvas sole inserts are used.
🍩 Final Thoughts
Your oversized cartoon dad is ready to claim the best seat in the house. 💛🍩
With his enormous round yellow head, giant close-set eyes, tiny pupils, wide taupe muzzle, small yellow nose, sparse black hair, white collared shirt, blue pants, extraordinarily long arms, mitten-like hands, and giant forward-facing gray shoes, this seated amigurumi has a wonderfully recognizable, playful silhouette.
Happy crocheting! 🧶✨