Refresh your crochet collection with the Amigurumi Lemonade🍋✨ , a bright and cheerful project that captures the essence of summer! With its zesty hues and playful design, this crochet creation brings a splash of sunshine to any space. Whether you craft a classic lemonade glass or add whimsical details like tiny lemon slices and a straw, each stitch infuses personality into this delightful piece. Perfect for kitchen décor, gifts, or simply adding a touch of citrusy charm to your amigurumi collection, this pattern is a fun way to celebrate creativity.
🧶🍹 This free crochet pattern offers a rewarding mix of simplicity and detail, making it an enjoyable project for crocheters of all skill levels. From shaping the cup to adding refreshing accents, every step is a creative adventure. Whether you prefer a pastel pink lemonade or a vibrant golden hue, this pattern allows endless customization. Grab your yarn, hook, and a splash of inspiration—it’s time to crochet a refreshing masterpiece! 🍋💕
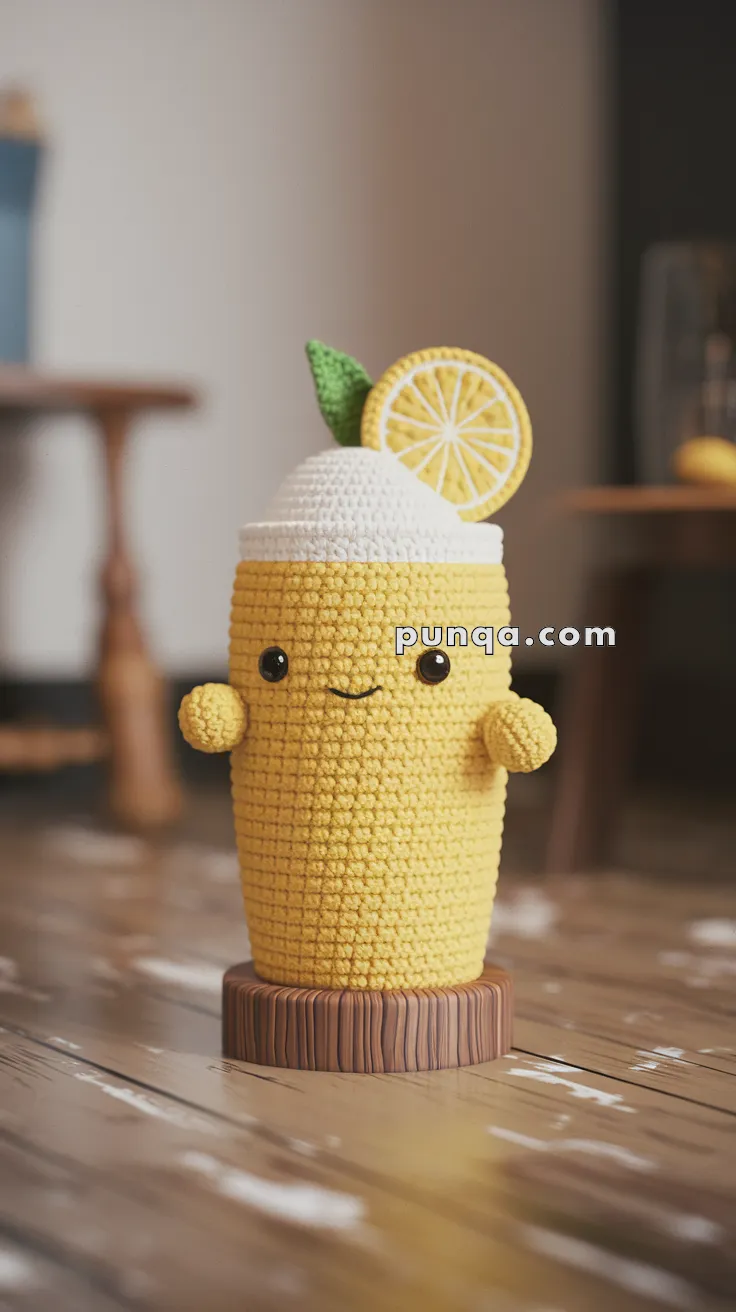
🍋 Amigurumi Lemonade Cup Crochet Pattern
Bright, cheerful, and oh-so-refreshing — this little lemonade plush is a summer must-have! With its tall yellow cup, fluffy whipped topping, bold lemon slice, and leafy garnish, this pattern is perfect for display or gifting.
✨ Skill Level
Easy to Intermediate – Basic stitches, simple shaping, some embroidery.
📏 Finished Size
Approx. 8–9 in (20–23 cm) tall when made with worsted yarn and a 3 mm hook.
🧶 Materials
-
Yarn (DK or Worsted):
-
Yellow (cup & arms)
-
White (whipped topping)
-
Brown (base)
-
Green (leaf)
-
Yellow + White (lemon slice)
-
-
Hook: 2.5–3.5 mm (depending on yarn)
-
Safety eyes: 6–8 mm black
-
Polyfill stuffing
-
Tapestry needle
-
Scissors
-
Optional: Pink yarn or blush for cheeks
🧵 Abbreviations (US Terms)
MR = Magic Ring
sc = single crochet
inc = increase (2 sc in 1 st)
dec = decrease (sc2tog)
sl st = slip stitch
ch = chain
st(s) = stitch(es)
BLO = back loop only
FO = fasten off
🍋 Pattern Instructions
Main Cup (Yellow)
-
MR, 6 sc (6)
-
inc ×6 (12)
-
(sc, inc) ×6 (18)
-
(2 sc, inc) ×6 (24)
-
(3 sc, inc) ×6 (30)
-
(4 sc, inc) ×6 (36)
-
BLO, sc around (36) → forms base edge.
8–32. sc around (36) → makes a tall, smooth cup wall.
👉 Stuff firmly as you go. -
(4 sc, dec) ×6 (30)
-
sc around (30)
FO, leave long tail.
Whipped Topping (White – cone shape)
-
MR, 6 sc (6)
-
inc ×6 (12)
-
(sc, inc) ×6 (18)
-
(2 sc, inc) ×6 (24)
-
(3 sc, inc) ×6 (30)
-
(4 sc, inc) ×6 (36)
7–8. sc around (36) -
(5 sc, inc) ×6 (42)
-
sc around (42)
-
(5 sc, dec) ×6 (36)
-
(4 sc, dec) ×6 (30)
-
(3 sc, dec) ×6 (24)
-
(2 sc, dec) ×6 (18)
-
(sc, dec) ×6 (12)
-
dec ×6 (6), FO and close.
👉 Stuff lightly to keep puffy cone shape.
👉 Sew to top of cup.
Base (Brown – coaster style)
-
MR, 6 sc (6)
-
inc ×6 (12)
-
(sc, inc) ×6 (18)
-
(2 sc, inc) ×6 (24)
-
(3 sc, inc) ×6 (30)
-
(4 sc, inc) ×6 (36)
-
sc around (36)
FO and sew securely to bottom.
Arms (Make 2, Yellow)
-
MR, 6 sc (6)
2–6. sc around (6)
FO, stuff lightly, flatten, and sew to sides of cup.
Face
-
Place safety eyes between R12–R13, ~5–6 sts apart.
-
Embroider a small curved smile in black yarn.
-
Add optional pink blush circles under eyes.
Leaf (Green)
Ch 6.
Row 1: sc in 2nd ch, hdc, dc, hdc, sc.
Row 2: Work up the other side of the chain the same way.
FO and sew behind lemon slice.
Lemon Slice (Yellow + White)
With yellow:
-
MR, 6 sc (6)
-
inc ×6 (12)
-
(sc, inc) ×6 (18)
-
(2 sc, inc) ×6 (24)
Change to white: -
sc around BLO (24) → gives clean border.
FO.
Embroidering segments (white):
-
Use 2 strands of white yarn.
-
Make bold radial lines from center to edge (6–8 slices).
-
Add an extra white outline around the slice for thickness.
Sew slice slightly tilted behind whipped topping with leaf tucked behind it.
🪡 Assembly
-
Sew whipped topping cone to cup top.
-
Attach arms at sides.
-
Place and secure eyes, embroider smile.
-
Attach brown base to bottom.
-
Sew lemon slice + leaf to side of topping.
🎉 Final Look
Your finished lemonade plush has:
-
A tall, slim yellow cup
-
Puffy cone-shaped whipped topping
-
A sturdy brown base
-
Cute stubby arms
-
Smiley face with optional blush
-
A bold lemon slice with clear embroidery and leaf tucked behind
Just like in the photo — fresh, summery, and guaranteed to make you smile! 🌞🍹