Level up your crochet game with the Amigurumi Mario, a pixel-perfect tribute to everyone’s favorite mustachioed hero! 🍄🧶 With his iconic red cap, blue overalls, and cheerful expression, this little plumber is ready to jump into your handmade world—whether you’re crafting for a gamer friend, decorating a playroom, or simply celebrating your love for classic video game characters. He’s a nostalgic nod to adventure, stitched with heart and a dash of fun.
Perfect for crocheters who enjoy bold colors and character-rich designs, this pattern invites you to play with tiny details like buttons, facial features, and even a mini mushroom or coin accessory. Make him solo or pair him with Luigi, Princess Peach, or other amigurumi pals to build your own crochet kingdom. The Amigurumi Mario is a joyful way to stitch up courage, charm, and a whole lot of handmade heroism—one loop at a time! 🧵⭐
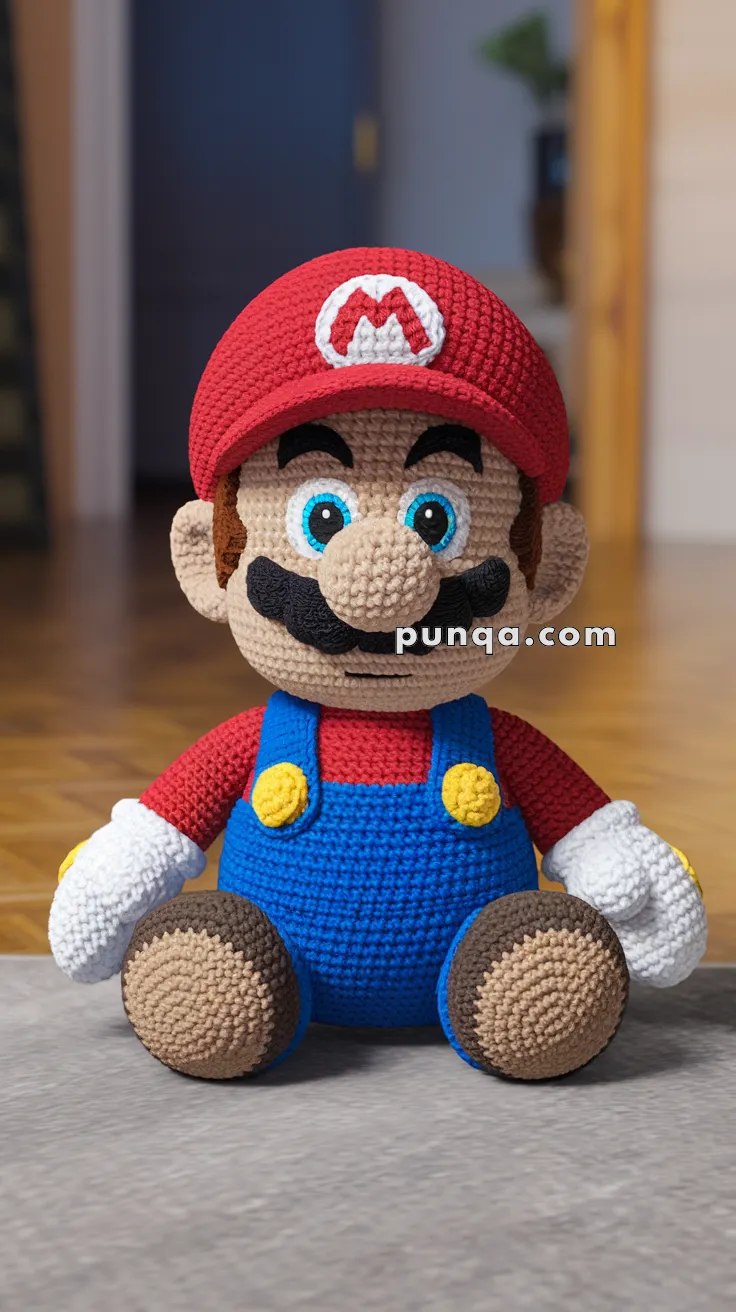
🍄 Amigurumi Mario Crochet Pattern
It’s-a me, Mario! 🎮 This handmade amigurumi brings the world’s favorite plumber to life with his iconic red hat, blue overalls, bushy mustache, and cheerful face. This pattern has everything you need to create a lovable Mario doll, complete with his signature details.
✨ Skill Level
Intermediate – includes shaping, color changes, and small detailed parts.
📏 Finished Size
Approx. 25–28 cm (10–11 in) when made with DK yarn and a 2.5–3 mm hook.
🧶 Materials
- DK or Worsted yarn:
- Beige (skin)
- Red (hat, shirt)
- Blue (overalls)
- Brown (shoes, hair)
- Light beige (shoe sole, nose)
- White (gloves, “M” logo, eyes)
- Black (mustache, pupils, eyebrows)
- Yellow (buttons)
- Light blue (eye irises)
- Crochet hook 2.5–3 mm
- 12 mm safety eyes OR crochet layered eyes
- Fiberfill stuffing
- Tapestry needle
- Stitch marker
- Optional: blush thread or fabric paint for cheeks
🧵 Abbreviations (US Terms)
- MR = Magic Ring
- sc = single crochet
- inc = increase (2 sc in same st)
- dec = decrease (sc2tog)
- hdc = half double crochet
- dc = double crochet
- sl st = slip stitch
- ch = chain
- FO = fasten off
🧩 Pattern Instructions
🔴 Head (Beige)
- MR, 6 sc [6]
- inc around [12]
- (sc, inc) × 6 [18]
- (2 sc, inc) × 6 [24]
- (3 sc, inc) × 6 [30]
- (4 sc, inc) × 6 [36]
7–18. sc around [36] - (4 sc, dec) × 6 [30]
- (3 sc, dec) × 6 [24]
- (2 sc, dec) × 6 [18]
- (sc, dec) × 6 [12]
- dec × 6 [6], FO.
➡️ Insert safety eyes between Rnds 12–13, spaced ~10 sts apart.
➡️ Sew on crocheted nose (see below).
➡️ Embroider thick eyebrows with black yarn.
👃 Nose (Light Beige)
- MR, 6 sc
- inc × 6 [12]
3–5. sc around [12]
Stuff lightly, sew between eyes.
🧔 Mustache (Black) – 2 Halves
- MR, 6 sc
- (sc, inc) × 3 [9]
- sc around [9], FO.
➡️ Make 2, sew side by side under the nose for the thick rounded mustache shape.
👂 Ears (Make 2, Beige)
- MR, 6 sc
- (sc, inc) × 3 [9]
- sc around [9], FO.
Flatten slightly, sew to sides of head.
🟤 Hair & Sideburns (Brown)
- Crochet small oval patches: MR, 6 sc, (sc, inc) × 3 [9], FO.
- Sew behind ears and along hat line.
🔴 Hat (Red)
- MR, 6 sc
- inc × 6 [12]
- (sc, inc) × 6 [18]
- (2 sc, inc) × 6 [24]
- (3 sc, inc) × 6 [30]
- (4 sc, inc) × 6 [36]
7–12. sc around [36], FO.
➡️ Brim:
- Join red yarn at front center.
- (hdc, inc) repeat across front 18 sts.
- sc 1 round to flatten edge.
➡️ Logo “M”:
- With white: small circle (MR, 6 sc, inc × 6 = 12, FO).
- With red: embroider or surface stitch a bold “M.”
- Sew to hat front.
Sew hat to head.
🔴 Body (Red Shirt → Blue Overalls)
- With red, MR, 6 sc
- inc × 6 [12]
- (sc, inc) × 6 [18]
- (2 sc, inc) × 6 [24]
- (3 sc, inc) × 6 [30]
6–8. sc around [30] (shirt base) - Switch to blue, sc around [30]
10–18. sc around [30] - (3 sc, dec) × 6 [24]
- (2 sc, dec) × 6 [18]
- (sc, dec) × 6 [12]
FO and close. Stuff firmly.
➡️ Overalls straps: ch 22, sc back. Make 2. Attach with yellow crocheted buttons.
Buttons (Make 2, Yellow):
- MR, 6 sc, FO.
🟤 Legs (Make 2 – Two-Tone Shoes)
- With light beige (sole): MR, 6 sc
- inc × 6 [12]
- (sc, inc) × 6 [18]
- sc around [18]
Switch to brown:
5–10. sc around [18]
Stuff firmly, sew to base of body.
💪 Arms (Make 2 – White Gloves + Red Sleeves)
- With white: MR, 6 sc
- (sc, inc) × 6 [12]
3–5. sc around [12]
Switch to red:
6–15. sc around [12]
Stuff lightly, FO. Sew to body.
👀 Eyes (Layered Crochet – Optional Instead of Safety Eyes)
- White: MR, 6 sc, inc × 6 [12].
- Blue: MR, 6 sc, FO. Sew on white base.
- Black: MR, 6 sc, FO. Sew at center.
- Embroider white shine dot.
🧵 Assembly
- Sew head securely to body.
- Attach legs to bottom in seated pose.
- Attach arms to body sides.
- Add hat, hair, ears, and nose.
- Sew on mustache halves and embroider mouth.
- Attach overalls straps and yellow buttons.
- Add eyes and facial details.
🌟 Finishing Touch
Your amigurumi Mario is complete! 🎉 Place him on your game shelf, gift him to a gamer friend, or pair him with Luigi for double the fun.