✨ Skill Level
Intermediate to Advanced
Includes:
- panel construction
- dimensional shaping
- wheel assembly
- structural reinforcement
- multi-piece joining
📏 Finished Size
Approx. 28 cm long × 20 cm tall
using DK or worsted yarn and a 3.5 mm hook.
🧶 Yarn Requirements
Bright Blue
Approx. 120 g
Used for:
- hood
- doors
- roof
- truck bed
- wheel arches
- side panels
Black
Approx. 90 g
Used for:
Yellow
Approx. 20 g
Used for:
White
Approx. 35 g
Used for:
Light Gray
Approx. 30 g
Used for:
- bumper
- mirrors
- roof lights
- wheel inner rings
Black Embroidery Yarn
Small amount
🧵 Supplies
- 3.5 mm crochet hook
- 10 mm safety eyes
- Polyester stuffing
- Yarn needle
- Stitch markers
- Plastic canvas or cardboard inserts
- Floral wire or aluminum craft wire
- Hot glue (optional for chrome details)
🔤 Abbreviations (US Terms)
- MR – magic ring
- sc – single crochet
- inc – increase
- dec – invisible decrease
- sl st – slip stitch
- ch – chain
- FO – fasten off
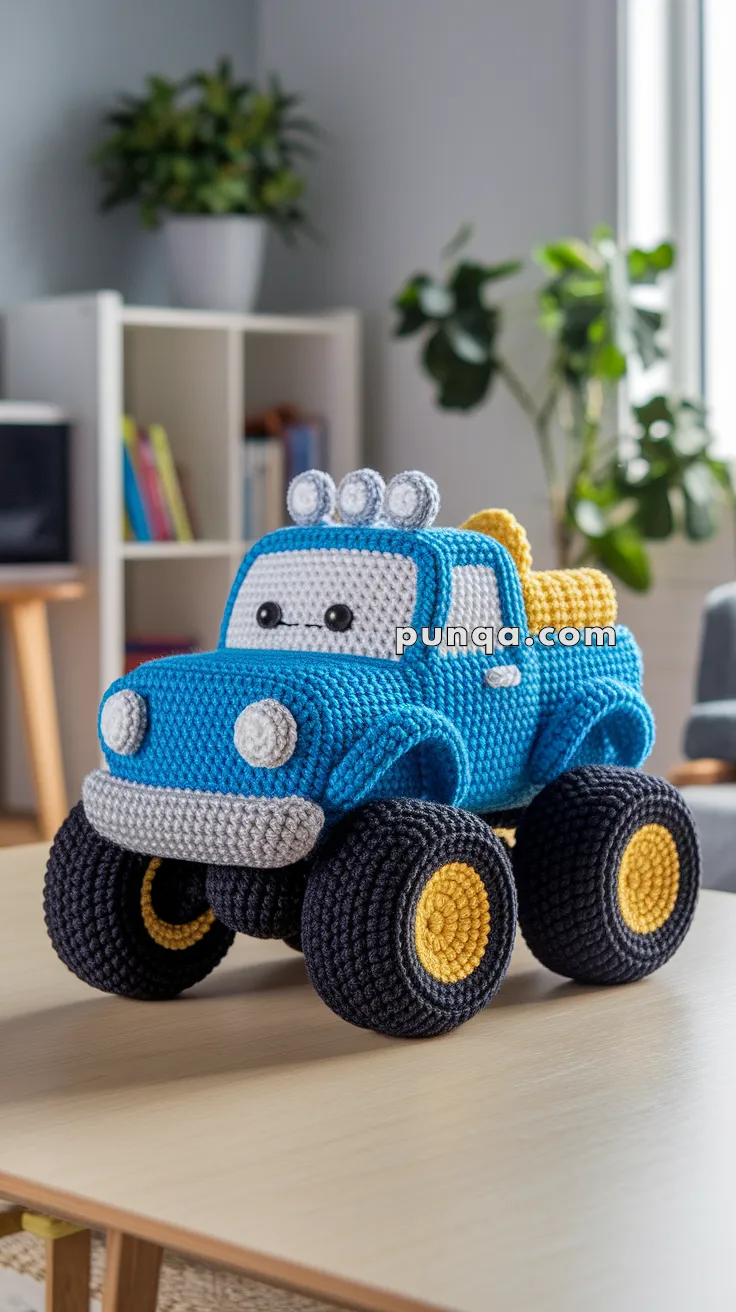
🚙 Main Truck Structure
The truck is made from:
- chassis base
- left side
- right side
- hood
- windshield
- roof
- rear bed floor
- rear tailgate
- inner support panels
This construction creates the true truck silhouette instead of a rounded body.
🛻 Chassis Base
Blue Yarn
Ch 28
R1
Starting in 2nd ch:
26 sc, 3 sc in final ch
Working opposite side:
26 sc, 3 sc in final st (58)
R2
inc, 26 sc, inc x3, 26 sc, inc x2 (64)
R3–R6
sc around (64)
FO.
The base should remain flat and rectangular.
Insert a plastic canvas rectangle before final assembly for stability.
🚪 Left Side Body Panel
Blue Yarn
Ch 30
Row 1
29 sc
Rows 2–11
sc across (29)
🪟 Window Opening
Row 12
7 sc, ch 10, skip 10 sts, 12 sc
Rows 13–17
sc across
FO.
🚪 Right Side Body Panel
Repeat exactly.
🚘 Front Hood Panel
Blue Yarn
Ch 18
Row 1
17 sc
Rows 2–7
sc across
Rows 8–10
dec, 13 sc, dec
This slight narrowing forms the curved hood.
FO.
🤍 Windshield Panel
White Yarn
Ch 18
Rows 1–10
17 sc across
FO.
Do NOT stuff.
This piece should stay flat.
🏠 Roof Panel
Blue Yarn
Ch 18
Rows 1–11
17 sc across
FO.
Insert lightweight plastic canvas inside roof during assembly.
🛻 Truck Bed Floor
Blue Yarn
Ch 18
Rows 1–13
17 sc across
FO.
🛻 Tailgate Panel
Blue Yarn
Ch 18
Rows 1–8
17 sc across
FO.
🚙 Inner Cab Support Panels
These are critical for keeping the truck square.
Make 2.
Blue Yarn
Ch 10
Rows 1–8:
9 sc
FO.
Sew vertically inside the cab corners.
🪡 Truck Assembly
Step 1
Sew side panels onto chassis.
Keep edges straight and vertical.
Step 2
Attach hood between front side edges.
The hood should slope slightly downward.
Step 3
Attach windshield directly behind hood.
The windshield must stand nearly upright.
Step 4
Sew roof onto top edges.
Insert plastic canvas before fully closing.
Step 5
Attach rear truck bed floor.
Keep completely flat.
Step 6
Attach tailgate vertically.
Step 7
Insert support panels inside cab corners.
This prevents collapsing.
😊 Windshield Face
Eye Placement
Insert safety eyes low on windshield panel.
Space about 8 stitches apart.
Smile
Using black embroidery yarn:
Create tiny horizontal smile centered between eyes.
The expression should stay minimal and cute.
🛞 Monster Tires (Make 4)
Outer Tire
Black Yarn
R1: MR 6
R2: inc x6 (12)
R3: (1 sc, inc) x6 (18)
R4: (2 sc, inc) x6 (24)
R5: (3 sc, inc) x6 (30)
R6: (4 sc, inc) x6 (36)
R7: (5 sc, inc) x6 (42)
R8–R14
sc around (42)
Stuff VERY firmly.
Inner Rim
Gray Yarn
R1: MR 6
R2: inc x6 (12)
R3: (1 sc, inc) x6 (18)
R4: (2 sc, inc) x6 (24)
R5: (3 sc, inc) x6 (30)
FO.
Wheel Hub
Yellow Yarn
R1: MR 6
R2: inc x6 (12)
R3: (1 sc, inc) x6 (18)
FO.
Attach centered.
🚗 Wheel Arches (Make 4)
Blue Yarn
Ch 16
Row 1
15 sc
Rows 2–6
sc across
Curve gently while sewing.
Attach directly above tires.
🤍 Front Bumper
Gray Yarn
Ch 18
Rows 1–5
17 sc
Lightly stuff.
Curve gently upward while sewing beneath hood.
💡 Headlights (Make 2)
White Yarn
R1: MR 6
R2: inc x6 (12)
R3: sc around
FO.
Attach widely spaced on hood front.
🚨 Roof Lights (Make 3)
Gray Yarn
R1: MR 6
R2: inc x6 (12)
FO.
Flatten slightly.
Attach evenly across roof front.
🪞 Side Mirrors (Make 2)
Gray Yarn
Ch 6
sl st back along chain
FO.
Attach beside windshield edges.
💛 Rear Pipes / Roll Bars
The truck has visible yellow rear pipes behind the cab.
Yellow Yarn
Make 2.
R1: MR 6
R2–R15:
sc around (6)
Insert floral wire inside.
Curve upward behind cab.
⚙️ Chrome Details
The truck includes shiny silver elements.
For Realistic Chrome Look
Use:
- aluminum wire
- metallic jewelry wire
- silver pipe cleaners
- painted floral wire
Create:
- front suspension bars
- handlebar-style roof details
- axle accents
Hot glue or stitch securely.
🚙 Tire Attachment
Attach wheels:
- lower than chassis
- slightly outward
- evenly spaced
Leave visible gap between:
to achieve lifted monster truck stance.
✨ Final Shaping
- Keep hood rounded but structured
- Truck bed flat and open
- Side walls vertical
- Roof squared
- Tires large and chunky
- Fenders rounded over wheels
- Windshield upright
Avoid overstuffing the cab.
The truck should feel structured rather than soft and spherical.
🌟 Final Thoughts
This adorable monster truck combines realistic pickup proportions with cozy handmade charm. The oversized lifted tires, chunky wheel arches, structured cab, open truck bed, bright colors, and cheerful windshield face create a playful crochet vehicle full of personality and adventure. Perfect for toy shelves, nursery decor, or gifts for little truck lovers. 💙🛻🧶