Snap into cuteness with this Amigurumi Mini Croc Keychain crochet pattern! With its tiny teeth, stubby legs, and playful grin, this little crocodile is ready to chomp its way into your heart—without any of the bite. Perfect for animal lovers, quirky gift-givers, or anyone who enjoys stitching up small, smile-worthy projects, this mini croc is a fun and fast way to add handmade charm to your keys, bags, or craft fair table. 🧶🐊🔑
Designed for personality and portability, this pattern invites you to play with bold greens, textured stitches, and fun extras like tiny eyes, a toothy smile, or even a mini bow tie for flair. Customize your croc with pastel hues for a whimsical twist or go classic with jungle tones and a cheeky expression. Whether it’s dangling from a backpack, tucked into a gift box, or guarding your crochet corner, this Mini Croc Keychain Amigurumi is a joyful and satisfying project—perfect for stitching up a little handmade snap, one loop at a time! 💖✨🌿
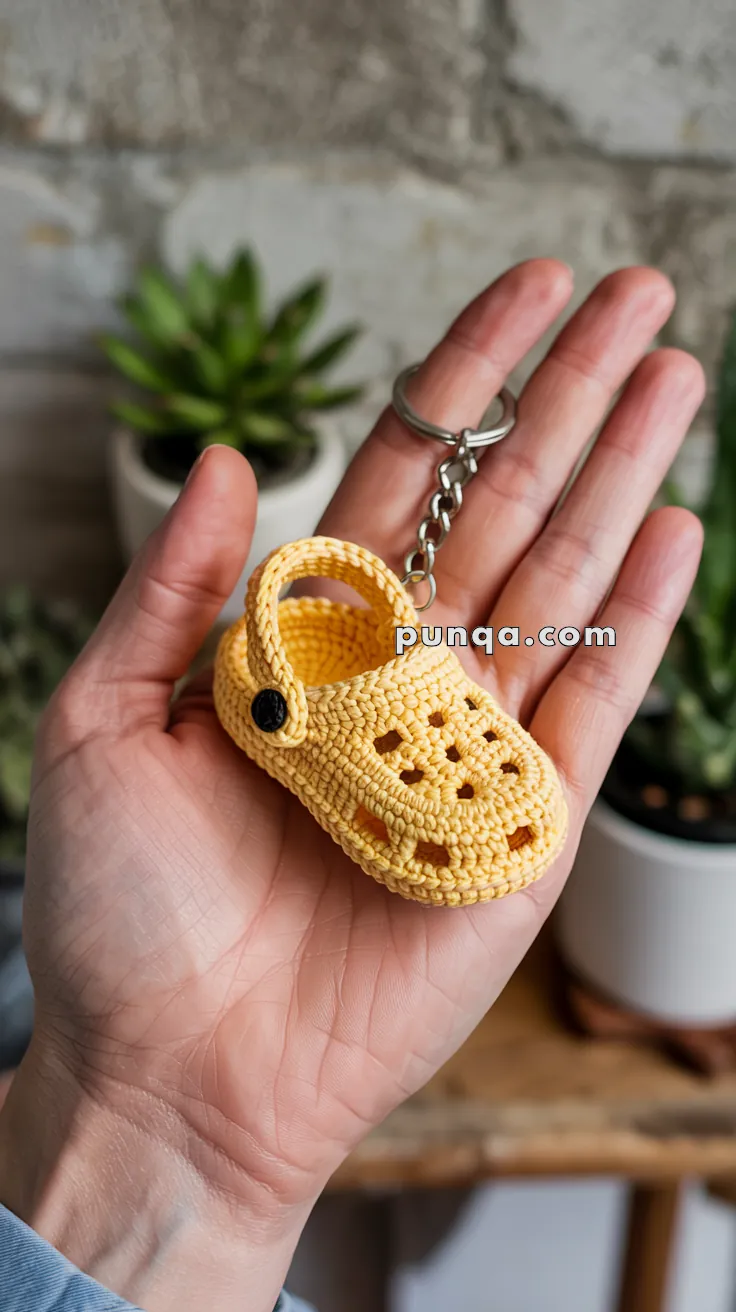
💛 Mini Crochet Clog Keychain Pattern
Turn a classic comfort clog into a tiny handmade accessory with this detailed crochet keychain pattern. The miniature shoe features a broad rounded toe, open heel, raised sole ridge, ventilated upper, side openings, curved heel strap, black rivet buttons, and a reinforced keychain attachment. 🔑👟
The clog is constructed from three main sections:
- A firm oval sole
- A low open-backed sidewall
- A separate ventilated toe panel
Working the upper separately creates actual open ventilation holes without closing the inside of the shoe. The finished clog remains hollow, lightweight, and neatly structured.
✨ Skill Level
Intermediate
This pattern includes:
- Oval sole shaping
- Back-and-forth rows
- Working into both sides of a foundation chain
- Chain-space ventilation holes
- Separate upper construction
- Open-heel shaping
- Reinforced strap attachment
- Miniature assembly and sculpting
📏 Finished Size
Using DK cotton yarn and a 2 mm crochet hook, the finished clog measures approximately:
- 7–7.5 cm (2¾–3 in) long
- 3.5–4 cm (1⅜–1½ in) wide
- 3–3.5 cm (1¼–1⅜ in) tall with the strap raised
The size may vary slightly depending on yarn, hook size, tension, and shaping.
🧶 Yarn Requirements
Use firm, tightly twisted DK or sport-weight mercerized cotton yarn.
- 💛 Golden yellow — approximately 15–20 g
- 🖤 Black — less than 1 g
No stuffing is required.
🧵 Materials
- 2 mm crochet hook
- Tapestry needle
- Fine sewing needle
- Strong polyester sewing thread
- Stitch markers
- Pins
- Scissors
- One metal keyring
- One short keychain chain
- Two or three small jump rings
- Optional clear fabric stiffener
- Optional thin plastic canvas for the sole
The keychain hardware should be attached with strong sewing thread or a jump ring rather than through a single yarn stitch.
🔤 Abbreviations — US Terms
- MR — Magic Ring
- ch — Chain
- sc — Single Crochet
- inc — Increase: 2 sc in the same stitch
- dec — Invisible Decrease
- sl st — Slip Stitch
- BLO — Back Loop Only
- FLO — Front Loop Only
- sp — Space
- sk — Skip
- FO — Fasten Off
- st — Stitch
Chains worked over skipped stitches count as stitches unless stated otherwise.
👟 Sole Base
The sole is worked in continuous oval rounds. The toe end is broad and rounded, while the heel remains slightly narrower.
Using yellow yarn:
R1
Ch 15.
Starting in the second chain from the hook:
2 sc in the first chain, sc in the next 12 chains, 4 sc in the final chain.
Continue along the opposite side of the foundation chain:
sc in the next 12 chains, 2 sc in the final chain.
(32)
Place a marker in the first stitch.
R2
inc in each of the first 2 stitches, 12 sc, inc in each of the next 4 stitches, 12 sc, inc in each of the final 2 stitches.
(40)
R3
(sc, inc) ×2, 12 sc, (sc, inc) ×4, 12 sc, (sc, inc) ×2.
(48)
The end containing four increase sections is the toe. Mark the center toe and center heel before continuing.
👣 Raised Sole Edge
R4
BLO sc around.
(48)
This round turns the work upward and creates the visible molded ridge around the sole.
R5
sc around.
(48)
FO invisibly.
Press the sole flat against the work surface. The ridge should remain slightly raised around the outside.
For extra firmness, cut a thin plastic-canvas oval slightly smaller than the sole and place it inside before attaching the upper.
🧱 Open-Back Sidewall
The sidewall is worked in rows around the toe and sides while leaving the center heel open.
Lay the sole with the toe facing away from you.
At the heel, mark 10 centered stitches. These stitches remain unworked and form the open back of the clog.
The remaining 38 stitches run from one back corner, around the side and toe, to the opposite back corner.
Join yellow yarn to the first stitch immediately after the marked heel section.
Row 1
Ch 1, sc in each of the 38 available stitches.
(38)
Turn.
Row 2
Ch 1, sc across.
(38)
Turn.
🕳 First Pair of Side Openings
Row 3
Ch 1, 8 sc, ch 2, sk 2, 18 sc, ch 2, sk 2, 8 sc.
(38)
Turn.
Row 4
Ch 1, sc across, working 2 sc into each ch-2 sp.
(38)
Turn.
🕳 Second Pair of Side Openings
Row 5
Ch 1, 10 sc, ch 2, sk 2, 14 sc, ch 2, sk 2, 10 sc.
(38)
Turn.
Row 6
Ch 1, sc across, working 2 sc into each ch-2 sp.
(38)
Turn.
Row 7
Ch 1, dec, 34 sc, dec.
(36)
Turn.
Row 8
Ch 1, sc across.
(36)
FO, leaving a long tail.
The sidewall should now stand approximately 1.5–2 cm above the sole. The heel remains completely open.
🪡 Shaping the Sidewall
Use the long tail to secure each back corner to the sole ridge.
Do not join the two heel corners together.
Gently curve the sidewall inward near the heel and outward around the toe. The opening should be narrower at the back and broader toward the front.
🕳 Ventilated Toe Panel
The top panel is worked separately from the front edge toward the instep. It begins narrower, gradually widens, and contains three staggered rows of true chain-space holes.
Using yellow yarn:
Row 1
Ch 14.
Starting in the second chain, sc across.
(13)
Turn.
Row 2
Ch 1, inc, 11 sc, inc.
(15)
Turn.
Row 3
Ch 1, sc across.
(15)
Turn.
🕳 Front Ventilation Row
Row 4
Ch 1, 1 sc,
(ch 1, sk 1, 2 sc) ×4,
2 sc.
(15)
This creates four small ventilation holes.
Turn.
Row 5
Ch 1, sc across, working 1 sc into each ch-1 sp.
(15)
Turn.
🕳 Middle Ventilation Row
Row 6
Ch 1, inc, 13 sc, inc.
(17)
Turn.
Row 7
Ch 1, 2 sc,
(ch 1, sk 1, 2 sc) ×4,
3 sc.
(17)
Turn.
Row 8
Ch 1, sc across, working 1 sc into every ch-1 sp.
(17)
Turn.
🕳 Rear Ventilation Row
Row 9
Ch 1, inc, 15 sc, inc.
(19)
Turn.
Row 10
Ch 1, 1 sc,
(ch 1, sk 1, sc) ×8,
2 sc.
(19)
This creates eight smaller holes across the widest area.
Turn.
Row 11
Ch 1, sc across, working 1 sc into every ch-1 sp.
(19)
Turn.
Row 12
Ch 1, sc across.
(19)
FO, leaving a long sewing tail.
🧵 Toe Panel Border
Join yellow yarn at one lower corner of the panel.
Work sc evenly around the two side edges and the starting-chain edge.
Place:
- 2 sc in each lower corner
- 1 sc in each row end
- 1 sc in each foundation-chain stitch
Do not work an additional border across the final 19-stitch edge.
FO.
The bordered panel should resemble a rounded trapezoid: narrower at the toe and wider toward the shoe opening.
🪡 Attaching the Toe Panel
Place the narrower starting edge against the front center of the sole.
Pin the panel in place before sewing.
Toe Edge
Sew the foundation-chain edge to the front sole ridge.
Keep it centered across the broad toe.
Side Edges
Sew the side edges to the inner upper edge of the sidewall.
Begin at the toe and work gradually toward the opening.
Rear Edge
Leave the final 19-stitch edge unattached.
This edge forms the front of the foot opening.
The completed upper should slope gently upward from the toe toward the opening rather than standing vertically.
💛 Opening Rim
Join yellow yarn at one back heel corner.
Work sc evenly around:
- The first heel side
- The sidewall edge
- The unattached rear edge of the toe panel
- The opposite sidewall edge
- The second heel corner
Do not crochet across the open center heel.
Rim Row 1
sc evenly around the opening.
Turn.
Rim Row 2
Ch 1, sl st loosely across.
FO invisibly.
This creates the neat raised rim visible around the foot opening.
🔁 Curved Heel Strap
The heel strap is a thick, narrow oval rather than a single chain.
Using yellow yarn:
R1
Ch 26.
Starting in the second chain:
24 sc, 3 sc in the final chain.
Continue along the opposite side:
23 sc, inc in the final chain.
(52)
R2
sc around.
(52)
FO, leaving two long tails—one at each end if possible.
Flatten the strap gently.
The completed strap should be approximately 9–10 cm (3½–4 in) long.
🪡 Attaching the Heel Strap
Position one strap end on each outer side of the clog, directly above the rear side openings.
The strap should:
- Curve upward above the opening
- Lean slightly toward the toe
- Remain free across the center
- Pivot visually from the side buttons
- Sit high enough for the keychain attachment
Sew each strap end to the sidewall with several strong passes.
Keep both attachment points level.
🔘 Black Strap Buttons — Make 2
Using black yarn and the smaller hook:
R1
MR 6.
Pull the ring closed and join with a sl st.
FO, leaving a sewing tail.
Flatten each circle.
Sew one button over each strap attachment point.
Pass the needle through the button, strap, sidewall, and back again several times so the joint is reinforced.
🔗 Reinforced Keychain Attachment
The safest attachment point is the top center of the raised heel strap.
Locate the center four stitches of the strap.
Using strong sewing thread:
- Pass through two or three strap stitches.
- Pass through the lowest jump ring.
- Repeat at least six times.
- Knot securely against the underside of the strap.
- Hide the knot between the strap layers.
Connect the jump ring to the short chain and keyring.
Do not attach the keychain hardware through only one crochet stitch.
For additional durability, sew a tiny metal ring directly between the two strap layers before closing the attachment.
✨ Final Shaping
Toe
Insert a finger or blunt tool through the heel opening.
Push the toe panel gently upward to create a rounded dome.
Sole
Press the underside firmly against a flat surface.
The sole should remain long, oval, and nearly flat.
Sidewalls
Curve the walls slightly inward near the opening while keeping the toe area broad.
Heel
Pull the two back corners gently upward.
The center heel must remain open.
Ventilation Holes
Open each chain space carefully with the tip of a tapestry needle.
Do not stretch them aggressively.
Strap
Arch the strap above the heel and allow it to lean slightly forward.
💡 Construction Tips
- Crochet tightly so the miniature holds its shape without stuffing.
- Cotton yarn produces a crisper result than soft acrylic.
- Mark the center toe and heel before beginning the sidewall.
- Pin the toe panel completely before sewing any section.
- Do not close the heel opening.
- Keep the upper panel slightly loose while sewing so it forms a dome.
- Sew through the edge loops rather than across the visible surface.
- Reinforce both strap ends more than once.
- Use sewing thread—not yarn alone—for the metal hardware.
- Block the finished clog around a small rolled cloth if the opening collapses.
🧴 Optional Stiffening
For a firmer display finish, dilute clear fabric stiffener according to its instructions.
Apply a small amount to:
- The sole edge
- The sidewalls
- The toe panel
- The heel strap
Avoid filling the ventilation holes.
Shape the clog and allow it to dry completely around a small form.
🧼 Care Instructions
Spot clean with a lightly damp cloth.
Dry the keychain flat and reshape it while damp.
Do not machine wash because the metal hardware may damage the crochet.
Check the strap and jump-ring attachment periodically when used daily.
🎁 Gift and Display Ideas
This miniature clog works beautifully as:
- 🔑 A keychain
- 🎒 A backpack charm
- 👜 A handbag accessory
- 🎁 A stocking filler
- 👟 A gift for comfort-shoe fans
- 🧶 A market-stall miniature
- 🌈 A color-coordinated bag charm
Try making several versions in pastel, neon, neutral, or multicolored cotton yarn.
🌟 Final Thoughts
Your miniature crochet clog is ready to join your keys or favorite bag. 💛🔑
With its broad rounded toe, layered sole ridge, real ventilation openings, hollow interior, open heel, raised rim, curved strap, dark rivet buttons, and secure keychain fitting, this tiny shoe packs plenty of recognizable detail into a lightweight crochet accessory.
Happy Crocheting! 🧶👟





These are so cute….