Welcome to the magical and timeless world of amigurumi! 🐭✨ Today, I’m excited to share my free crochet pattern for an Amigurumi Minnie & Mickey Mouse Duo—a charming and nostalgic creation perfect for Disney fans, gift-giving, or anyone who enjoys crafting iconic and expressive plush designs! 🧶 Whether you love stitching up beloved characters, creating textured and lifelike figures, or simply want to add the most famous mouse couple to your handmade lineup, this pattern will guide you through crafting beautifully sculpted plushies with Minnie’s signature bow and Mickey’s classic charm! 🎀
This design embraces bold colors, rounded shaping, and delightful details to bring a fun and heartwarming presence to your crochet projects! 🧶✨ I’ve carefully outlined each step to ensure your Amigurumi Minnie & Mickey Mouse Duo turns out just right—ready to brighten up your space or become a treasured handmade gift! 🎁 So grab your hooks, pick out classic reds, deep blacks, and soft whites, and let’s stitch up a magical Disney duo! 🐭
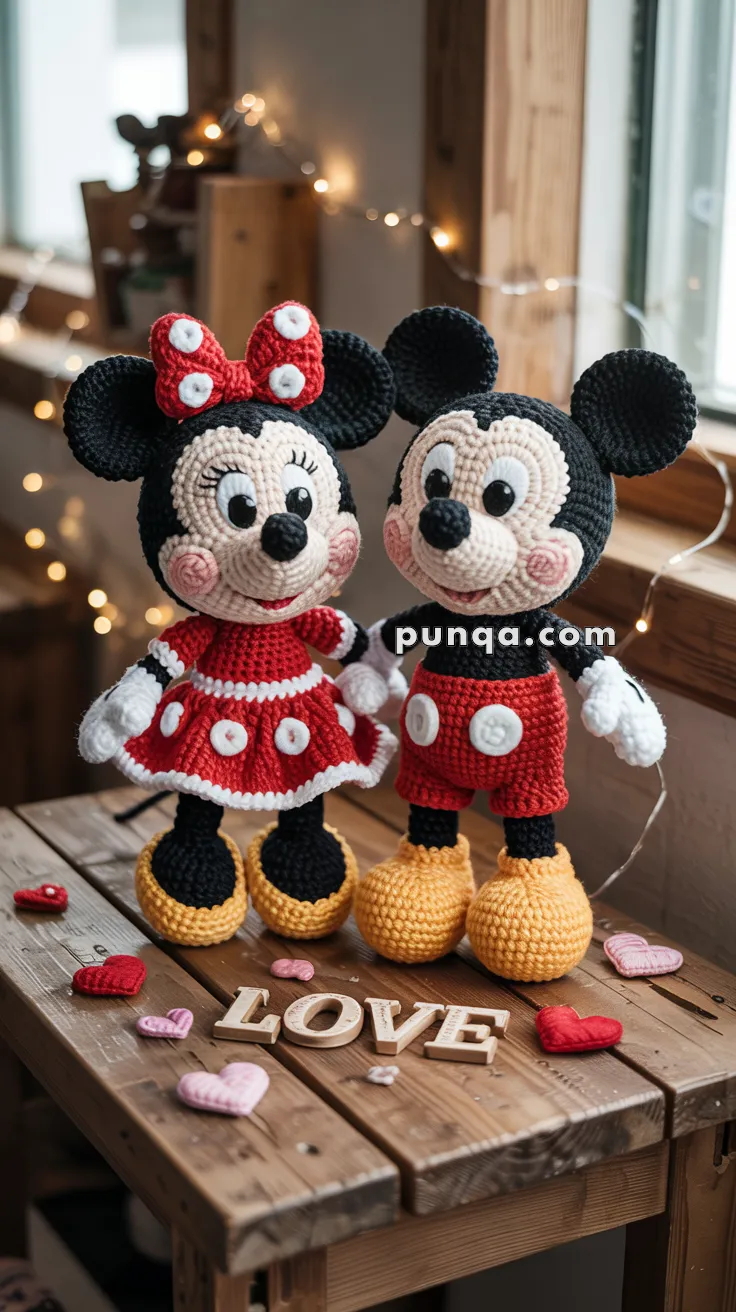
🐭💖Amigurumi Mickey & Minnie Mouse Crochet Pattern
Create the world’s most iconic duo with this charming crochet Mickey & Minnie set! Their oversized yellow shoes, expressive faces, Minnie’s polka-dot dress, and Mickey’s classic shorts make them perfect for gifts, décor, or your amigurumi collection.
🧵 Skill Level
Intermediate – involves shaping, color changes, facial embroidery, and assembling multiple detailed components.
📏 Finished Size
Approx. 24–27 cm (9.5–10.5 inches) tall
🧶 Materials & Yarn Amount (Both Dolls)
- Black: 170–190 g (head, ears, arms, legs, upper body)
- Beige: 120–140 g (face + muzzle)
- Red: 160–180 g (dress, shorts, bow)
- White: 130–150 g (gloves, eye whites, skirt trim, buttons)
- Yellow: 140–160 g (oversized shoes)
- Pink: small amount (cheeks)
- Black embroidery thread: small amount
Other:
- 10–12 mm safety eyes (4 total)
- Polyester stuffing (~500–600 g)
- 3.0 mm crochet hook
- Yarn needle
- Stitch markers
✂️ Abbreviations (US Terms)
MR – magic ring
sc – single crochet
inc – increase
dec – invisible decrease
sl st – slip stitch
ch – chain
FO – fasten off
🖤 Head (Make 2 – Round & Full)
Round 1: MR, 6 sc (6)
Round 2: inc ×6 (12)
Round 3: (1 sc, inc) ×6 (18)
Round 4: (2 sc, inc) ×6 (24)
Round 5: (3 sc, inc) ×6 (30)
Round 6: (4 sc, inc) ×6 (36)
Round 7: (5 sc, inc) ×6 (42)
Round 8: (6 sc, inc) ×6 (48)
Rounds 9–15: sc around (48)
➡️ Insert eyes between Rounds 11–12, close together (about 5 stitches apart)
Round 16: (6 sc, dec) ×6 (42)
Round 17: (5 sc, dec) ×6 (36)
Round 18: (4 sc, dec) ×6 (30)
Round 19: (3 sc, dec) ×6 (24)
Stuff firmly.
Round 20: (2 sc, dec) ×6 (18)
Round 21: (1 sc, dec) ×6 (12)
Round 22: dec ×6 (6)
FO.
😊 Face Panel (Beige – Wide & Smooth)
Round 1: MR, 6 sc
Round 2: inc ×6 (12)
Round 3: (1 sc, inc) ×6 (18)
Round 4: (2 sc, inc) ×6 (24)
Round 5: (3 sc, inc) ×6 (30)
Round 6: (4 sc, inc) ×6 (36)
Rounds 7–8: sc around (36)
➡️ Sew centered on lower head, covering front neatly.
🐭 Muzzle (Pronounced & Rounded)
Round 1: MR, 6 sc
Round 2: inc ×6 (12)
Round 3: (1 sc, inc) ×6 (18)
Round 4: (2 sc, inc) ×6 (24)
Round 5: sc around (24)
Lightly stuff and attach.
➡️ Should extend clearly outward for a soft rounded face.
🖤 Nose
Round 1: MR, 6 sc
Round 2: (1 sc, inc) ×3 (9)
Round 3: sc around (9)
Attach centered above muzzle.
👀 Eyes (Large & Close)
White Ovals (Make 4):
R1: MR 6
R2: inc ×6 (12)
R3: (1 sc, inc) ×6 (18)
Flatten slightly.
Insert safety eyes through white pieces before sewing.
➡️ Place very close together for signature expression.
- Add white highlight stitches
- Female: embroider lashes
😀 Mouth & Expression
- Stitch a short vertical line under nose
- Add curved smile outward
- Male: add small red inner mouth detail
🌸 Cheeks
Embroider soft spiral circles using pink yarn.
➡️ Position slightly lower and outward from eyes.
🐭 Ears (Large & Balanced – Make 4)
Round 1: MR, 6 sc
Round 2: inc ×6 (12)
Round 3: (1 sc, inc) ×6 (18)
Round 4: (2 sc, inc) ×6 (24)
Round 5: (3 sc, inc) ×6 (30)
Rounds 6–7: sc around (30)
Flatten slightly.
➡️ Attach high and symmetrical.
🧤 Arms with Gloves
Arm (Black):
R1: MR 6
R2: inc ×6 (12)
R3–R9: sc around
Glove (White):
R10–R14: sc around
R15: (2 sc, dec) ×3
Add 3 rounded finger bumps.
🦵 Legs (Short & Slim)
Round 1: MR, 8 sc
Rounds 2–15: sc around (8)
Lightly stuff.
💛 Oversized Shoes (Very Round & Bulky)
Round 1: MR, 6 sc
Round 2: inc ×6 (12)
Round 3: (1 sc, inc) ×6 (18)
Round 4: (2 sc, inc) ×6 (24)
Round 5: (3 sc, inc) ×6 (30)
Round 6: (4 sc, inc) ×6 (36)
Round 7: (5 sc, inc) ×6 (42)
Rounds 8–9: sc around (42)
Round 10: (5 sc, dec) ×6 (36)
Round 11: (4 sc, dec) ×6 (30)
Round 12: (3 sc, dec) ×6 (24)
Round 13: (2 sc, dec) ×6 (18)
Stuff very firmly.
➡️ Shoes must be round and oversized.
❤️ Female Doll Body & Dress
Body Base:
R1–R4: increase to 24
R5–R7: sc around
Switch to red:
R8–R14: sc around
R15: (2 sc, dec) ×6
👗 Skirt (Wide & Flowing)
Join yarn in front loops:
R1: sc (24)
R2: (sc, inc) ×12 (36)
R3: (2 sc, inc) ×12 (48)
R4: (3 sc, inc) ×12 (60)
R5: (4 sc, inc) ×12 (72)
➡️ Creates full flared skirt
Add white ruffled trim.
Add 8–10 white dots.
🎀 Bow (Large & Structured)
Make 2 panels:
R1: MR 6
R2: inc ×6 (12)
R3: (1 sc, inc) ×6 (18)
R4–R6: sc around
Join and wrap center tightly.
Add white dots (5–6).
Attach between ears.
🔴 Male Doll Body & Shorts
Same base body.
Add red section for shorts.
Add 2 large white buttons, spaced wide apart.
🧵 Assembly
- Attach head securely
- Sew ears high and even
- Attach arms slightly forward
- Attach legs to shoes and body
- Adjust stance for balance
✨ Finishing Touches
- Shape muzzle and cheeks
- Adjust eye alignment
- Slightly angle heads toward each other
- Ensure symmetry
💡 Pro Tips
- Tight stitches improve structure
- Firm stuffing keeps shape
- Face placement is key for expression
- Keep proportions balanced (large head + shoes, smaller limbs)
🌟 Your Mickey & Minnie Are Ready!
You now have a charming handmade pair inspired by two beloved characters. Display them together, gift them to someone special, or create themed variations for holidays and celebrations.


thanks both are cute😂👍❤️