✨ Skill Level
Beginner
(Simple shaping and small parts)
📏 Finished Size
Approx. 8–10 cm (3–4 inches) tall
Using DK yarn and a 2.5 mm hook
🧶 Materials
Yarn (DK weight):
Supplies:
-
2.5 mm crochet hook
-
Polyester fiberfill
-
Yarn needle
-
Stitch marker
-
6 mm safety eyes
-
Small flat round magnet
-
Strong craft glue
🧵 Abbreviations (US Terms)
MR – magic ring
sc – single crochet
inc – increase
dec – decrease
sl st – slip stitch
FO – fasten off
( ) = stitch count
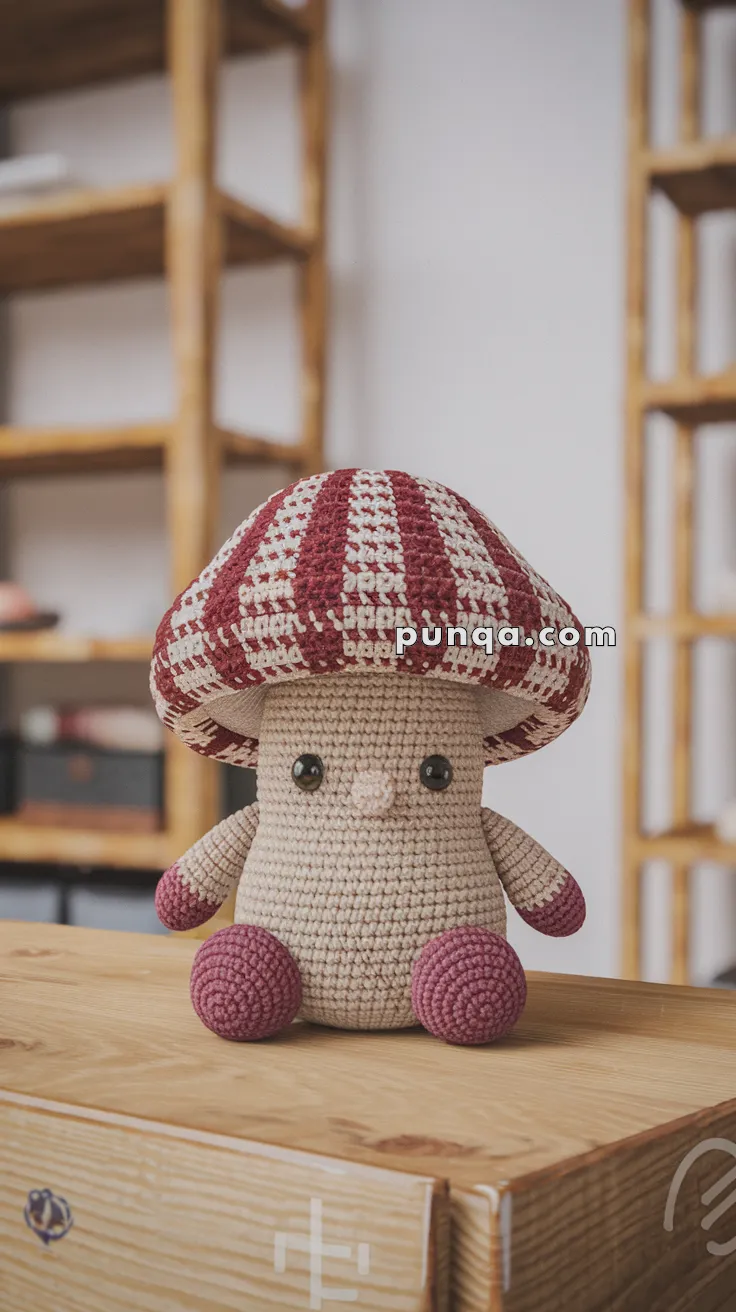
🍄 BODY (Beige – flat back)
R1: MR 6 (6)
R2: inc x6 (12)
R3: (1 sc, inc) x6 (18)
R4: (2 sc, inc) x6 (24)
R5–R9: sc around (24)
Insert safety eyes between R6–R7, about 5 stitches apart.
R10: (2 sc, dec) x6 (18)
Stuff lightly (do not overstuff – keep back flat)
R11: (1 sc, dec) x6 (12)
R12: dec x6 (6)
FO and close.
Flatten slightly to create a flat back surface for magnet.
👃 NOSE (Beige)
R1: MR 4 (4)
R2: sc around (4)
FO with tail.
Sew nose centered between eyes.
💪 ARMS (Make 2 – Beige with Burgundy Tips)
With beige:
R1: MR 5 (5)
R2–R3: sc around (5)
Change to burgundy:
R4–R5: sc around (5)
Lightly stuff.
FO, leave tail for sewing.
Sew arms to sides of body just below eye level.
🦶 FEET (Make 2 – Burgundy)
R1: MR 6 (6)
R2: inc x6 (12)
R3–R4: sc around (12)
Stuff firmly into round balls.
FO, leave long tail.
Attach feet to the lower front of the body so the mushroom sits in a seated pose.
🍄 MUSHROOM CAP (Burgundy & Cream Pattern)
Work in alternating stripes:
(2 sc burgundy, 2 sc cream) repeated around each round.
R1: MR 6
R2: inc x6 (12)
R3: (1 sc, inc) x6 (18)
R4: (2 sc, inc) x6 (24)
R5: (3 sc, inc) x6 (30)
R6: (4 sc, inc) x6 (36)
R7–R9: sc around (36) maintaining stripe pattern
R10: (4 sc, dec) x6 (30)
Lightly stuff cap.
FO, leave long tail.
Cap should be wide and dome-shaped with a slight overhang over the face.
🍄 CAP BRIM (Cream – underside edge)
Attach cream yarn to front loops of last round:
(sl st, ch 2, sl st) in each stitch around
FO.
This creates the soft rolled edge seen in the finished mushroom.
🧲 MAGNET ATTACHMENT
After assembling body and parts:
-
Glue a flat round magnet securely to the back of the body
-
Let dry completely before attaching to fridge
-
Optional: crochet a small beige circle and glue over magnet for a clean finish
🧷 ASSEMBLY
-
Sew nose to face
-
Attach arms to sides
-
Attach feet to bottom front
-
Sew cap onto top of body (sit low over eyes)
-
Glue magnet to back
✨ FINAL SHAPING
-
Keep back slightly flat
-
Shape cap so it frames face
-
Angle feet outward slightly
-
Keep arms short and rounded
-
Face remains minimal (eyes + nose only)
🍄 Finished Mushroom Magnet
Your finished mushroom magnet should have:
💖 Closing Note
This Amigurumi Mushroom Fridge Magnet is a sweet woodland-inspired decoration that brings cozy charm to any kitchen or workspace. With its patterned cap and friendly face, it’s perfect for gifting or creating a whole mushroom magnet collection in different color combinations.
Happy crocheting and enjoy your tiny forest friend! 🧶🍄