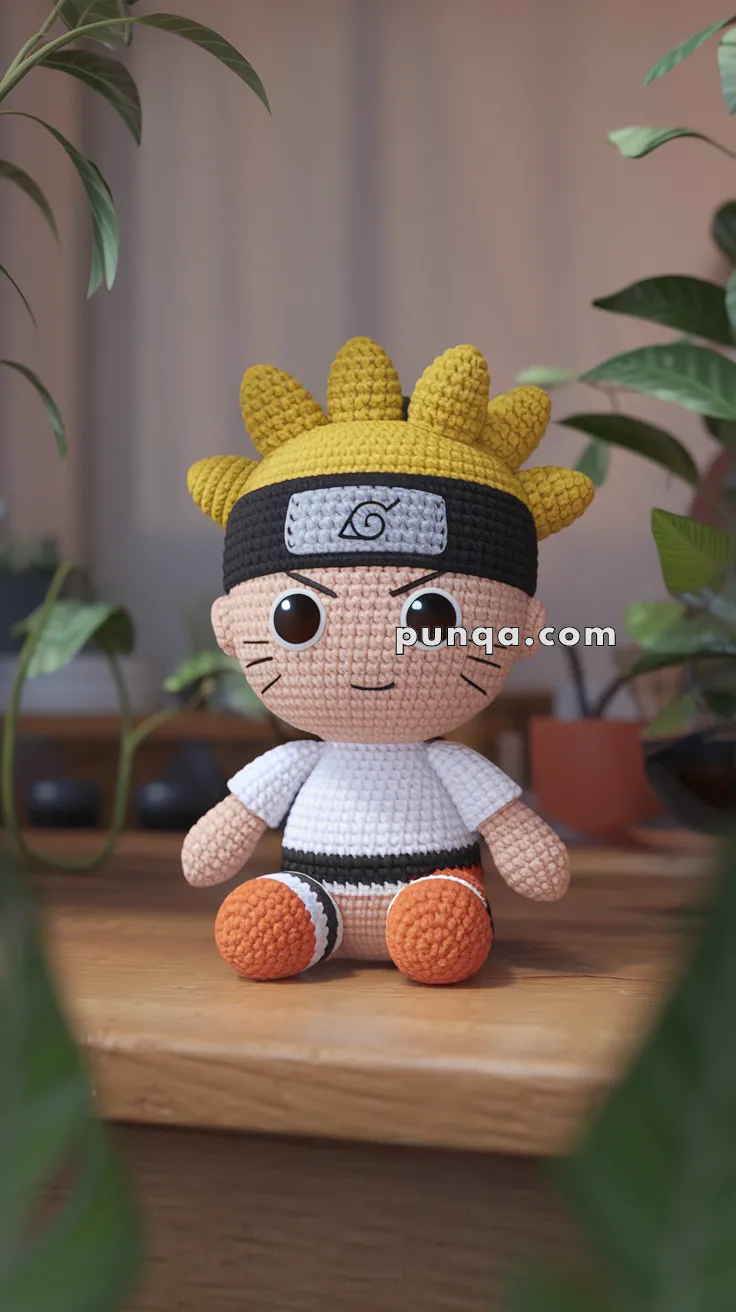
✨ Skill Level
Intermediate — includes shaping, structured hair construction, embroidery, and color changes.
📏 Finished Size
Approximately 18–20 cm (7–8 inches) tall
Using DK or light worsted yarn and a 3.0 mm hook.
🧶 Yarn Requirements (DK / Light Worsted)
Light peach (skin): 30 g
Yellow (hair): 35–40 g
White (shirt + eye whites): 30 g
Orange (pants + shoes): 35 g
Black (headband + belt + details): 20 g
Grey (headband plate): 10 g
Dark brown (pupils + brows): small amount
Polyester stuffing: 150–180 g
🧵 Materials
3.0 mm crochet hook
14 mm brown safety eyes
Tapestry needle
Stitch marker
Black embroidery thread
Work in continuous rounds unless stated otherwise.
🔤 Abbreviations (US Terms)
MR – magic ring
sc – single crochet
inc – increase (2 sc in one stitch)
dec – invisible decrease
ch – chain
sl st – slip stitch
FO – fasten off
🧑 Head (Skin Color)
The head is large and rounded to emphasize the chibi style.
R1: MR 6 sc (6)
R2: inc x6 (12)
R3: (1 sc, inc) x6 (18)
R4: (2 sc, inc) x6 (24)
R5: (3 sc, inc) x6 (30)
R6: (4 sc, inc) x6 (36)
R7: (5 sc, inc) x6 (42)
R8–15: sc around (42)
Insert 14 mm safety eyes between R11–12, spaced about 7 stitches apart.
R16: (5 sc, dec) x6 (36)
R17: (4 sc, dec) x6 (30)
R18: (3 sc, dec) x6 (24)
Stuff firmly and evenly.
R19: (2 sc, dec) x6 (18)
R20: (1 sc, dec) x6 (12)
R21: dec x6 (6)
FO and close tightly.
Facial Details
• Embroider three short whisker lines on each cheek.
• Add a small upward curved smile centered under the eyes.
• Embroider slightly angled eyebrows above the eyes for a confident expression.
🌟 Hair Cap (Yellow)
The hair cap fits snugly over the head and sits just above the eyes.
R1: MR 6 sc (6)
R2: inc x6 (12)
R3: (1 sc, inc) x6 (18)
R4: (2 sc, inc) x6 (24)
R5: (3 sc, inc) x6 (30)
R6: (4 sc, inc) x6 (36)
R7: (5 sc, inc) x6 (42)
R8–9: sc around (42)
FO leaving a long tail.
Test fit before sewing — the cap should hug the head without covering the eyes.
🔥 Hair Spikes (Make 8–10)
These spikes are fuller and slightly thicker at the base.
R1: MR 5 sc (5)
R2–4: sc around (5)
R5: (1 sc, inc) x2, 1 sc (7)
R6–9: sc around (7)
R10: (1 sc, dec) x2, 1 sc (5)
Lightly stuff only the base.
FO leaving long tail.
Attach:
• 4 spikes across the front angled upward
• 2 on each side angled outward
• 2 at the back
Arrange symmetrically for a bold, balanced silhouette.
Sew cap securely to head after attaching spikes.
🟫 Headband (Black)
Ch 40 (adjust slightly to fit snugly around head).
Join without twisting.
Rounds 1–4: sc around.
FO.
Position so the band crosses just above the eyes.
🪙 Headband Plate (Grey)
Ch 12.
Row 1–4: sc across (11)
FO leaving tail.
Sew centered on front of headband.
Embroider a simple spiral symbol in black thread.
👕 Body (Top-Down Construction)
The body is compact and slightly tapered for a seated pose.
With white:
R1: MR 6 sc (6)
R2: inc x6 (12)
R3: (1 sc, inc) x6 (18)
R4: (2 sc, inc) x6 (24)
R5–9: sc around (24)
Switch to black (belt trim):
R10: sc around (24)
Switch to orange:
R11: (2 sc, dec) x6 (18)
R12–14: sc around (18)
Stuff firmly.
FO leaving tail.
The waist should narrow slightly before widening into the seated base.
💪 Arms (Make 2)
With skin color:
R1: MR 6 sc (6)
R2–5: sc around (6)
Switch to white:
R6–11: sc around (6)
Lightly stuff only halfway.
FO leaving tail.
Sew slightly angled downward at shoulder level.
🦵 Legs & Shoes (Make 2)
Shoes are rounded and slightly oversized.
With orange:
R1: MR 6 sc (6)
R2: inc x6 (12)
R3: (1 sc, inc) x6 (18)
R4–6: sc around (18)
Switch to white:
R7: sc around (18)
Switch to black:
R8: sc around (18)
Stuff firmly.
FO leaving long tail.
Flatten back slightly and sew angled forward so the doll sits securely.
🧷 Assembly
-
Sew head firmly to body.
-
Attach headband at eye level.
-
Sew plate centered and embroider symbol.
-
Attach arms symmetrically.
-
Sew legs forward in seated position.
-
Arrange hair spikes evenly before securing fully.
✨ Shaping Tips
• Stuff head firmly to prevent wobbling.
• Shape cheeks slightly outward for fuller chibi look.
• Ensure hair spikes mirror each other for balance.
• Position legs evenly so the doll sits flat without leaning.
❤️ Final Result
Your chibi ninja amigurumi now features bold upright spikes, expressive oversized eyes, iconic forehead band, and a clean white-and-orange outfit that creates strong contrast and personality. The balanced seated proportions make him perfect for display on a desk, shelf, or as a gift for anime lovers.
Enjoy bringing this spirited little ninja to life — one stitch at a time. 🧶🔥