Roll out the yarn and get ready to crochet a legend—introducing the Amigurumi Optimus Prime, a heroic twist on your handmade collection! 🤖🧶 With bold colors, iconic details, and a surprisingly cuddly form, this pattern transforms the mighty leader of the Autobots into a soft, stitchable companion. Whether you’re a die-hard Transformers fan or just love bringing characters to life through crochet, this project is packed with personality and power.
From his signature helmet to his blocky boots, every piece of Optimus Prime is a celebration of craftsmanship and geeky charm. Customize his armor, add tiny embellishments, or even pose him for display—this amigurumi is as fun to make as it is to show off. Perfect for gifting, collecting, or simply unleashing your inner crocheting superhero, this pattern proves that even the strongest warriors can be handmade with heart. 💥🧵
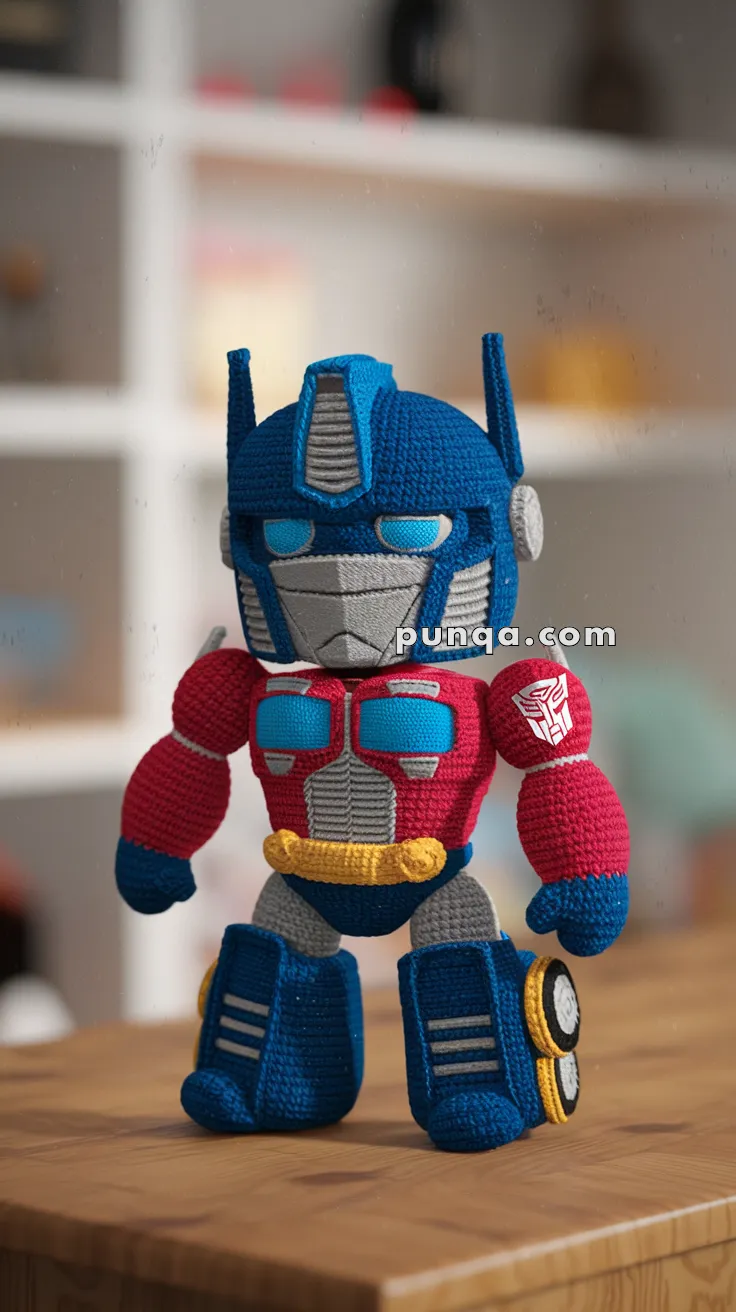
🤖 Amigurumi Optimus Prime–Inspired Robot Crochet Pattern
This bold, chibi-style robot is inspired by the legendary Optimus Prime! With his iconic blue helmet, glowing cyan eyes, red chest with twin windows, ribbed grille, yellow belt, and chunky boots with side wheels, this amigurumi is a true show-stopper.
Whether you’re a fan of Transformers or just love geeky crochet projects, this pattern will guide you step-by-step to create a display-ready figure.
🧵 Skill Level
Advanced – involves structured shaping, precise color placement, and multiple attached components.
📏 Finished Size
- Height: 23–25 cm (9–10 inches)
- Shoulder width: 12–14 cm (4.7–5.5 inches)
🧶 Materials & Yarn Amount
- Blue yarn (helmet, boots, forearms): 100 g
- Red yarn (torso, upper arms): 80 g
- Light gray yarn (face mask, grille, thighs): 60 g
- Dark gray yarn (panel accents): 25 g
- Yellow yarn (belt, wheel rims): 20 g
- White yarn (small details): 10 g
- Cyan yarn or felt (eyes): small amount
- Black yarn (outlines): small amount
Other supplies:
- 2.75–3.0 mm crochet hook
- Polyester stuffing (~250 g)
- Aluminum wire (for structure)
- Plastic canvas/cardboard (boot soles)
- Yarn needle, stitch markers
✂️ Abbreviations (US Terms)
MR – magic ring
sc – single crochet
inc – increase
dec – invisible decrease
sl st – slip stitch
FO – fasten off
🧠 Helmet Head (Wide Dome Shape)
With blue yarn:
R1: MR, 6 (6)
R2: inc ×6 (12)
R3: (1 sc, inc) ×6 (18)
R4: (2 sc, inc) ×6 (24)
R5: (3 sc, inc) ×6 (30)
R6: (4 sc, inc) ×6 (36)
R7: (5 sc, inc) ×6 (42)
R8: (6 sc, inc) ×6 (48)
R9–15: sc around (48)
➡️ Keep shape slightly flattened for a helmet look
R16: (6 sc, dec) ×6 (42)
R17: (5 sc, dec) ×6 (36)
R18: (4 sc, dec) ×6 (30)
Stuff firmly and FO.
🔩 Helmet Details
Center Crest (Blue):
Ch 7, sc back 5 rows → sew centered on forehead
Front Vent Panel (Light Gray):
Ch 5, 6 rows sc → embroider horizontal ridges → attach on crest
Side Antennae (Make 2):
MR 5, sc 10 rounds → keep stiff and upright
Ear Discs (Make 2 – Gray):
MR 6, inc ×6 (12), 1 round sc → flatten and sew to sides
😐 Face Mask (Angular Layered Piece)
With light gray yarn:
Ch 16
Row 1: sc across
Rows 2–9: gradually decrease both edges to form trapezoid
➡️ Embroider horizontal panel lines
Attach centered below eyes.
🔹 Cheek Panels (Make 2 – Gray)
Ch 6, 3 rows sc
Attach diagonally on each side of mask
👁 Eyes (Inset Panels)
- Create small cyan rectangles or ovals
- Slight inward tilt toward center
- Place under helmet edge for recessed look
🟥 Torso (Compact Armor Block)
With red yarn:
R1: MR, 6
R2: inc ×6 (12)
R3: (1 sc, inc) ×6 (18)
R4: (2 sc, inc) ×6 (24)
R5: (3 sc, inc) ×6 (30)
R6: (4 sc, inc) ×6 (36)
R7–12: sc around (36)
➡️ Keep torso short and wide
R13: (4 sc, dec) ×6 (30)
R14: sc around (30)
R15: (3 sc, dec) ×6 (24)
FO and stuff firmly.
🔷 Chest Panels (Make 2)
With blue yarn:
Ch 10
Work 6 rows sc
Edge with gray slip stitch
Attach symmetrically on chest.
🔳 Center Grille
With light gray yarn:
Ch 9
Work 12 rows sc
Embroider vertical ribs
Attach under chest panels.
🟡 Belt
Ch 10, sc 2 rows
Make 2 small circles (MR 6 → inc ×6)
Attach across waist.
💪 Arms (Make 2)
Upper Arm (Red)
MR 6
R2: inc ×6 (12)
R3–8: sc around (12)
Forearm (Blue)
R9–14: sc around (12)
Hand (Blue)
R15: (2 sc, dec) ×3 (9)
R16: (sc, dec) ×3 (6)
Lightly stuff and FO.
Shoulder Cap
MR 6 → inc ×6 → (18)
Flatten and attach.
🟦 Pelvis
With blue yarn:
MR 6
R2: inc ×6 (12)
R3: (1 sc, inc) ×6 (18)
R4–5: sc around (18)
FO.
🦵 Legs & Boots (Make 2)
Upper Leg (Gray)
MR 6
R2: inc ×6 (12)
R3–7: sc around (12)
Boots (Large & Structured)
With blue yarn:
Ch 10 → work oval base (~28 sts)
R2: increase evenly
R3: BLO sc around
R4–8: sc around
➡️ Insert firm sole
Front Panel Detail
Attach 3 vertical gray strips on front.
🛞 Side Wheels (Per Leg)
- Black circle: MR 6 → inc ×6
- Yellow ring (same size)
- White center
Stack and sew to outer side of boot.
🧵 Assembly
- Attach head slightly tilted forward
- Sew torso to pelvis securely
- Attach arms level with chest panels
- Attach legs wide for balance
- Add wheels to outer legs
- Attach chest panels, grille, and belt
✨ Final Shaping Tips
- Keep helmet broad and slightly flattened
- Maintain strong, square torso proportions
- Ensure boots are flat and stable
- Align facial elements precisely
⚙️ Finished Look
This chibi-style robot stands strong with bold proportions, layered armor details, and striking color contrast. From the structured helmet to the heavy boots and side wheels, every detail creates a powerful and polished handmade figure 🤖✨