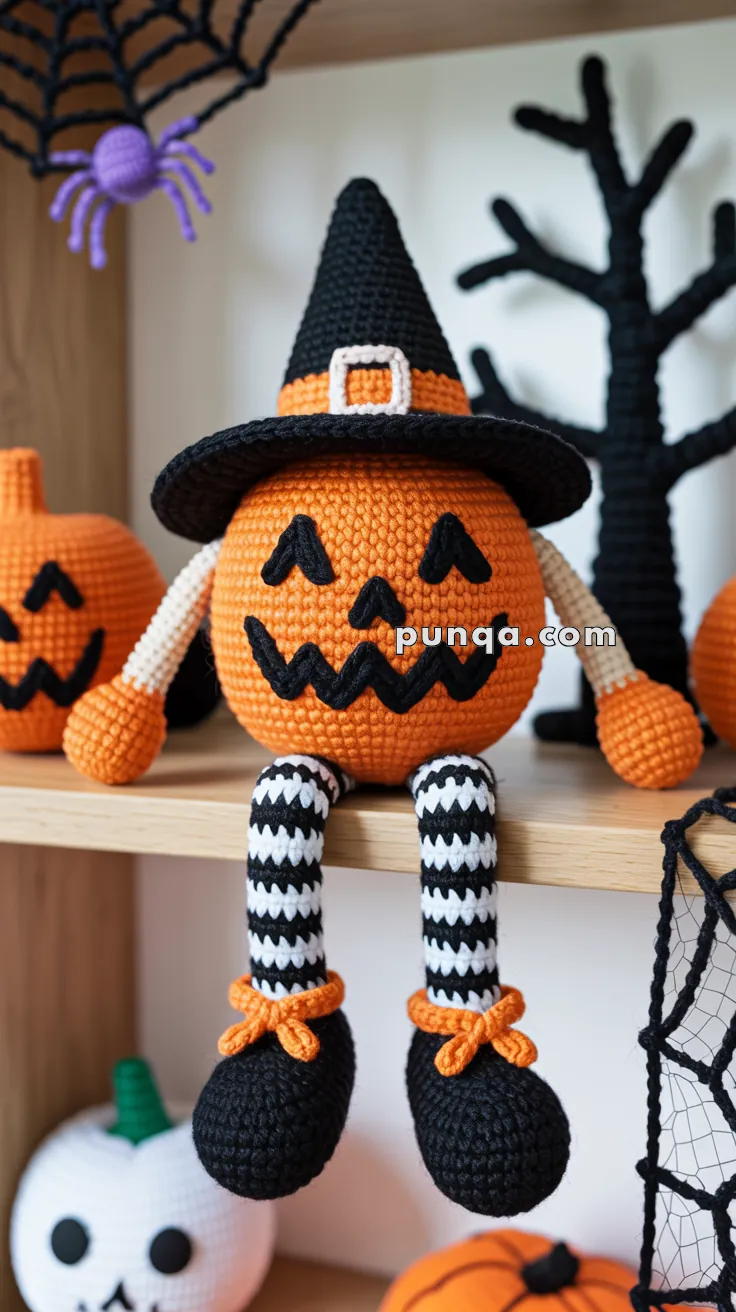
Get ready to stir up some Halloween magic with the Amigurumi Pumpkin Witch Doll—a spellbinding blend of spooky charm and seasonal sweetness! 🎃🧙♀️ With her pumpkin-shaped body, pointy hat, and mischievous little grin, this enchanting doll is the perfect handmade companion for autumn festivities. Whether perched on a mantel, tucked into a trick-or-treat basket, or gifted to a fellow Halloween lover, she brings a cozy, whimsical vibe that’s impossible to resist.
This crochet cutie is bursting with personality and perfect for customizing—try bold orange hues, glittery yarn for her hat, or even a tiny broomstick accessory to complete her look. From her stitched-on boots to her twinkling eyes, every detail invites you to play and personalize. Whether you’re crafting for décor, gifting, or just indulging in some seasonal stitching fun, the Pumpkin Witch Doll is a delightful way to celebrate the spooky season with a handmade twist! 🧶✨
🎃 Amigurumi Pumpkin Witch Doll Crochet Pattern
This spooky-cute pumpkin witch will bring Halloween charm to your home! With her bright orange pumpkin head, striped legs, and pointy hat, she’s perfect for decorating shelves or gifting to Halloween lovers.
✨ Skill Level
Intermediate – You’ll need basic knowledge of amigurumi techniques, color changes, and shaping.
📏 Finished Size
Approx. 25 cm (10 inches) tall (including hat), when made with worsted weight yarn and 3.5 mm hook.
🧶 Materials
- Worsted weight yarn:
- Orange (pumpkin, bows, hat band)
- Black (hat, shoes, mouth, eyes, nose, leg stripes)
- White (leg stripes, arms)
- Yellow (hat buckle)
- 3.5 mm crochet hook
- Toy stuffing
- Yarn needle
- Stitch markers
- Craft wire or pipe cleaner (optional, for hat support)
🔤 Abbreviations (US)
- MR = Magic Ring
- sc = single crochet
- inc = increase (2 sc in same st)
- dec = decrease (sc 2 together)
- sl st = slip stitch
- ch = chain
- FO = fasten off
🪄 Pattern Instructions
🎃 Pumpkin Body (Orange)
- R1: 6 sc in MR (6)
- R2: inc in each st (12)
- R3: (sc, inc) ×6 (18)
- R4: (2 sc, inc) ×6 (24)
- R5: (3 sc, inc) ×6 (30)
- R6: (4 sc, inc) ×6 (36)
- R7: (5 sc, inc) ×6 (42)
- R8: (6 sc, inc) ×6 (48)
- R9: (7 sc, inc) ×6 (54)
- R10: (8 sc, inc) ×6 (60)
11–25. sc around (60) - (8 sc, dec) ×6 (54)
- (7 sc, dec) ×6 (48)
- (6 sc, dec) ×6 (42)
- (5 sc, dec) ×6 (36)
- (4 sc, dec) ×6 (30)
- (3 sc, dec) ×6 (24)
- (2 sc, dec) ×6 (18)
- (sc, dec) ×6 (12)
- dec ×6 (6)
FO, close. Stuff firmly.
🧙 Witch Hat (Black with Orange Band & Yellow Buckle)
Cone:
- R1: 6 sc in MR (6)
- R2: (sc, inc) ×3 (9)
- R3: sc around (9)
- R4: (2 sc, inc) ×3 (12)
- R5: sc around (12)
- R6: (3 sc, inc) ×3 (15)
- R7: sc around (15)
- R8: (4 sc, inc) ×3 (18)
- R9: sc around (18)
👉 Keep increasing every other round until 48 sts. Work 10 rounds even for cone height.
Brim:
- R1: (7 sc, inc) ×6 (54)
- R2: (8 sc, inc) ×6 (60)
- R3: (9 sc, inc) ×6 (66)
- R4: (10 sc, inc) ×6 (72)
- R5: (11 sc, inc) ×6 (78)
6–9. sc around (78)
FO.
Hat Band (Orange): ch 50, join, sc 3 rows. Sew around hat base.
Buckle (Yellow): ch 12, join, work 2 rows sc, sew to front.
👉 Optional: insert craft wire inside cone to keep hat tall and sturdy.
🦵 Legs (make 2 – striped)
- With Black: MR, 6 sc (6)
- R2: inc ×6 (12)
- R3: (sc, inc) ×6 (18)
4–6: sc around (18)
👉 Switch to White every 2 rounds, alternating with Black every 2 rounds, to make bold stripes.
Work until 14 color blocks (28 rounds). Stuff lightly. FO.
👟 Shoes (make 2 – Black)
- MR, 6 sc (6)
- inc ×6 (12)
- (sc, inc) ×6 (18)
- (2 sc, inc) ×6 (24)
- (3 sc, inc) ×6 (30)
6–9. sc around (30) - (3 sc, dec) ×6 (24)
- (2 sc, dec) ×6 (18)
👉 Stuff firmly.
12–14. sc around (18) - (sc, dec) ×6 (12)
- sc around (12) – ankle opening.
FO.
Bow (Orange, make 2):
ch 30, sl st across, tie into a bow. Sew to front of shoe.
✋ Hands (Orange, make 2)
- MR, 6 sc (6)
- inc in each st (12)
- (sc, inc) ×6 (18)
4–6. sc around (18) → this gives the plump rounded palm. - (sc, dec) ×6 (12)
👉 Lightly stuff to keep ball shape. - sc around (12)
FO, leaving tail for sewing.
🤲 Arms with Hands (White + Orange)
- After finishing hands above, switch to White yarn to continue arm tube.
- R1–8: sc around (12)
👉 Stuff lightly, so arms can dangle.
FO.
Assembly tip: Sew the white arm tubes slightly inside the sides of the pumpkin body so the plump orange ball hands are sticking out, like in the photo.
😀 Face Details
- Eyes & nose: Black felt triangles or crocheted mini pieces.
- Mouth: Embroider jagged zigzag with black yarn (or felt).
- Attach securely to pumpkin.
🧵 Assembly
- Sew witch hat to pumpkin top.
- Attach striped legs to pumpkin bottom.
- Sew shoes to legs; add bows.
- Attach arms to pumpkin sides.
- Add face pieces.
And there you have it – the Pumpkin Witch Amigurumi, perfectly photo-accurate with her striped dangling legs, tall witch hat, and cheeky jack-o’-lantern grin! 🎃🧙♀️ This doll will sit beautifully on a shelf, bring Halloween fun to your décor, and charm everyone who sees her. Make one as a gift, or create a whole pumpkin patch of witches for the season. 🕸️✨


That’s so cute and thanks for the pattern