Strut your stuff with this Amigurumi Rooster Keychain crochet pattern! Bursting with barnyard charm and bold personality, this tiny rooster is the perfect pocket-sized project to brighten your day. With its colorful comb, cheerful beak, and fluffy tail feathers, this little clucker is ready to perch on your keys, backpack, or gift bag. Whether you’re a beginner looking for a quick win or a seasoned crocheter adding to your farmyard flock, this pattern is a fun and feathery way to show off your skills. 🐓🧶🔑
Designed for playful detail and portability, this pattern invites you to mix vibrant yarns, expressive features, and fun extras like tiny legs, a loop for hanging, or even a mini egg accessory. Customize your rooster with bold reds, sunny yellows, or pastel hues for a whimsical twist. Whether it’s a quirky gift, a craft fair favorite, or a cheerful charm for your own collection, this Rooster Keychain is a joyful and satisfying project—perfect for stitching up a little handmade crow of delight! 💖✨🌞
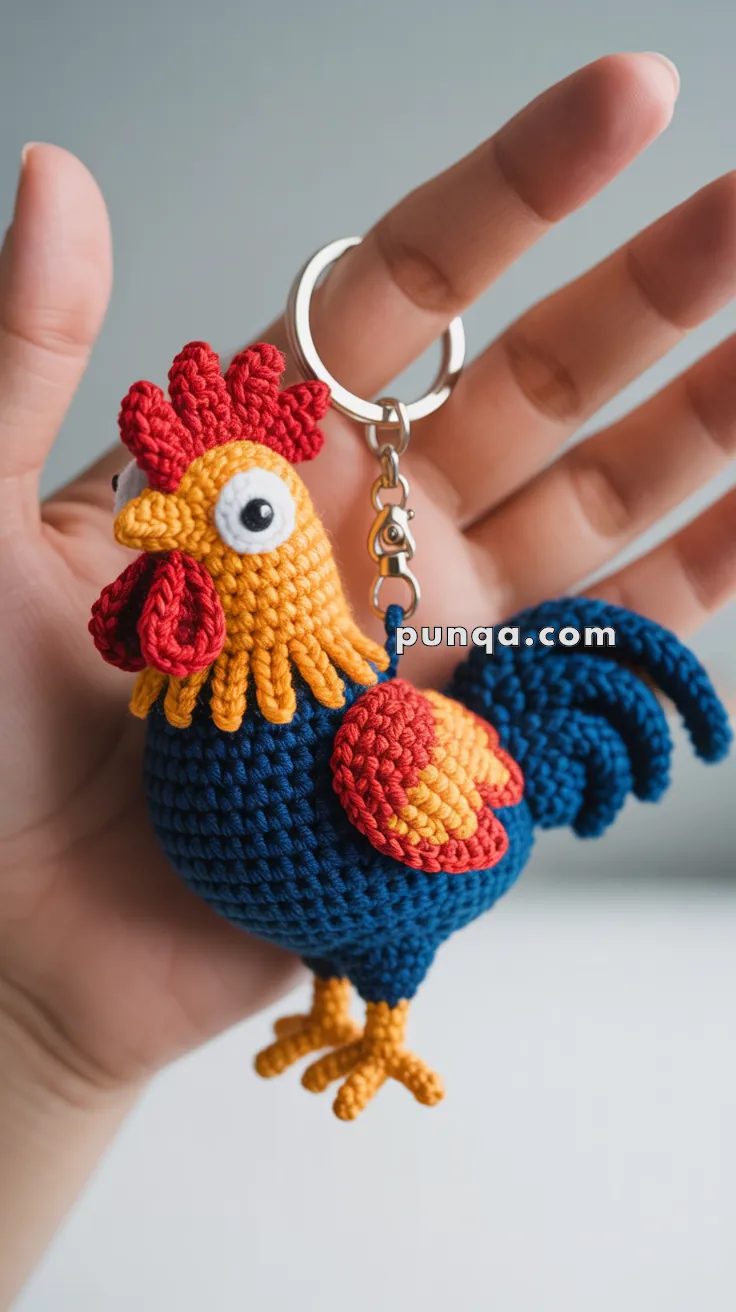
🐓 Amigurumi Rooster Keychain Crochet Pattern
Add a bold and playful charm to your bag or keys with this vibrant amigurumi rooster keychain! Featuring striking red, yellow, and blue hues, this little rooster stands out with its detailed comb, fluffy tail, and cartoonish eyes. Perfect as a gift, backpack buddy, or just to brighten your day!
✨ Skill Level
Intermediate
Small-scale shaping, layered details, and careful assembly.
📏 Finished Size
Approximately 9–10 cm (3.5–4 inches) tall
Measured from feet to comb, excluding keyring
Using 2.0–2.5 mm hook and mercerized cotton yarn.
🧶 Materials
Yarn (DK / mercerized cotton recommended):
- Navy blue – body & tail
- Mustard yellow – head, neck ruffles, beak, feet
- Red – comb, wattles, wing accents
- White – eye whites
Notions:
- 2.0–2.5 mm crochet hook
- Fiberfill stuffing
- 6–8 mm black safety eyes or black embroidery thread
- Tapestry needle
- Stitch marker
- Metal keyring + lobster clasp
🪡 Abbreviations (US Terms)
- MR – Magic Ring
- sc – Single Crochet
- inc – Increase (2 sc in same stitch)
- dec – Invisible Decrease
- ch – Chain
- sl st – Slip Stitch
- FO – Fasten Off
- FLO – Front Loop Only
Work in continuous rounds unless stated otherwise.
🧵 BODY (Navy Blue)
Worked from bottom to neck opening.
R1: MR, 6 sc (6)
R2: inc ×6 (12)
R3: (sc, inc) ×6 (18)
R4: (2 sc, inc) ×6 (24)
R5: (3 sc, inc) ×6 (30)
R6–R11: sc around (30)
Begin shaping upper body:
R12: (3 sc, dec) ×6 (24)
R13: (2 sc, dec) ×6 (18)
Stuff firmly, maintaining a round, chubby shape.
R14: (sc, dec) ×6 (12)
R15: dec ×6 (6)
FO, close tightly.
🌼 NECK RUFFLES (Mustard Yellow)
These create the distinctive layered “feather collar” seen in the photo.
Attach yarn to the FLO of R11 of the body.
Repeat around entire opening (30 sts):
In each stitch:
sc, ch 3, sl st in same stitch
FO and secure ends.
The ruffles should flare outward naturally.
🧠 HEAD (Mustard Yellow)
R1: MR, 6 sc (6)
R2: inc ×6 (12)
R3: (sc, inc) ×6 (18)
R4–R7: sc around (18)
Insert eyes between R5–R6, spaced 6–7 sts apart.
Lightly stuff.
R8: (sc, dec) ×6 (12)
R9: dec ×6 (6)
FO.
Sew head directly on top of body, centered and slightly forward-tilted.
👁 EYES (White – Make 2)
R1: MR, 6 sc
R2: inc ×6 (12)
FO, flatten lightly.
Sew onto head so they sit slightly protruding, giving a cartoon look.
Add black safety eye or embroidered pupil in center.
🧠 BEAK (Mustard Yellow)
R1: MR, 4 sc
R2–R3: sc around (4)
FO.
Pinch slightly into a cone and sew between eyes, angled forward.
❤️ COMB (Red)
Ch 9
Starting in 2nd ch from hook, work:
sl st, sc, hdc, dc, hdc, sc, sl st, sl st
This creates five rounded bumps.
FO and sew along top of head, slightly off-center forward.
💋 WATTLES (Red – Make 2)
R1: MR, 5 sc
R2: sc around (5)
FO.
Sew directly under beak, touching at the base.
🪽 WINGS (Make 2)
Base Wing (Red)
R1: MR, 6 sc
R2: (sc, inc) ×3 (9)
R3: (2 sc, inc) ×3 (12)
FO, flatten into oval.
Overlay Feather (Mustard)
Ch 6
Starting in 2nd ch from hook:
sc, hdc, dc, hdc, sc
FO.
Sew mustard layer on top of red wing.
Attach wings to sides of body, slightly angled back.
🌀 TAIL FEATHERS (Navy Blue – Make 3)
Ch 13
sl st in each chain back to start
FO.
Repeat with ch 15 and ch 17.
Do not force curl — the slip stitches naturally create the tight spiral seen in the photo.
Sew all three at back of body, fanned upward.
🐾 FEET (Mustard Yellow – Make 2)
Ch 5
sl st back (center toe)
From base stitch:
ch 4, sl st back (outer toe)
Repeat once more for third toe.
FO.
Sew feet close together under body for compact stance.
🔑 KEYCHAIN LOOP
Attach navy yarn to top back of head.
Ch 10, sl st back to same stitch.
Reinforce with a second pass if needed.
Attach metal jump ring and lobster clasp securely.
🪡 FINAL ASSEMBLY & SHAPING
- Ensure head sits slightly forward
- Tail should curve upward and outward
- Wings sit mid-body, not too high
- Neck ruffles should remain visible from all angles
Lightly shape with fingers — no stiffening needed.
🌟 Final Thoughts
This tiny rooster is all about bold color, clean shaping, and joyful personality. Designed to be sturdy yet expressive, it’s a perfect handmade accent that brings charm wherever it goes — from keys and backpacks to gift wrapping and craft fairs. A small project with big character, ready to brighten everyday moments.
Happy crocheting 🧶🐓