Snap into something irresistibly cute with this Amigurumi Sango the Crab crochet pattern! 🦀💖 With her cheerful smile, bright eyes, and perfectly pinchable claws, Sango is a delightful little crustacean who’s ready to scuttle into your heart. Whether you’re crafting a beach-themed display, adding to your sea creature collection, or just looking for a quick and quirky project, this crab brings a splash of ocean charm to every stitch.
Designed with playful shaping and vibrant personality, Sango invites you to explore fun textures, bold colors, and adorable extras like rosy cheeks or a tiny shell accessory. You can customize her with pastel tones, glittery yarn, or even a mini beach towel for lounging vibes. Whether perched on a shelf, tucked into a gift basket, or starring in a handmade underwater scene, this Sango the Crab Amigurumi is a joyful and satisfying project—perfect for stitching up a little seaside sweetness, one loop at a time! 🌊🧶✨
🦀 Amigurumi Sango the Crab Crochet Pattern
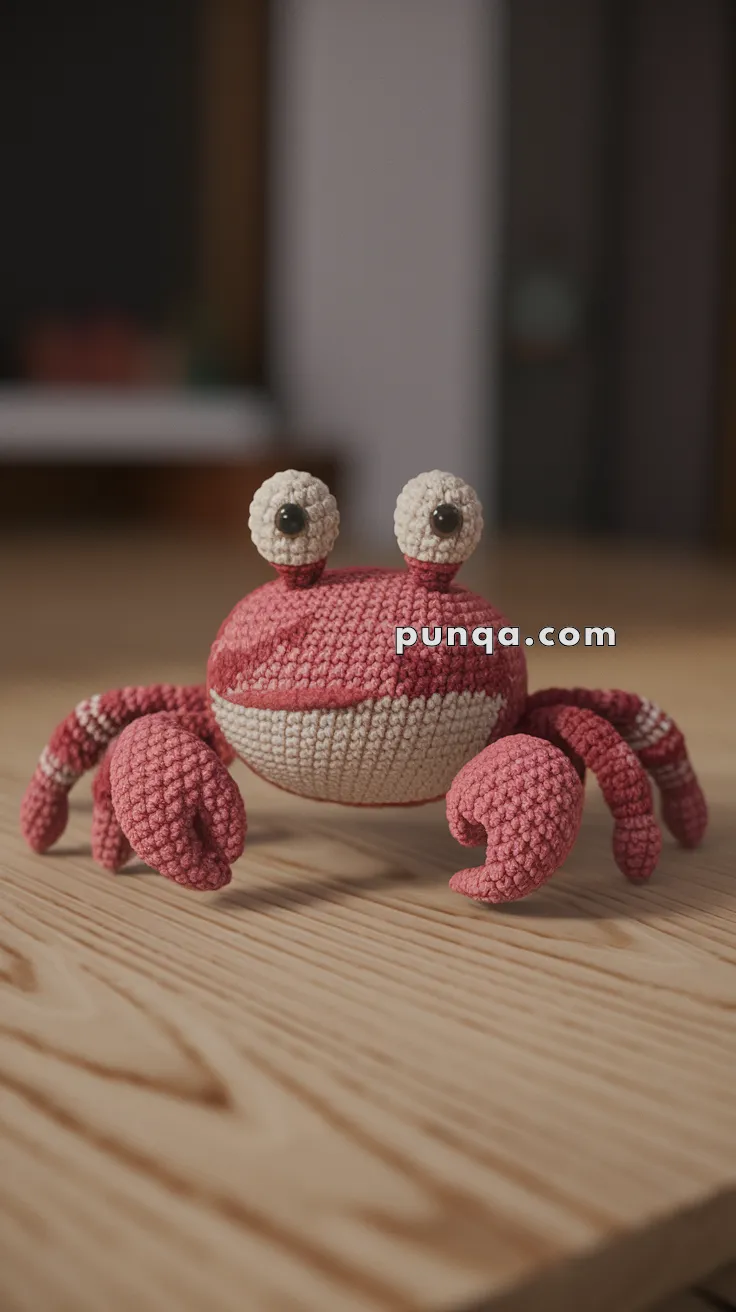
Meet Sango, a cheerful little crochet crab with a wide two-tone shell, raised googly eyes, chunky curled pincers, six bendy walking legs, and a warm coral-and-cream color palette. 🧶🌊
This design uses a flattened oval shell rather than a round ball, with a coral upper shell and cream lower belly joined around a clean horizontal edge. The claws are built from a plump palm plus a separate curved lower pincer, giving them the distinctive open “C” shape. Three lightly stuffed legs on each side curve naturally outward, while the short eye stalks lift the oversized eyes above the shell.
✨ Skill Level
Intermediate
This project includes:
- Oval shell shaping
- Two-piece stuffed body construction
- Small color changes
- Raised eye stalks
- Three-dimensional pincers
- Curved tubular legs
- Small-part assembly
- Light sculpting
📏 Finished Size
Using DK or light-worsted cotton yarn with a 3 mm crochet hook, the finished crab measures approximately:
- 15–17 cm / 6–6¾ in across the body
- 21–24 cm / 8¼–9½ in across the claws
- 11–13 cm / 4¼–5 in tall to the top of the eyes
Finished measurements vary with yarn, hook, tension, stuffing, and leg positioning.
🧶 Required Yarn Amounts
For one crab:
- 🪸 Coral/dusty red — approximately 90–105 g
- 🤍 Warm cream/beige — approximately 40–50 g
- 🖤 Black — approximately 2–3 g
Polyester fiberfill — approximately 80–100 g
A few extra grams of coral are useful if you prefer longer walking legs.
🧵 Materials
- 3 mm crochet hook
- Two 10–12 mm black safety eyes
- Polyester fiberfill
- Tapestry needle
- Stitch markers
- Pins
- Scissors
- Optional black embroidery thread
For a child under three, embroider the pupils instead of using safety eyes.
🔤 Abbreviations — US Terms
MR — Magic Ring
sc — Single Crochet
inc — Increase: 2 sc in one stitch
dec — Invisible Decrease
sl st — Slip Stitch
ch — Chain
BLO — Back Loop Only
FLO — Front Loop Only
FO — Fasten Off
st — Stitch
Work in continuous rounds unless stated otherwise.
🦀 Coral Upper Shell
The upper shell is a shallow dome rather than a deep sphere.
Using coral yarn:
R1
MR 6.
(6)
R2
inc ×6.
(12)
R3
(1 sc, inc) ×6.
(18)
R4
(2 sc, inc) ×6.
(24)
R5
(3 sc, inc) ×6.
(30)
R6
(4 sc, inc) ×6.
(36)
R7
(5 sc, inc) ×6.
(42)
R8
(6 sc, inc) ×6.
(48)
R9
(7 sc, inc) ×6.
(54)
R10–14
sc around.
(54)
R15
(7 sc, dec) ×6.
(48)
FO, leaving a long sewing tail.
Do not stuff yet.
The piece should look like a broad shallow bowl.
🤍 Cream Lower Shell
Using cream yarn:
R1
MR 6.
(6)
R2
inc ×6.
(12)
R3
(1 sc, inc) ×6.
(18)
R4
(2 sc, inc) ×6.
(24)
R5
(3 sc, inc) ×6.
(30)
R6
(4 sc, inc) ×6.
(36)
R7
(5 sc, inc) ×6.
(42)
R8
(6 sc, inc) ×6.
(48)
R9–11
sc around.
(48)
FO.
The cream half should be slightly shallower than the coral half.
🪡 Joining the Shell
Place the coral upper shell over the cream lower shell with wrong sides facing inward.
Align all 48 stitches.
Using coral yarn, sc through both layers around the edge.
Before closing the final 8–10 stitches, stuff the body firmly but not rock-hard.
Concentrate stuffing in the center and keep the outer edge somewhat flatter.
Finish joining and FO.
Gently press the shell into a wide horizontal oval.
The color divide should run cleanly around the middle.
👀 Eye Stalks — Make 2
Each eye has a short coral stalk topped with a round cream eyeball.
Coral Stalk
Using coral:
R1
MR 6.
(6)
R2–5
sc around.
(6)
Switch to cream.
🤍 Eyeball
R6
inc ×6.
(12)
R7
(1 sc, inc) ×6.
(18)
R8–9
sc around.
(18)
Insert one safety eye between Rounds 8 and 9.
Place it slightly toward the front of the eyeball rather than perfectly centered.
R10
(1 sc, dec) ×6.
(12)
Add a small amount of stuffing.
R11
dec ×6.
(6)
FO and close.
Make a second eye.
🪡 Eye Placement
Position the stalks toward the upper-front portion of the coral shell.
Leave approximately 5–6 stitches between the bases.
The stalks should be:
- Short
- Upright
- Slightly angled apart
- Symmetrical
Sew securely around each coral base.
🦞 Main Claw Palms — Make 2
The claws are large, rounded, and much fuller than the walking legs.
Using coral yarn:
R1
MR 6.
(6)
R2
inc ×6.
(12)
R3
(1 sc, inc) ×6.
(18)
R4
(2 sc, inc) ×6.
(24)
R5–9
sc around.
(24)
R10
(2 sc, dec) ×6.
(18)
R11
(1 sc, dec) ×6.
(12)
Stuff firmly.
R12–14
sc around.
(12)
FO, leaving a long sewing tail.
Gently flatten the rounded end so each palm becomes slightly oval.
🦀 Curved Pincer Fingers — Make 2
These smaller fingers create the open crescent shape.
Using coral yarn:
R1
MR 6.
(6)
R2
(1 sc, inc) ×3.
(9)
R3–7
sc around.
(9)
R8
(1 sc, dec) ×3.
(6)
R9–12
sc around.
(6)
Stuff only the wider first half.
Leave the pointed half mostly unstuffed.
FO.
🪡 Shaping the Claws
Curve each pincer finger sharply inward.
Sew its narrow end to the lower-inner edge of one claw palm.
Leave a visible opening between the two claw tips.
The finished claw should resemble a chunky C shape, with:
- One large rounded upper lobe
- One smaller curved lower finger
- A visible opening between them
Make sure the two claws mirror one another.
🦀 Claw Arms — Make 2
Using coral yarn:
R1
MR 8.
(8)
R2–8
sc around.
(8)
Stuff lightly.
FO, leaving a long tail.
Sew one arm behind each claw.
The arm should attach to the back or lower side of the palm, not directly between the pincer tips.
🪡 Attaching the Claws
Place the claws at the front corners of the shell.
Angle them:
- Forward
- Slightly outward
- With the openings facing inward/upward
Sew the arm bases securely into the coral shell edge.
The claws should sit noticeably in front of the walking legs.
🐾 Walking Legs — Make 6
The crab has three walking legs on each side, in addition to the two claws.
They are curved, lightly stuffed tubes with a subtle cream stripe near the outer half.
Make six.
Begin with coral yarn.
R1
MR 6.
(6)
R2
(1 sc, inc) ×3.
(9)
R3–6
sc around.
(9)
Switch to cream.
R7–8
sc around.
(9)
Switch back to coral.
R9–14
sc around.
(9)
R15
(1 sc, dec) ×3.
(6)
R16–18
sc around.
(6)
FO.
Stuff very lightly, mainly near the body end.
Leave the tip almost unstuffed so it can curve naturally.
🐾 Curving the Legs
Before attaching, bend each leg into a shallow arc.
The three legs on each side should not all point in exactly the same direction.
For the most natural arrangement:
- Front walking leg: angles forward
- Middle walking leg: extends sideways
- Rear walking leg: angles backward
Use one or two hidden stitches along the inside bend if you want the curve permanently fixed.
🪡 Attaching the Walking Legs
Sew three legs to each side of the shell beneath the horizontal color seam.
Place them behind the claws.
Keep the cream bands visible.
The outer tips should touch or hover just above the display surface.
🧵 Optional Mouth
The face is charming without a visible mouth, but you can add a tiny smile if desired.
Using thin black embroidery floss:
Work one shallow curved stitch on the cream belly, centered below the eyes.
Keep it very small so it does not compete with the large eye stalks.
🪡 Recommended Assembly Order
For the cleanest finish:
- Crochet the coral shell.
- Crochet the cream lower shell.
- Join and stuff the body.
- Make both eye stalks.
- Attach the eyes.
- Make both claw palms.
- Crochet and attach the pincer fingers.
- Make the short claw arms.
- Attach both claws to the body.
- Crochet all six walking legs.
- Curve and pin the legs.
- Sew three legs to each side.
- Adjust the shell shape and limb angles.
- Add an optional mouth.
✨ Final Shaping
For the finished silhouette:
- Keep the body broad and relatively flat.
- Make the coral upper shell slightly deeper than the cream underside.
- Keep the eye stalks short and upright.
- Angle the pupils forward.
- Make the claws substantially larger than the walking legs.
- Leave a clear notch between each pair of pincer tips.
- Curve every walking leg instead of leaving it straight.
- Keep the legs arranged in a fan on each side.
- Let the cream stripe appear only as a small accent on the walking legs.
💡 Helpful Crochet Tips
Do not stuff the shell before joining the two halves. Joining first gives you much better control over the clean coral-and-cream seam.
Avoid overstuffing the walking legs. Too much stuffing will make them look stiff and cylindrical rather than naturally bent.
Pin all six walking legs before sewing any permanently. This makes it much easier to balance the crab.
When shaping the claws, the smaller finger should curve toward the large palm. If it points straight forward, the claw will look more like two separate tubes than a pincer.
Place the eye pupils slightly toward the front of the eyeballs before closing them. Their orientation is difficult to change afterward.
🧼 Care Instructions
Spot clean gently with a damp cloth.
Allow the crab to air dry completely.
Reshape the claws and legs while damp.
Avoid machine washing when safety eyes are used.
🌊 A Cheerful Little Ocean Companion
Sango is ready to scuttle into your handmade collection. 🦀💕
With a broad coral shell, contrasting cream belly, tall googly eyes, chunky curled pincers, and six softly striped walking legs, this little crab has a wonderfully playful silhouette while still being simple enough to display almost anywhere.
Make one for a beach-themed nursery, an ocean animal collection, summer décor, or simply as a tiny crochet friend with plenty of personality.
Happy crocheting! 🧶🌊