Bring the cunning and regal presence of Scar to life with this Amigurumi Scar crochet pattern! 🦁✨ With his sleek mane, piercing eyes, and unmistakable expression, this design captures the essence of the iconic Lion King villain in yarn form. Whether you’re crafting for a Disney fan, a themed décor piece, or simply love character-inspired amigurumi, this FREE pattern is a striking addition to your collection.
Designed for intermediate to advanced crocheters, this pattern allows for customization in fur textures, facial details, and even tiny accessories like a miniature throne or a dramatic pose to enhance Scar’s commanding personality. Choose classic deep oranges and blacks for an authentic look or experiment with bold hues for a creative twist! Whether displayed alongside Simba and Mufasa or gifted to a fellow crochet enthusiast, this amigurumi Scar is sure to impress. Grab your hook, select your favorite yarn, and let’s bring this legendary villain to life—one stitch at a time! 🧶✨
🦁 Amigurumi Scar (Lion King) Crochet Pattern
Bring the iconic villain of Pride Rock to life with this fierce and regal Scar amigurumi pattern! Featuring a detailed mane, intense embroidered eyes, and a dignified lion’s posture, this crochet lion is perfect for fans of The Lion King.
✨ Skill Level
Intermediate to Advanced
Includes structured body shaping, oval muzzle construction, detailed eye embroidery, and full radial loop mane attachment.
📏 Finished Size
Approx. 28–32 cm (11–12.5 inches) tall when seated
Using worsted weight yarn and a 3.5 mm hook.
🧶 Materials & Yarn Amount
Golden Ochre (main body & outer ears) – approx. 170 g
Cream (muzzle & paw bottoms) – approx. 75 g
Dark Golden Brown (mane loops & tail tuft) – approx. 130 g
Black (nose, brows, mouth) – approx. 15 g
Amber / Mustard (eye embroidery) – small amount
12 mm safety eyes (optional)
Polyester stuffing – approx. 350 g
3.5 mm crochet hook
Tapestry needle
Stitch marker
🧵 Abbreviations (US Terms)
MR – magic ring
sc – single crochet
inc – increase
dec – invisible decrease
ch – chain
sl st – slip stitch
FO – fasten off
Work in continuous rounds unless noted.
🦁 Head (Golden Ochre)
The head is wide and rounded with strong cheeks.
Round 1: MR, 6 sc (6)
Round 2: inc ×6 (12)
Round 3: (1 sc, inc) ×6 (18)
Round 4: (2 sc, inc) ×6 (24)
Round 5: (3 sc, inc) ×6 (30)
Round 6: (4 sc, inc) ×6 (36)
Round 7: (5 sc, inc) ×6 (42)
Round 8: (6 sc, inc) ×6 (48)
Rounds 9–17: sc around (48)
Insert 12 mm eyes between R11–12, spaced 8 stitches apart.
Round 18: (6 sc, dec) ×6 (42)
Round 19: (5 sc, dec) ×6 (36)
Round 20: (4 sc, dec) ×6 (30)
Round 21: (3 sc, dec) ×6 (24)
Stuff very firmly to keep the face broad and flat at front.
Round 22: (2 sc, dec) ×6 (18)
Round 23: (1 sc, dec) ×6 (12)
Round 24: dec ×6 (6)
FO and close.
🐽 Oval Muzzle (Cream)
The muzzle is slightly vertical and pronounced.
Ch 7.
Round 1: Starting in 2nd ch, sc 5, 3 sc in last st, working opposite side sc 4, inc (14)
Round 2: inc, sc 4, inc ×3, sc 4, inc ×2 (20)
Round 3: (3 sc, inc) ×5 (25)
Rounds 4–6: sc around (25)
Lightly stuff to keep rounded but not overly bulky.
Sew centered low on the face so upper edge sits just below eyes.
Embroider a solid triangular black nose and short vertical line down, finishing with a subtle curved mouth.
👂 Ears (Make 2)
Round 1: MR, 6 sc
Round 2: (1 sc, inc) ×3 (9)
Round 3: (2 sc, inc) ×3 (12)
Round 4: sc around (12)
Lightly stuff lower half only.
Flatten slightly and sew high on head, partially embedded into mane.
🧍 Body (Golden Ochre)
Compact, upright, slightly tapered at top.
Round 1: MR, 6 sc (6)
Round 2: inc ×6 (12)
Round 3: (1 sc, inc) ×6 (18)
Round 4: (2 sc, inc) ×6 (24)
Round 5: (3 sc, inc) ×6 (30)
Round 6: (4 sc, inc) ×6 (36)
Round 7: (5 sc, inc) ×6 (42)
Rounds 8–18: sc around (42)
Round 19: (5 sc, dec) ×6 (36)
Round 20: (4 sc, dec) ×6 (30)
Round 21: (3 sc, dec) ×6 (24)
Round 22: (2 sc, dec) ×6 (18)
Stuff extremely firmly to ensure seated stability.
Round 23: (1 sc, dec) ×6 (12)
Round 24: dec ×6 (6)
FO.
🐾 Front Legs (Make 2)
Start with Cream:
Round 1: MR, 6 sc
Round 2: inc ×6 (12)
Rounds 3–6: sc around (12)
Switch to Golden:
Rounds 7–22: sc around (12)
Stuff firmly, especially lower half.
Attach straight and vertical so paws rest directly under shoulders.
🐾 Large Back Paws (Make 2)
These are oversized and rounded, visible from front.
Start with Cream:
Round 1: MR, 6 sc
Round 2: inc ×6 (12)
Round 3: (1 sc, inc) ×6 (18)
Round 4: (2 sc, inc) ×6 (24)
Round 5: (3 sc, inc) ×6 (30)
Rounds 6–8: sc around (30)
Switch to Golden:
Rounds 9–16: sc around (30)
Round 17: (3 sc, dec) ×6 (24)
Round 18: (2 sc, dec) ×6 (18)
Round 19: (1 sc, dec) ×6 (12)
Stuff very firmly so paws remain round and structured.
Round 20: dec ×6 (6)
FO.
Attach low on body sides, angled outward so cream pads face forward.
🦁 Dense Loop Mane
The mane consists of tightly packed loop stitches worked directly around the head.
Join dark golden brown yarn at the base of the head near jawline.
Round 1 (Mane Base): sc evenly around head edge (approx. 60–70 sts)
Round 2 (Loop Round):
Ch 18, sl st in next st repeat around.
Round 3:
Ch 16, sl st in next st repeat around.
Round 4 (Optional inner layer):
Ch 14, sl st in next st repeat around.
Do not cut loops. Allow them to stand freely.
After completing all loop rounds, trim very slightly only if needed. The loops should form a thick, dense circular halo framing the face.
Gently finger-shape loops so they radiate evenly outward.
🦴 Tail
With Golden:
Ch 20
Row 1: sc in 2nd ch from hook and across (19)
Rows 2–3: sc across
Lightly stuff base if desired.
Attach centered at back.
For tuft:
Attach 15–18 dark brown strands to tip and trim into a compact tassel.
👁 Facial Expression
Embroider thick, sharply angled black brows slightly slanted downward toward center.
If embroidering eyes:
Work amber oval iris, black pupil, and tiny white highlight.
Keep expression intense but controlled.
🧩 Assembly Order
- Sew muzzle.
- Attach ears.
- Complete full loop mane.
- Attach head securely to body.
- Sew back paws first for balance.
- Attach front legs straight and aligned.
- Add tail and final embroidery.
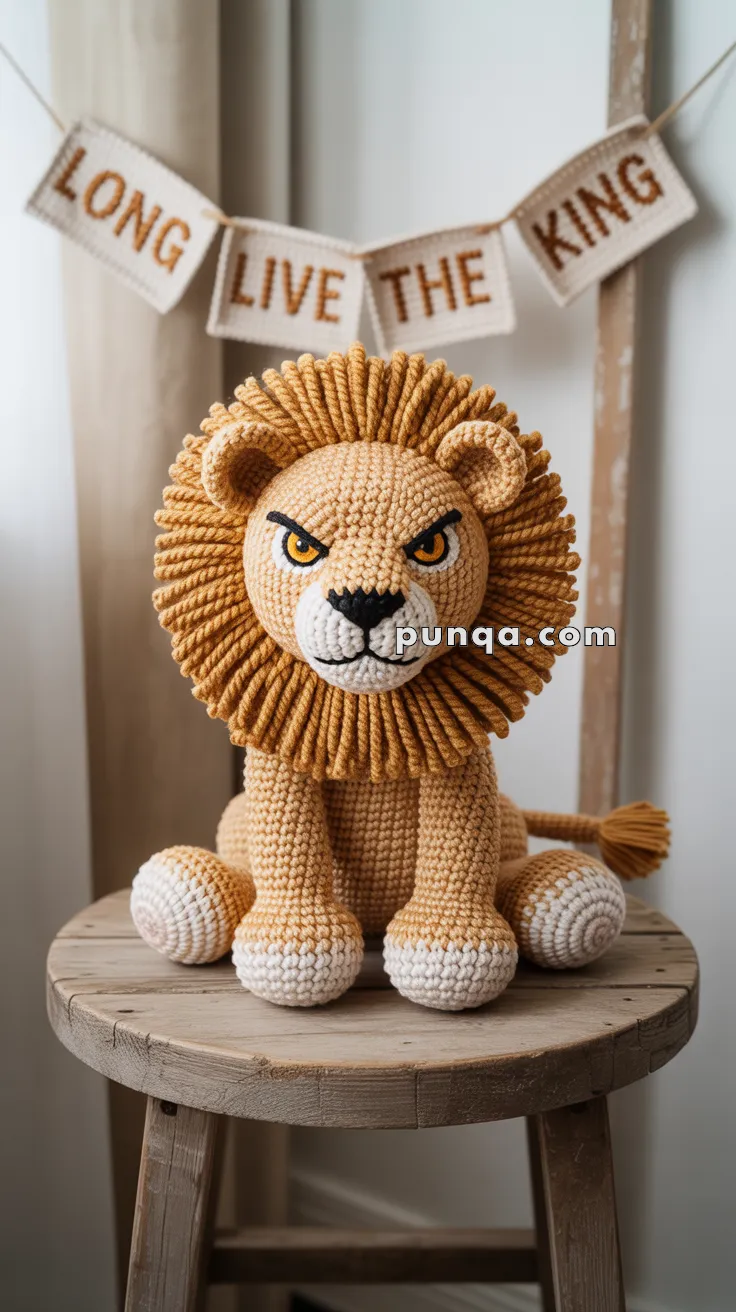
🦁 Finished Scar (Lion King) Amigurumi
This Scar amigurumi commands attention with his intense gaze and royal pose. Whether you’re recreating a Pride Rock scene or adding to your villain collection, this lion king is a bold statement piece for any crocheter! 🦁👑


So cute!!