Solve mysteries in stitches with this Amigurumi Scooby-Doo crochet pattern! Bringing the beloved Great Dane to life in yarn form, this pattern captures Scooby’s signature brown fur, floppy ears, and iconic blue collar with his golden dog tag. Whether you’re a longtime fan of the classic cartoon or simply love crafting character-inspired amigurumi, this FREE crochet pattern is a delightful addition to your collection.
Designed for intermediate crocheters, this pattern allows for customization in details like Scooby’s playful expression and stance. Add a tiny crocheted Scooby Snack for extra charm or pair him with other mystery-solving friends for a complete set! Grab your hook, select your favorite yarn, and let’s bring this lovable detective to life—one stitch at a time! 🧶🐶✨
🐾 Amigurumi Scooby-Doo Crochet Pattern
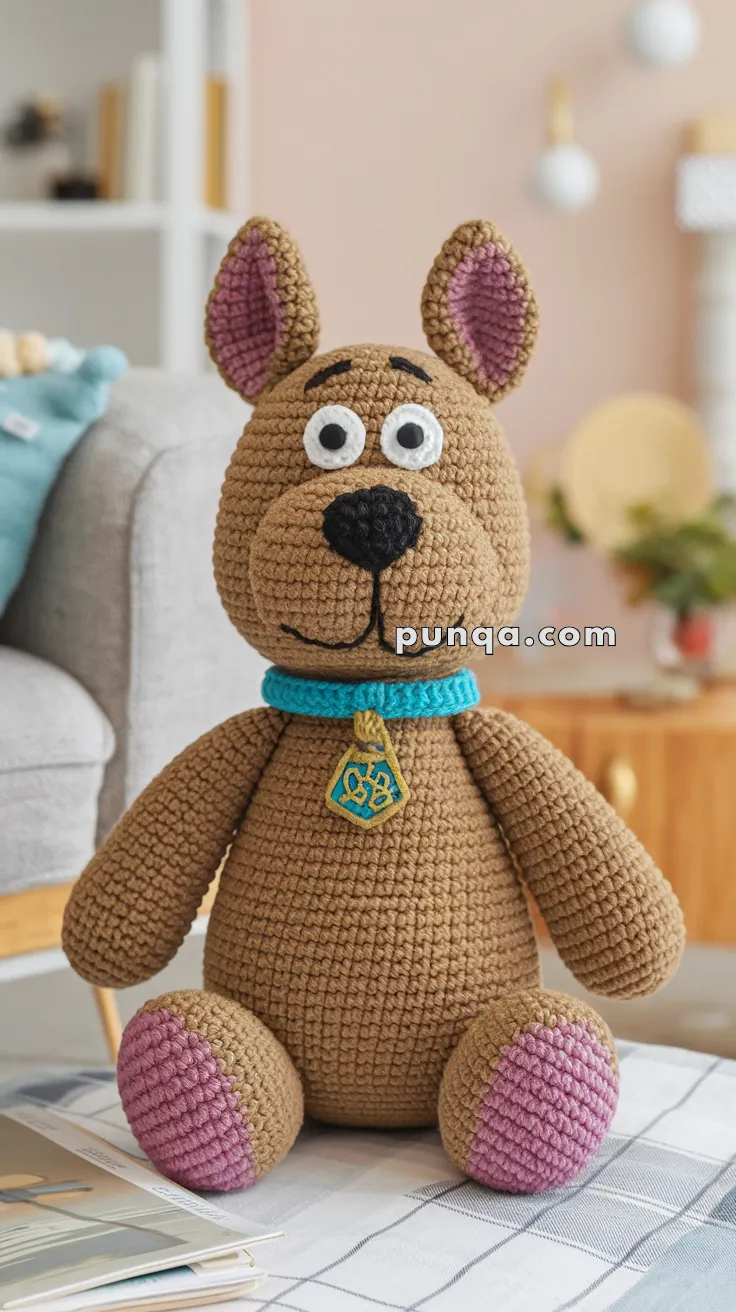
Scooby-Dooby-Doo, where are you? Right here — in the form of an adorable handmade amigurumi! This lovable version of the mystery-solving pup features his classic brown coat, blue collar, and signature SD tag. Perfect for fans of all ages!
✨ Skill Level
Intermediate
This pattern includes:
- 🧠 Large oval head shaping
- 👀 Layered crocheted eyes
- 👂 Tall lined ears
- 🐽 Raised muzzle construction
- 🐾 Oversized seated feet
- 💙 Separate collar and tag
- 🪡 Detailed assembly and embroidery
📏 Finished Size
Using worsted-weight yarn and a 3.5 mm crochet hook, the finished dog measures approximately:
32–35 cm (12½–13¾ inches) tall while seated
The final measurement may vary with yarn, hook size, tension, and stuffing.
🧶 Yarn Requirements
Use worsted-weight cotton, cotton-blend, or smooth acrylic yarn.
🤎 Warm Medium Brown — 240–260 g
🩷 Dusty Rose Pink — 35 g
🤍 White — 15 g
🖤 Black — 18 g
💙 Bright Turquoise — 22 g
💛 Mustard Gold — 8 g
Polyester fiberfill — approximately 250–300 g
🧵 Materials
- 3.5 mm crochet hook
- Two 10–12 mm black safety eyes, optional
- Polyester fiberfill
- Tapestry needle
- Stitch markers
- Pins
- Scissors
- Black embroidery thread
- Optional plastic pellets for sitting stability
- Optional plastic canvas for the foot soles
Safety eyes are not suitable for children under three years old. Use embroidered pupils when making the toy for a young child.
🔤 Abbreviations — US Terms
MR — Magic Ring
sc — Single Crochet
inc — Increase: 2 sc in one stitch
dec — Invisible Decrease
sl st — Slip Stitch
ch — Chain
hdc — Half Double Crochet
BLO — Back Loop Only
FLO — Front Loop Only
FO — Fasten Off
Work in continuous rounds unless instructed otherwise.
🧠 Head
The head is large, tall, and softly oval with a broad lower face.
Using warm brown yarn:
R1
MR 6.
(6)
R2
inc ×6.
(12)
R3
(1 sc, inc) ×6.
(18)
R4
(2 sc, inc) ×6.
(24)
R5
(3 sc, inc) ×6.
(30)
R6
(4 sc, inc) ×6.
(36)
R7
(5 sc, inc) ×6.
(42)
R8
(6 sc, inc) ×6.
(48)
R9
(7 sc, inc) ×6.
(54)
R10
(8 sc, inc) ×6.
(60)
R11–24
sc around.
(60)
Do not insert the eyes directly into the head. The layered eye pieces will be attached later.
R25
(8 sc, dec) ×6.
(54)
R26
(7 sc, dec) ×6.
(48)
R27
(6 sc, dec) ×6.
(42)
Begin stuffing firmly.
R28
(5 sc, dec) ×6.
(36)
R29
(4 sc, dec) ×6.
(30)
Continue stuffing, keeping the forehead rounded and the lower face full.
R30
(3 sc, dec) ×6.
(24)
R31
(2 sc, dec) ×6.
(18)
R32
(1 sc, dec) ×6.
(12)
R33
dec ×6.
(6)
FO and close.
Gently shape the head into a tall oval. Press the front lightly to create a stable surface for the muzzle and eyes.
🐽 Muzzle
The muzzle is a wide, softly padded oval made in the same brown as the head.
Using warm brown yarn:
R1
Ch 12.
Beginning in the second chain:
10 sc, 3 sc in the final chain.
Continue along the opposite side:
9 sc, inc.
(24)
R2
inc, 9 sc, 3 inc, 9 sc, 2 inc.
(30)
R3
sc around.
(30)
R4
(4 sc, inc) ×6.
(36)
R5–8
sc around.
(36)
R9
(4 sc, dec) ×6.
(30)
Lightly stuff.
FO, leaving a long sewing tail.
Position the muzzle across the lower half of the face. Its upper edge should sit just below the eyes.
Sew around the edge, adding a little extra stuffing before closing the final stitches.
👃 Nose
The nose is large, black, and softly triangular.
Using black yarn:
R1
MR 6.
(6)
R2
inc ×6.
(12)
R3
(1 sc, inc) ×6.
(18)
R4
sc around.
(18)
R5
(1 sc, dec) ×6.
(12)
Lightly stuff.
FO, leaving a long tail.
Flatten the upper edge and gently pinch the lower section into a rounded point.
Sew the nose to the upper center of the muzzle.
🙂 Mouth
Using black embroidery thread:
- Embroider one straight vertical line downward from the nose.
- From the bottom of this line, work a long shallow curve toward the left.
- Add a shorter curve toward the right.
The mouth should look friendly and slightly asymmetrical.
👀 Eye Whites — Make 2
The eyes are small white circles positioned close together above the muzzle.
Using white yarn:
R1
MR 6.
(6)
R2
inc ×6.
(12)
R3
(1 sc, inc) ×6.
(18)
FO, leaving a sewing tail.
Flatten each circle.
🖤 Pupils — Make 2
Using black yarn:
R1
MR 6.
(6)
R2
inc ×6.
(12)
FO.
Alternatively, insert a safety eye through the center of each white eye piece.
Position each pupil near the center of its white base.
Sew the completed eyes above the muzzle, leaving approximately one stitch between the inner edges.
🖤 Eyebrows
Using black yarn or embroidery thread, add one thick curved eyebrow above each eye.
Angle the inner ends slightly downward and the outer ends upward to create a curious expression.
👂 Outer Ears — Make 2
The ears are tall, narrow, and upright with softly pointed tips.
Using warm brown yarn:
R1
MR 6.
(6)
R2
inc ×6.
(12)
R3
(1 sc, inc) ×6.
(18)
R4
(2 sc, inc) ×6.
(24)
R5–15
sc around.
(24)
R16
(2 sc, dec) ×6.
(18)
R17–20
sc around.
(18)
R21
(1 sc, dec) ×6.
(12)
Do not stuff.
Flatten each ear and gently shape the upper edge into a soft point.
FO, leaving a long sewing tail.
🩷 Inner Ear Panels — Make 2
Using dusty pink yarn:
R1
Ch 16.
Beginning in the second chain:
14 sc, 3 sc in the final chain.
Continue along the opposite side:
13 sc, inc.
(32)
R2
sc around.
(32)
FO.
Flatten each panel into a narrow oval and sew it to the front of an outer ear, leaving a visible brown border.
🪡 Attaching the Ears
Position the ears high on the head.
They should:
- Stand nearly upright
- Angle slightly outward
- Sit well apart
- Frame the rounded crown
Sew firmly around each flattened base.
🧍 Body
The body is tall and pear-shaped, with broad hips and narrower shoulders.
Using warm brown yarn:
R1
MR 6.
(6)
R2
inc ×6.
(12)
R3
(1 sc, inc) ×6.
(18)
R4
(2 sc, inc) ×6.
(24)
R5
(3 sc, inc) ×6.
(30)
R6
(4 sc, inc) ×6.
(36)
R7
(5 sc, inc) ×6.
(42)
R8
(6 sc, inc) ×6.
(48)
R9
(7 sc, inc) ×6.
(54)
R10–22
sc around.
(54)
Begin stuffing firmly.
R23
(7 sc, dec) ×6.
(48)
R24–27
sc around.
(48)
R28
(6 sc, dec) ×6.
(42)
R29–32
sc around.
(42)
R33
(5 sc, dec) ×6.
(36)
R34–36
sc around.
(36)
R37
(4 sc, dec) ×6.
(30)
R38–39
sc around.
(30)
R40
(3 sc, dec) ×6.
(24)
Finish stuffing firmly, concentrating extra stuffing in the lower belly.
FO, leaving a long sewing tail.
💪 Arms — Make 2
The arms are long, thick, and gently tapered.
Using warm brown yarn:
R1
MR 6.
(6)
R2
inc ×6.
(12)
R3
(1 sc, inc) ×6.
(18)
R4
(2 sc, inc) ×6.
(24)
R5–10
sc around.
(24)
R11
(2 sc, dec) ×6.
(18)
R12–24
sc around.
(18)
R25
(4 sc, dec) ×3.
(15)
R26–28
sc around.
(15)
Stuff the rounded paw and lower arm firmly. Stuff the upper arm lightly.
Flatten the opening.
FO, leaving a long sewing tail.
🦶 Legs and Feet — Make 2
The legs are large rounded ovals with prominent pink sole panels.
Using warm brown yarn:
R1
Ch 12.
Beginning in the second chain:
10 sc, 3 sc in the final chain.
Continue along the opposite side:
9 sc, inc.
(24)
R2
inc, 9 sc, 3 inc, 9 sc, 2 inc.
(30)
R3
(4 sc, inc) ×6.
(36)
R4
(5 sc, inc) ×6.
(42)
R5–11
sc around.
(42)
R12
(5 sc, dec) ×6.
(36)
R13–17
sc around.
(36)
R18
(4 sc, dec) ×6.
(30)
R19–22
sc around.
(30)
R23
(3 sc, dec) ×6.
(24)
R24–26
sc around.
(24)
Stuff very firmly, keeping the front broad and the upper opening flatter.
FO, leaving a long sewing tail.
🩷 Paw Pads — Make 2
Using dusty pink yarn:
R1
Ch 10.
Beginning in the second chain:
8 sc, 3 sc in the final chain.
Continue along the opposite side:
7 sc, inc.
(20)
R2
inc, 7 sc, 3 inc, 7 sc, 2 inc.
(26)
R3–4
sc around.
(26)
FO, leaving a long tail.
Flatten each oval and sew it across the front-facing surface of a foot.
Leave a narrow brown border visible around the pink panel.
🐕 Tail
The tail is short, narrow, and only lightly stuffed.
Using warm brown yarn:
R1
MR 6.
(6)
R2
(1 sc, inc) ×3.
(9)
R3
(2 sc, inc) ×3.
(12)
R4–13
sc around.
(12)
R14
(2 sc, dec) ×3.
(9)
R15–18
sc around.
(9)
Stuff lightly.
FO, leaving a sewing tail.
Attach low on the back and curve it gently toward one side.
💙 Turquoise Collar
Using turquoise yarn:
Row 1
Ch enough stitches to fit snugly around the neck, approximately 42–46 chains.
Beginning in the second chain, sc across.
Rows 2–4
Ch 1, turn, sc across.
FO, leaving a sewing tail.
Wrap the collar around the neck and join the short ends at the back.
Tack it to the body at several points.
💛 Diamond Tag
Using mustard-gold yarn:
Row 1
Ch 2.
Work 2 sc in the second chain.
(2)
Row 2
Ch 1, turn, inc twice.
(4)
Row 3
Ch 1, turn, inc, 2 sc, inc.
(6)
Row 4
Ch 1, turn, inc, 4 sc, inc.
(8)
Row 5
Ch 1, turn, dec, 4 sc, dec.
(6)
Row 6
Ch 1, turn, dec, 2 sc, dec.
(4)
Row 7
Ch 1, turn, dec twice.
(2)
FO.
Work one round of sc around the tag if a thicker edge is desired.
💙 Tag Decoration
Using turquoise yarn, embroider a small stylized monogram or decorative paw-like symbol in the center.
Attach the tag beneath the collar with a short gold chain or several tight stitches.
🪡 Assembly
Attach the Head
Center the head on the upper body.
Add extra stuffing between the pieces if needed.
Sew firmly around the opening.
The head should sit upright with a gentle forward tilt.
Attach the Arms
Position the arms high on the sides of the body.
Angle them downward and slightly away from the belly.
Attach the Legs
Sew the large feet to the lower front sides of the body.
Angle them outward so the dog sits securely with both pink pads facing forward.
Attach the Tail
Sew the tail low on the back and curve it toward one side.
Add the Collar
Place the collar over the neck seam and center the tag beneath the chin.
✨ Final Shaping
- Shape the head into a tall oval.
- Keep the muzzle broad and softly rounded.
- Stand both ears upright.
- Center the eyes close together.
- Adjust the brows into matching curves.
- Rotate the feet outward evenly.
- Let the arms hang naturally beside the body.
- Center the collar and tag.
- Confirm that the dog sits without leaning.
Now you’ve got your own cuddly mystery-solving Scooby-Doo! 🐾🔍🦴