Get ready for some nutty fun with this Amigurumi Scrat from Ice Age crochet pattern! This lovable, acorn-obsessed saber-toothed squirrel is brought to life with wild eyes, a fluffy tail, and that signature frantic energy we all adore. Whether you’re a longtime fan of the Ice Age movies or just love quirky characters with big personalities, this pattern lets you stitch up a hilarious little critter who’s always chasing his next snack. 🐿️🧶🌰
Designed for expressive detail and playful charm, this pattern invites you to work with textured yarns, bold shaping, and fun extras like a tiny acorn or a stitched-on look of panic. Add poseable limbs, a dramatic tail swoosh, or even a snowy backdrop for full cinematic flair. Whether he’s perched on a shelf, gifted to a fellow movie buff, or just hanging out in your yarny herd, this Scrat Amigurumi is a wild and satisfying project—perfect for bringing a touch of handmade chaos to every stitch! 💖✨🎬
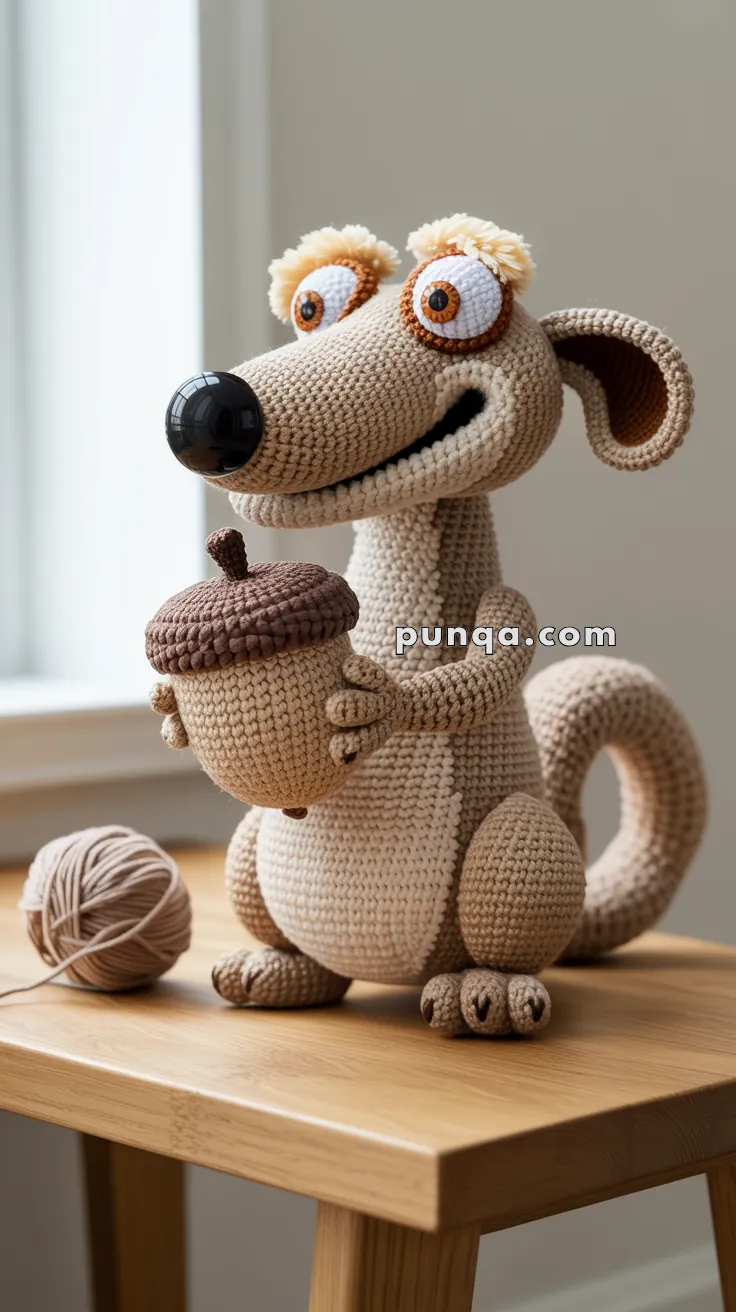
🐿️ Amigurumi Scrat with Acorn Crochet Pattern
Bring this wonderfully expressive prehistoric squirrel to life with a long sculpted snout, enormous raised eyes, fluffy brows, an open grin, oversized feet, a tightly curled tail, and—most importantly—his treasured acorn. 🌰
This design uses a broad pear-shaped body, a separate upright neck, a long tapered head and muzzle, layered eye pieces, dimensional hands and toes, and a heavily stuffed tail that curves into a large loop behind the body. The finished character sits independently while holding the acorn securely against his chest.
✨ Skill Level
Advanced
This pattern includes:
- 🐽 Long tapered muzzle shaping
- 😁 Separate upper and lower jaws
- 👁️ Layered dimensional eyes
- 👂 Double-layered ears
- ✋ Hands with individual fingers
- 🐾 Feet with three rounded toes
- 🌀 Large sculpted loop tail
- 🌰 Stuffed acorn with textured cap
- 🪡 Pose-based assembly
📏 Finished Size
Using DK or light-worsted yarn with a 3–3.25 mm hook, the finished character measures approximately:
- 32–36 cm (12½–14 in) tall
- 23–26 cm (9–10¼ in) wide including the tail
- Acorn: approximately 10–12 cm (4–4¾ in) tall
Finished dimensions will vary with yarn, hook size, tension, and stuffing.
🧶 Yarn Requirements
Use smooth DK cotton, cotton-blend, or acrylic yarn for clear shaping.
🤎 Warm Taupe or Mushroom Beige — 280–320 g
🤍 Cream — 95–115 g
⚪ White — 40–50 g
🟠 Rust or Golden Brown — 25–30 g
🟤 Dark Brown — 45–55 g
🌰 Light Acorn Brown — 65–75 g
💛 Pale Cream or Buttery Yellow — 18–25 g
🖤 Black — 15–20 g
Polyester fiberfill — approximately 450–550 g
🧵 Materials
- 3–3.25 mm crochet hook
- Two 14–16 mm black safety eyes, or crocheted pupils
- Polyester fiberfill
- Tapestry needle
- Stitch markers
- Pins for positioning
- Scissors
- Optional plastic pellets for body stability
- Optional 2 mm aluminum craft wire for the tail and arms
- Floral tape for wrapping wire
- Pet slicker brush for fluffy eyebrows
- Optional plastic canvas for the sitting base
Safety eyes and internal wire are not suitable for toys intended for very young children. Use embroidered eyes and omit wire when necessary.
🔤 Abbreviations — US Terms
MR — Magic Ring
sc — Single Crochet
inc — Increase: 2 sc in one stitch
dec — Invisible Decrease
sl st — Slip Stitch
ch — Chain
hdc — Half Double Crochet
dc — Double Crochet
BLO — Back Loop Only
FLO — Front Loop Only
FO — Fasten Off
Work in continuous rounds unless otherwise stated.
🐿️ Body
The body is broad, pear-shaped, and slightly flattened at the bottom for a stable seated pose.
Using warm taupe yarn:
R1
MR 6. (6)
R2
inc ×6. (12)
R3
(1 sc, inc) ×6. (18)
R4
(2 sc, inc) ×6. (24)
R5
(3 sc, inc) ×6. (30)
R6
(4 sc, inc) ×6. (36)
R7
(5 sc, inc) ×6. (42)
R8
(6 sc, inc) ×6. (48)
R9–19
sc around. (48)
Begin stuffing firmly.
R20
(6 sc, dec) ×6. (42)
R21–23
sc around. (42)
R24
(5 sc, dec) ×6. (36)
R25–27
sc around. (36)
R28
(4 sc, dec) ×6. (30)
R29–30
sc around. (30)
R31
(3 sc, dec) ×6. (24)
Finish stuffing, keeping the lower belly broad and firm.
FO, leaving a long sewing tail.
🤍 Belly Patch
Using cream yarn:
R1
Ch 13.
Starting in the second chain:
11 sc, 3 sc in the final chain, continue along the opposite side, 10 sc, inc. (26)
R2
inc, 10 sc, 3 inc, 10 sc, 2 inc. (32)
R3
sc around. (32)
R4
(4 sc, inc) ×6, 2 sc. (38)
R5–12
sc around. (38)
R13
(4 sc, dec) ×6, 2 sc. (32)
FO, leaving a long tail.
Flatten into a tall oval. Sew to the center front of the body, beginning below the neck and ending near the lower belly.
🦴 Neck
The long upright neck lifts the head above the body.
Using warm taupe yarn:
R1
MR 6. (6)
R2
inc ×6. (12)
R3
(1 sc, inc) ×6. (18)
R4
(2 sc, inc) ×6. (24)
R5–18
sc around. (24)
Stuff very firmly.
FO, leaving a long sewing tail.
Sew the lower end high on the body. Tilt the neck slightly backward so the muzzle can project forward without making the figure tip over.
🧠 Head
The head is elongated from front to back and supports the large eyes and ears.
Using warm taupe yarn:
R1
MR 6. (6)
R2
inc ×6. (12)
R3
(1 sc, inc) ×6. (18)
R4
(2 sc, inc) ×6. (24)
R5
(3 sc, inc) ×6. (30)
R6
(4 sc, inc) ×6. (36)
R7–14
sc around. (36)
R15
(4 sc, dec) ×6. (30)
R16–18
sc around. (30)
Begin stuffing firmly.
R19
(3 sc, dec) ×6. (24)
R20
(2 sc, dec) ×6. (18)
R21
(1 sc, dec) ×6. (12)
R22
dec ×6. (6)
FO and close.
Shape the head into a long oval, with the narrower end facing forward.
🐽 Long Upper Snout
The snout is worked from the nose end toward the head so it remains long and gradually widens.
Using warm taupe yarn:
R1
MR 6. (6)
R2
inc ×6. (12)
R3–5
sc around. (12)
R6
(1 sc, inc) ×6. (18)
R7–10
sc around. (18)
R11
(2 sc, inc) ×6. (24)
R12–17
sc around. (24)
R18
(3 sc, inc) ×6. (30)
R19–24
sc around. (30)
Stuff very firmly, keeping the end rounded and the upper surface smooth.
FO, leaving a long tail.
Pin the wide end to the lower front of the head. Angle the snout slightly upward and sew securely.
⚫ Large Nose
Using black yarn:
R1
MR 6. (6)
R2
inc ×6. (12)
R3
(1 sc, inc) ×6. (18)
R4–6
sc around. (18)
R7
(1 sc, dec) ×6. (12)
Stuff firmly.
R8
dec ×6. (6)
FO.
Sew to the tip of the snout. The nose should appear very large, round, and glossy-looking.
😁 Lower Jaw
Using cream yarn:
R1
Ch 15.
Starting in the second chain:
13 sc, 3 sc in the final chain, continue along the opposite side, 12 sc, inc. (30)
R2
inc, 12 sc, 3 inc, 12 sc, 2 inc. (36)
R3–5
sc around. (36)
R6
(4 sc, dec) ×6. (30)
Lightly stuff only the front and sides.
FO, leaving a long tail.
Flatten the upper opening and sew beneath the snout, leaving a narrow gap between the upper and lower jaws.
🖤 Mouth Interior
Using black yarn:
Ch 19.
Starting in the second chain, work 18 sc.
Work 2 additional rows of sc.
FO.
Sew the strip inside the gap between the jaws. Keep the black section visible from both sides to create the open smile.
👁️ Eye Whites — Make 2
Using white yarn:
R1
MR 6. (6)
R2
inc ×6. (12)
R3
(1 sc, inc) ×6. (18)
R4
(2 sc, inc) ×6. (24)
R5–7
sc around. (24)
R8
(2 sc, dec) ×6. (18)
Lightly stuff.
FO, leaving a long tail.
The eye whites should be thick domes rather than flat circles.
🟠 Iris Rings — Make 2
Using rust or golden-brown yarn:
R1
MR 6. (6)
R2
inc ×6. (12)
R3
(1 sc, inc) ×6. (18)
FO.
Sew one iris to the front of each white eye dome.
🖤 Pupils — Make 2
Using black yarn:
R1
MR 6. (6)
R2
inc ×6. (12)
FO.
Sew each pupil to the center of an iris, or place a safety eye through the iris and eye white before closing.
Add one tiny white embroidery stitch to each pupil for a highlight.
👀 Attaching the Eyes
Place the eyes very high and close together on top of the head.
The inner edges should nearly touch, while the lower edges overlap the base of the snout slightly.
Angle the pupils slightly inward.
Sew firmly around the back of each eye dome.
💛 Fluffy Eyebrows — Make 2
Using pale-yellow or cream brushable yarn:
Ch 10.
Work 2 sc in each chain beginning in the second chain.
FO.
Brush the curls lightly with a slicker brush.
Sew one eyebrow above each eye, letting the fibers fan upward and outward.
Alternatively, attach short strands of yarn directly above each eye using lark’s head knots and trim into fluffy tufts.
👂 Outer Ears — Make 2
The ears are large, oval, and cupped.
Using warm taupe yarn:
R1
Ch 12.
Starting in the second chain:
10 sc, 3 sc in the final chain, continue along the opposite side, 9 sc, inc. (24)
R2
inc, 9 sc, 3 inc, 9 sc, 2 inc. (30)
R3–5
sc around. (30)
FO.
Do not stuff.
🟤 Inner Ears — Make 2
Using dark-brown yarn:
R1
Ch 9.
Starting in the second chain:
7 sc, 3 sc in the final chain, continue along the opposite side, 6 sc, inc. (18)
R2
sc around. (18)
FO.
Sew one inner piece to each outer ear, leaving a taupe border.
Fold the outer ear gently into a cup and tack the base.
Sew the ears to the sides of the head, angled outward and slightly backward.
🦵 Haunches — Make 2
The large rear haunches sit on each side of the body.
Using warm taupe yarn:
R1
MR 6. (6)
R2
inc ×6. (12)
R3
(1 sc, inc) ×6. (18)
R4
(2 sc, inc) ×6. (24)
R5
(3 sc, inc) ×6. (30)
R6–10
sc around. (30)
R11
(3 sc, dec) ×6. (24)
R12
(2 sc, dec) ×6. (18)
Stuff firmly.
FO, leaving a long tail.
Sew one haunch to each lower side of the body.
🐾 Toes — Make 6
Using warm taupe yarn:
R1
MR 6. (6)
R2
inc ×6. (12)
R3–5
sc around. (12)
R6
dec ×6. (6)
Stuff firmly and close.
Sew three toes side by side in front of each haunch. The center toe should sit slightly farther forward.
🟤 Toe Claws
Using dark-brown embroidery yarn, work one short vertical stitch at the tip of each toe.
Pull the stitch slightly tight to form a shallow groove.
💪 Arms — Make 2
Using warm taupe yarn:
R1
MR 6. (6)
R2
inc ×6. (12)
R3
(1 sc, inc) ×6. (18)
R4–6
sc around. (18)
R7
(1 sc, dec) ×6. (12)
R8–19
sc around. (12)
Stuff lightly, leaving the upper arm flexible.
FO, leaving a long tail.
✋ Fingers — Make 6
Using warm taupe yarn:
R1
MR 5. (5)
R2–4
sc around. (5)
Lightly stuff.
FO.
Sew three fingers to the end of each arm. Curve them inward around the acorn.
Add a dark-brown claw stitch at each fingertip if desired.
🌀 Large Curled Tail
The tail is a thick, stuffed tube that bends into a large loop behind the body.
Using warm taupe yarn:
R1
MR 6. (6)
R2
inc ×6. (12)
R3
(1 sc, inc) ×6. (18)
R4
(2 sc, inc) ×6. (24)
R5–44
sc around. (24)
Stuff firmly as you work, but leave every fourth or fifth round slightly softer so the tube can bend.
R45
(2 sc, dec) ×6. (18)
R46
(1 sc, dec) ×6. (12)
R47
dec ×6. (6)
FO and close.
Curve the tail upward from the lower back, around into a large open loop, and downward again.
Tack the curved sections together with hidden stitches.
For additional support, insert a looped and taped craft-wire armature before closing.
🌰 Acorn Body
Using light acorn-brown yarn:
R1
MR 6. (6)
R2
inc ×6. (12)
R3
(1 sc, inc) ×6. (18)
R4
(2 sc, inc) ×6. (24)
R5
(3 sc, inc) ×6. (30)
R6–12
sc around. (30)
R13
(3 sc, dec) ×6. (24)
R14
(2 sc, dec) ×6. (18)
Begin stuffing firmly.
R15
(1 sc, dec) ×6. (12)
R16
dec ×6. (6)
FO and close.
Shape the lower end into a gently rounded point.
🟤 Acorn Cap
Using dark-brown yarn:
R1
MR 6. (6)
R2
inc ×6. (12)
R3
(1 sc, inc) ×6. (18)
R4
(2 sc, inc) ×6. (24)
R5
(3 sc, inc) ×6. (30)
R6
BLO sc around. (30)
R7–9
sc around. (30)
FO, leaving a long tail.
Fit the cap over the wide end of the acorn and sew it in place.
🌰 Acorn Stem
Using dark-brown yarn:
R1
MR 5. (5)
R2–6
sc around. (5)
Stuff very lightly or leave unstuffed.
FO and sew to the center of the cap.
🪡 Assembly
🧷 Attach the Neck and Head
Sew the neck to the upper body.
Attach the head to the top of the neck, tilting it slightly backward.
The muzzle should remain nearly horizontal.
🐽 Attach the Snout and Jaw
Sew the wide snout base to the front of the head.
Attach the lower jaw beneath it, keeping the black mouth interior visible.
Add hidden stitches at the corners of the mouth to hold the smile shape.
👁️ Add the Eyes, Brows, and Ears
Attach the large eyes high on the head.
Add the fluffy brows directly above them.
Sew the ears to the sides and angle them outward.
🐾 Attach the Haunches and Toes
Sew the haunches low on the body.
Attach three toes to each side so the character sits securely.
🌀 Attach the Tail
Sew the broad tail base low on the back.
Reinforce the join thoroughly, as the stuffed tail is heavy.
Tack the top of the loop to the upper back if extra stability is needed.
🌰 Position the Acorn
Place the acorn upright against the belly.
Pin both arms around it.
The hands should rest on opposite sides of the acorn, with the fingers curling toward the front.
Sew the shoulders to the upper body.
Add several hidden stitches between the palms and acorn so it cannot slip.
✨ Final Shaping
- Angle the nose slightly upward.
- Keep the eyes high and close together.
- Brush the eyebrows into uneven tufts.
- Curve the ears gently backward.
- Press the lower jaw upward at the corners to emphasize the grin.
- Position the three toes evenly on each foot.
- Make the tail loop broad and open.
- Tilt the acorn slightly toward the body.
- Adjust the hands so all fingers appear to grip naturally.
💡 Stability Tips
- Add plastic pellets to the lower body before stuffing.
- Keep the haunches and toes firmly stuffed.
- Reinforce the neck-to-body and tail-to-body seams.
- Tack the acorn to the belly beneath the hands.
- Use hidden stitches between the body and tail if the figure leans backward.
🧼 Care Instructions
Spot clean gently with a damp cloth.
Allow the figure to air dry completely.
Do not machine wash if wire, safety eyes, pellets, or plastic supports are used.
Brush the eyebrows lightly after storage to restore their fluffy texture.
🌰 Final Thoughts
Your acorn-loving prehistoric squirrel is now ready to guard his greatest treasure. 🐿️🌰
With his enormous raised eyes, fluffy brows, long rounded snout, open grin, cupped ears, plump belly, oversized toes, gripping fingers, and dramatic looped tail, this expressive amigurumi is full of comic personality.
Display him on a sturdy shelf, desk, or woodland-themed table and enjoy the determined little guardian of the most important acorn in the world.
Happy Crocheting! 🧶🐿️🌰