Drift into dreamland with this Amigurumi Sleepy Moon & Cloud Duo crochet pattern! Whether you’re crafting for nursery decor, a cozy bedtime companion, or simply love celestial-themed creations, this free pattern lets you stitch up a peaceful moon and its fluffy cloud friend. With soft textures, dreamy embroidered details, and a gentle, sleepy expression, this adorable duo adds a touch of serenity to your handmade collection. Perfect for gifts, hanging mobiles, or simply creating a soothing crochet project, these little celestial cuties bring warmth and whimsy to any space.
Designed for customization, this pattern allows you to play with pastel hues, subtle gradients, and tiny embellishments to make your moon and cloud truly special. Add twinkling stars, delicate blush accents, or even a miniature nightcap for an extra cozy touch! Whether displayed as part of a dreamy decor setup, gifted to a loved one, or crafted just for relaxation, this amigurumi Sleepy Moon & Cloud Duo is a heartwarming and enchanting project—one stitch at a time! 🌙☁️🧶✨
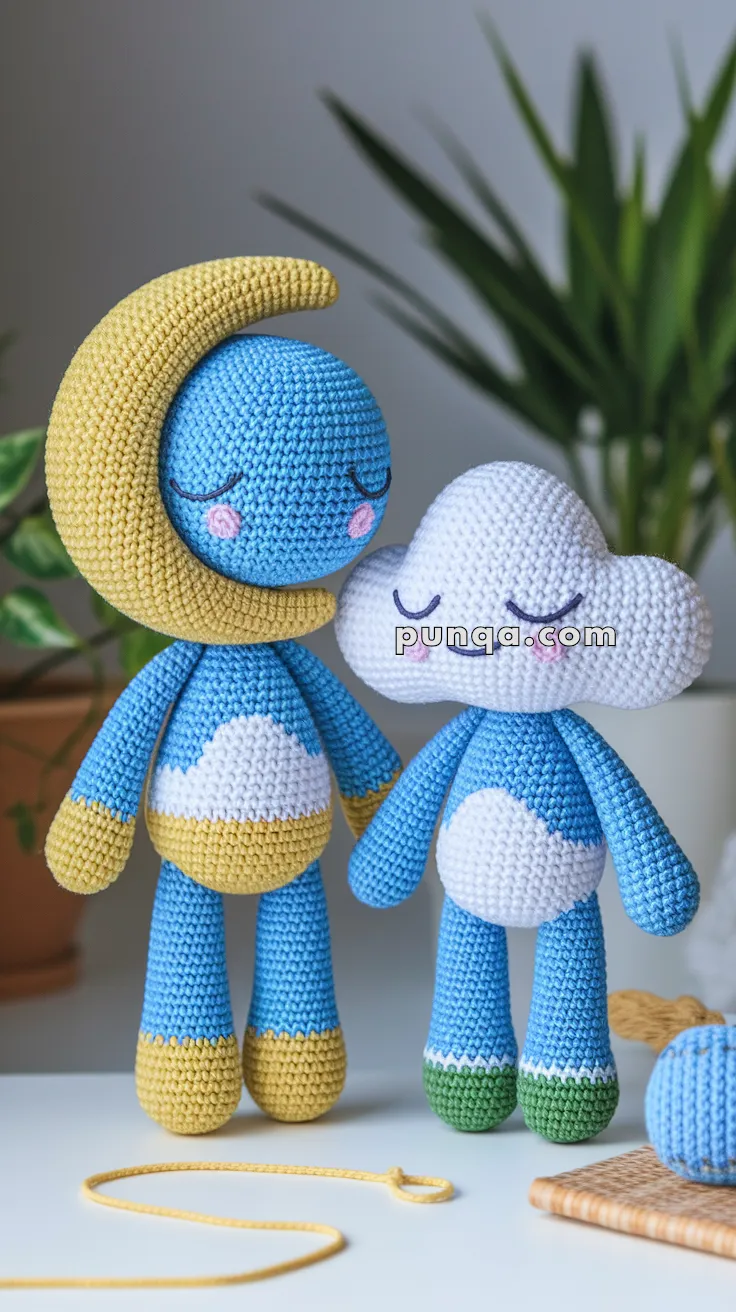
🌙 Sleepy Moon & Cloud Amigurumi Duo ☁️
Soft pastel colors, peaceful sleepy faces, oversized heads, and long dangling limbs make this celestial crochet pair irresistibly calming and cozy. This refined version features a much more accurate crescent moon shape, a properly proportioned cloud head, slimmer bodies, longer limbs, and rounded cloud belly patches that closely match the photographed dolls.
The moon doll has:
- a very large rounded blue head
- a thick crescent moon hugging the head
- slim elongated body and limbs
- mustard yellow hands and feet
- fluffy white cloud belly
The cloud doll features:
- a wide puffed cloud-shaped head
- tiny green feet
- long floppy arms
- rounded white cloud tummy
- a smaller body than the moon doll
Both dolls use minimalist embroidered sleepy expressions and soft blush details for a dreamy nursery aesthetic. ✨
✨ Skill Level
Intermediate
Techniques included:
- shaping
- curved construction
- appliqué sewing
- embroidery
- multi-piece joining
- color changes
📏 Finished Size
🌙 Moon Doll
Approx. 33–36 cm (13–14 in) tall
☁️ Cloud Doll
Approx. 24–27 cm (9.5–10.5 in) tall
Using DK cotton yarn and a 2.5–3 mm crochet hook.
🧶 Yarn Requirements
Sky Blue Yarn
Approx. 110 g
Used for:
- moon head
- both bodies
- arms
- legs
White Yarn
Approx. 80 g
Used for:
- cloud head
- belly appliqués
Mustard Yellow Yarn
Approx. 65 g
Used for:
- crescent moon
- moon doll hands
- moon doll feet
Sage Green Yarn
Approx. 15 g
Used for:
- cloud doll feet
Pink Yarn
Small amount
Used for:
- blush cheeks
Dark Brown or Navy Yarn
Small amount
Used for:
- facial embroidery
🧵 Supplies
- 2.5–3 mm crochet hook
- Polyester stuffing
- Yarn needle
- Stitch markers
- Scissors
🔤 Abbreviations (US Terms)
- MR – magic ring
- sc – single crochet
- inc – increase
- dec – invisible decrease
- sl st – slip stitch
- ch – chain
- FO – fasten off
Work in continuous spirals unless noted.
☁️ Cloud Doll
☁️ Cloud Head
The cloud head is made from three rounded puff sections joined together to create the wide cloud silhouette visible from the front.
The center puff is slightly larger than the side puffs.
Center Puff
With White Yarn
R1
MR 6 sc (6)
R2
inc x6 (12)
R3
(sc, inc) x6 (18)
R4
(2 sc, inc) x6 (24)
R5
(3 sc, inc) x6 (30)
R6
(4 sc, inc) x6 (36)
R7–11
sc around (36)
FO.
Side Puffs (Make 2)
Repeat R1–R10.
Do not FO on second side puff.
☁️ Joining the Cloud Shape
Join one side puff to the center puff with:
- 8 sc through both layers
Continue crocheting around both pieces.
Attach third puff to opposite side the same way.
Joining Round
sc evenly around all joined sections
Approximate stitch count:
84–90 sts
Next 4 Rounds
sc evenly around
Shaping Round
(11 sc, dec) repeat around
Continue decreasing gradually over the next 3 rounds while maintaining:
- rounded side lobes
- soft top curve
- flatter lower edge
Stuff firmly while shaping.
The finished head should:
- be much wider than the body
- have three visible puff sections
- appear fluffy and rounded
- sit slightly flattened underneath
FO and close neatly.
😊 Cloud Face
Using dark brown or navy yarn:
embroider:
- thin curved sleepy eyes
- tiny curved smile
Using pink yarn:
embroider soft blush ovals beneath the eyes.
The facial features should remain very small and minimal.
🩵 Cloud Body
The cloud body is intentionally tiny compared to the oversized head.
With Sky Blue Yarn
R1
MR 6 sc (6)
R2
inc x6 (12)
R3
(sc, inc) x6 (18)
R4
(2 sc, inc) x6 (24)
R5–13
sc around (24)
R14
(2 sc, dec) x6 (18)
Stuff firmly but keep the body slim.
R15–17
sc around (18)
FO leaving long tail.
The body should appear narrow and elongated.
☁️ Cloud Belly Appliqué
The belly patch is rounded with soft cloud-like upper curves rather than a plain oval.
With White Yarn
R1
MR 6
R2
inc x6 (12)
R3
(sc, inc) x6 (18)
R4
(2 sc, inc) x6 (24)
R5
(3 sc, inc) x6 (30)
R6
Work:
- sl st
- ch 2 picot
- sl st
across upper edge to create gentle cloud bumps
FO.
Flatten lightly and sew centered on tummy.
The patch should sit high on the body.
💪 Cloud Arms (Make 2)
The cloud doll has very long floppy arms.
With Sky Blue Yarn
R1
MR 6
R2
(sc, inc) x3 (9)
R3–21
sc around (9)
Stuff only the top few rounds.
Leave the remainder soft and floppy.
FO.
🦵 Cloud Legs (Make 2)
Start With Sage Green
R1
MR 6
R2
inc x6 (12)
R3–5
sc around (12)
Switch to Sky Blue.
R6–20
sc around (12)
Stuff lightly.
FO.
The green feet should remain very small compared to the legs.
🌙 Moon Doll
🌙 Moon Head
The moon doll head is extremely large, smooth, and perfectly round.
With Sky Blue Yarn
R1
MR 6 sc (6)
R2
inc x6 (12)
R3
(sc, inc) x6 (18)
R4
(2 sc, inc) x6 (24)
R5
(3 sc, inc) x6 (30)
R6
(4 sc, inc) x6 (36)
R7
(5 sc, inc) x6 (42)
R8
(6 sc, inc) x6 (48)
R9
(7 sc, inc) x6 (54)
R10
(8 sc, inc) x6 (60)
R11–22
sc around (60)
R23
(8 sc, dec) x6 (54)
R24
(7 sc, dec) x6 (48)
Stuff very firmly.
R25
(6 sc, dec) x6 (42)
R26
(5 sc, dec) x6 (36)
R27
(4 sc, dec) x6 (30)
R28
(3 sc, dec) x6 (24)
R29
(2 sc, dec) x6 (18)
R30
(sc, dec) x6 (12)
R31
dec x6 (6)
FO and close.
The finished head should remain extremely spherical and oversized.
😊 Moon Face
Using dark brown or navy yarn:
embroider:
- long curved sleepy eyelids
- tiny curved smile
Using pink yarn:
embroider soft blush circles beneath eyes.
Keep the face tiny and delicate relative to the large head.
🌙 Crescent Moon
The crescent moon is thick, plush, and wraps tightly around the side of the moon head.
It should:
- extend above the head
- curve beneath the chin
- remain thick and rounded
- taper smoothly at both ends
First Crescent Piece
With Mustard Yellow Yarn
R1
MR 6
R2
inc x6 (12)
R3
(sc, inc) x6 (18)
R4
(2 sc, inc) x6 (24)
R5
(3 sc, inc) x6 (30)
R6–34
sc around (30)
FO.
Second Crescent Piece
Repeat exactly.
🌙 Joining the Crescent
Place both crescent pieces together.
Sc evenly around outer edges joining them.
Stuff lightly during joining.
Shape carefully into a smooth crescent.
The crescent should:
- hug the head closely
- remain thick and plush
- curve inward naturally
Sew securely around the left side of the face.
🩵 Moon Body
The moon body is taller and slimmer than the cloud body.
With Sky Blue Yarn
R1
MR 6
R2
inc x6 (12)
R3
(sc, inc) x6 (18)
R4
(2 sc, inc) x6 (24)
R5–17
sc around (24)
R18
(2 sc, dec) x6 (18)
Stuff firmly.
R19–21
sc around (18)
FO.
☁️ Moon Belly Cloud
With White Yarn
R1
MR 6
R2
inc x6 (12)
R3
(sc, inc) x6 (18)
R4
(2 sc, inc) x6 (24)
R5
(3 sc, inc) x6 (30)
Add tiny cloud bumps across the top edge using:
- sl st
- ch 2 picot
- sl st
FO.
Flatten slightly and sew centered on tummy.
💪 Moon Arms (Make 2)
Start With Mustard Yellow
R1
MR 6
R2
(sc, inc) x3 (9)
R3–5
sc around (9)
Switch to Sky Blue.
R6–23
sc around (9)
Stuff lightly only near shoulder area.
FO.
🦵 Moon Legs (Make 2)
Start With Mustard Yellow
R1
MR 6
R2
inc x6 (12)
R3–6
sc around (12)
Switch to Sky Blue.
R7–25
sc around (12)
Stuff lightly.
FO.
The legs should appear noticeably longer than the cloud doll legs.
🪡 Assembly
Step 1
Attach heads securely to bodies.
Step 2
Attach arms low beside shoulders.
Allow them to hang naturally.
Step 3
Attach legs evenly beneath bodies.
The dolls should stand with slightly dangling limbs.
Step 4
Sew cloud-shaped belly appliqués centered on torsos.
Step 5
Attach crescent moon tightly around moon doll head.
The lower point should curve beneath the chin.
Step 6
Embroider sleepy faces and blush details.
✨ Final Shaping Tips
- Stuff heads very firmly
- Keep limbs lightly stuffed
- Shape cloud lobes carefully
- Curve crescent inward tightly around face
- Keep embroidery minimal
- Steam lightly if needed
🌟 Finished Sleepy Duo
Your finished celestial duo features:
- oversized dreamy heads
- long dangling limbs
- soft nursery-inspired colors
- fluffy cloud shaping
- plush crescent moon framing
- rounded cloud appliqués
- delicate sleepy embroidery
- whimsical balanced proportions
Together they create a peaceful bedtime aesthetic perfect for nursery décor, baby gifts, cozy shelf displays, and dreamy handmade collections. 🌙☁️✨