Get ready to crochet a classic with the Amigurumi Snoopy, a heartwarming project that brings everyone’s favorite beagle to life in yarn form! 🐾🧶 With his floppy ears, iconic black-and-white coat, and laid-back charm, Snoopy is the perfect companion for Peanuts fans of all ages. Whether he’s lounging atop his doghouse or dancing with joy, this cuddly version captures all the whimsy and nostalgia of the beloved comic strip character.
Perfect for crocheters who love character-inspired designs and timeless appeal, this pattern invites you to stitch up a little piece of cartoon history. Add a red collar, pose him with Woodstock, or even create a mini aviator outfit for extra flair. Whether gifted to a lifelong fan or kept as a cozy desk buddy, the Amigurumi Snoopy is a delightful way to stitch up smiles—one iconic loop at a time! 🧵❤️
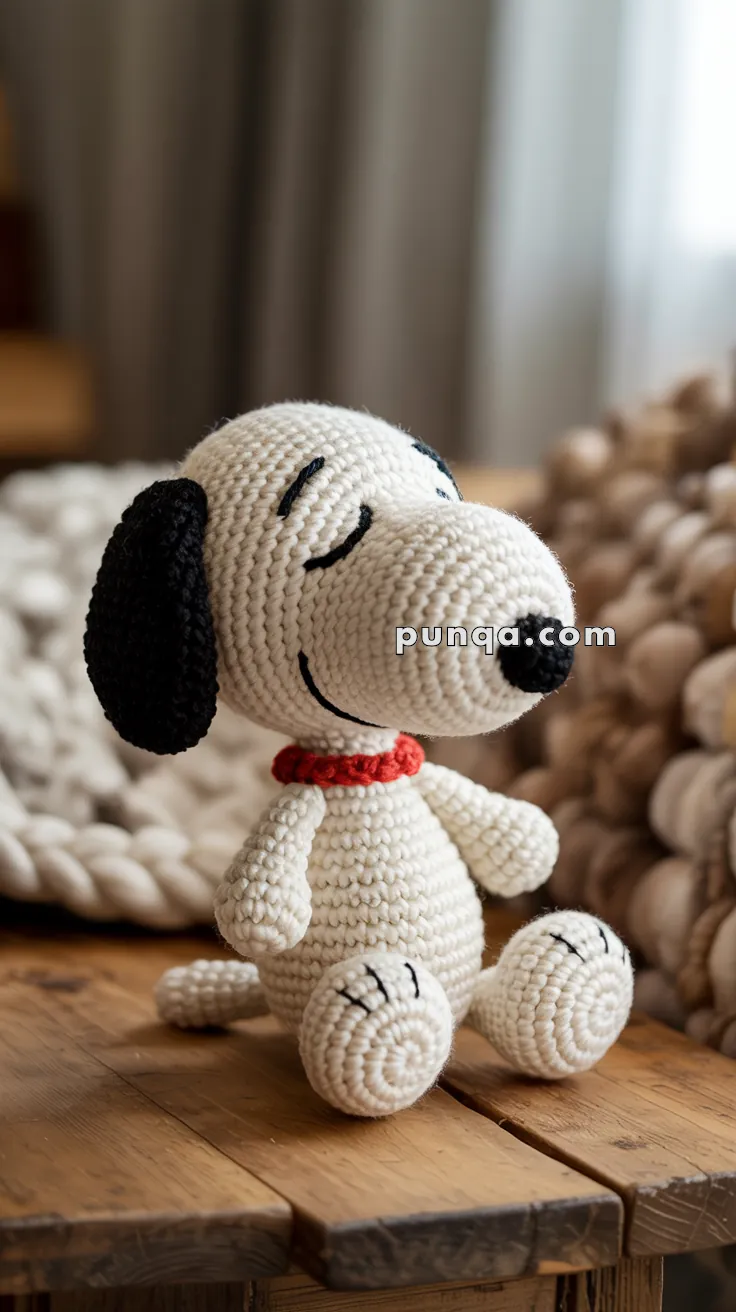
🐾 Crochet Snoopy Amigurumi Pattern
Create a lovable seated Snoopy with a softly rounded head, an extra-long sculpted muzzle, floppy black ears, a tiny sleepy expression, oversized oval feet, short relaxed arms, and a bright red collar. 🐶❤️
This design uses compact cartoon proportions: the head and muzzle dominate the silhouette, while the pear-shaped body, forward-facing feet, and small tail create a stable seated pose. The muzzle is worked separately from its narrow nose end toward a wide facial opening, then shaped during assembly to achieve the distinctive long, gently lifted profile.
✨ Skill Level
Intermediate
This pattern includes:
- Working in continuous rounds
- Invisible increases and decreases
- Elongated muzzle shaping
- Light facial sculpting
- Flat floppy-ear construction
- Oversized oval feet
- Embroidered facial details
- Multi-piece assembly
📏 Finished Size
Using sport-weight cotton yarn with a 2.5–2.75 mm crochet hook, the finished dog measures approximately:
- 20–22 cm (8–8¾ in) tall while seated
- 17–19 cm (6¾–7½ in) from the back of the head to the nose
- 13–15 cm (5–6 in) wide across the feet
The finished size may vary depending on yarn, hook size, tension, and stuffing.
🧶 Yarn Requirements
Use sport-weight cotton, cotton-blend, or smooth acrylic yarn.
- 🤍 White — 120–140 g
- 🖤 Black — 22–28 g
- ❤️ Red — 8–10 g
Polyester fiberfill — approximately 90–120 g
🧵 Materials
- 2.5–2.75 mm crochet hook
- Polyester fiberfill
- Tapestry needle
- Fine embroidery needle
- Stitch markers
- Pins for positioning
- Scissors
- Black embroidery thread
- Optional plastic pellets for sitting stability
- Optional plastic canvas for reinforcing the feet
No safety eyes are required because the facial features are embroidered.
🔤 Abbreviations — US Terms
- MR — Magic Ring
- sc — Single Crochet
- inc — Increase: 2 sc in the same stitch
- dec — Invisible Decrease
- sl st — Slip Stitch
- ch — Chain
- hdc — Half Double Crochet
- BLO — Back Loop Only
- FLO — Front Loop Only
- FO — Fasten Off
Work in continuous rounds unless instructed otherwise.
🧠 Head
The head is a large rounded oval with a broad forehead and enough depth to support the long muzzle.
Using white yarn:
R1
MR 6. (6)
R2
inc ×6. (12)
R3
(1 sc, inc) ×6. (18)
R4
(2 sc, inc) ×6. (24)
R5
(3 sc, inc) ×6. (30)
R6
(4 sc, inc) ×6. (36)
R7
(5 sc, inc) ×6. (42)
R8
(6 sc, inc) ×6. (48)
R9
(7 sc, inc) ×6. (54)
R10–20
sc around. (54)
R21
(7 sc, dec) ×6. (48)
R22
(6 sc, dec) ×6. (42)
R23
(5 sc, dec) ×6. (36)
Begin stuffing firmly.
R24
(4 sc, dec) ×6. (30)
R25
(3 sc, dec) ×6. (24)
Continue stuffing, keeping the forehead full and the lower front slightly flatter.
R26
(2 sc, dec) ×6. (18)
R27
(1 sc, dec) ×6. (12)
R28
dec ×6. (6)
FO and close.
Shape the head into a tall oval. The face should remain smooth, while the back of the head stays fully rounded.
🐽 Long Sculpted Snout
The snout is the most important shaping element. It begins at the narrow nose end and widens gradually toward the head, creating a long tapered muzzle rather than a short round protrusion.
Using white yarn:
R1
MR 6. (6)
R2
inc ×6. (12)
R3
(1 sc, inc) ×6. (18)
R4–6
sc around. (18)
These rounds form the narrow front section beneath the nose.
R7
(2 sc, inc) ×6. (24)
R8–12
sc around. (24)
R13
(3 sc, inc) ×6. (30)
R14–18
sc around. (30)
R19
(4 sc, inc) ×6. (36)
R20–22
sc around. (36)
FO, leaving a very long sewing tail.
Do not close the opening.
🪡 Stuffing and Shaping the Snout
Stuff the snout in stages.
Nose End
Stuff the first six rounds firmly. This keeps the nose end rounded and prevents it from collapsing beneath the black nose.
Middle Section
Stuff Rounds 7–18 moderately firmly. Roll the piece gently between your palms so it becomes a smooth elongated cylinder.
Head End
Stuff the final four rounds more lightly. The wide opening must remain flexible enough to spread against the front of the head.
The finished snout should measure approximately 8–9 cm (3¼–3½ in) long before attachment.
📍 Positioning the Snout
Place the wide opening horizontally across the lower front of the head.
The center of the snout should sit approximately between Head Rounds 15 and 23.
Pin the upper edge first.
The muzzle should:
- Project almost straight forward
- Tilt very slightly upward at the nose
- Sit wider at its base than at its tip
- Remain lower than the embroidered eyes
- Extend well beyond the head profile
Before sewing, check the shape from the front, both sides, and above.
🧵 Sewing the Snout
Sew the upper half of the opening to the head first.
As you sew, spread the final snout round into a broad oval rather than keeping it circular.
Add extra stuffing through the lower opening if necessary.
Sew the lower edge to the head, allowing it to sit slightly farther forward than the upper edge. This creates a softly dropped lower muzzle.
Do not pull the stitches too tightly. Tight sewing can shorten the snout or make the base look pinched.
🪡 Snout Sculpting
Using a long strand of white yarn:
- Insert the needle beneath the snout near the head.
- Bring it out beneath the nose end.
- Return the needle to the starting point.
- Pull gently and knot securely.
This creates a subtle upward curve along the muzzle.
For a flatter lower surface, add a second sculpting stitch running from one side of the muzzle base to the other beneath the snout.
The result should be elongated, smooth, and gently lifted rather than sharply pointed.
🤍 Lower Jaw Pad
The small lower jaw adds depth beneath the muzzle and helps define the smiling mouth.
Using white yarn:
R1
Ch 9.
Starting in the second chain:
7 sc, 3 sc in the final chain.
Continue along the opposite side:
6 sc, inc. (18)
R2
inc, 6 sc, 3 inc, 6 sc, 2 inc. (24)
R3–4
sc around. (24)
FO, leaving a long tail.
Add only a thin layer of stuffing.
Flatten the piece into a shallow oval.
Sew it beneath the back half of the snout. Its front edge should remain tucked behind the nose end, while the lower curve remains visible from the side.
👃 Black Nose
The nose is a rounded black oval positioned at the very end of the snout.
Using black yarn:
R1
MR 6. (6)
R2
inc ×6. (12)
R3
(1 sc, inc) ×6. (18)
R4–5
sc around. (18)
R6
(1 sc, dec) ×6. (12)
Stuff firmly.
R7
dec ×6. (6)
FO and close.
Shape the nose into a rounded horizontal oval.
Sew it to the snout tip, slightly above center. Leave a narrow white edge visible below it.
👄 Smile
Using black embroidery thread:
- Begin approximately halfway along one side of the muzzle.
- Work a long shallow curved stitch toward the lower rear edge.
- Add a shorter curved stitch near the opposite side if desired.
The smile should sit on the side of the snout rather than directly beneath the nose.
Keep it thin and relaxed.
👀 Sleepy Face
The expression combines one gently closed eye with one small visible eye.
Closed Eye
Using black embroidery thread, stitch a shallow downward curve above the snout on one side.
Add one tiny outer lash if desired.
Open Eye
On the opposite side, embroider a small vertical oval or short thick stitch.
Place it slightly higher than the closed eye to account for the three-quarter expression.
Eyebrows
Add one short curved eyebrow above each eye.
The eyebrows should be fine and slightly angled.
👂 Black Ears — Make 2
The ears are broad, long, flat, and completely unstuffed.
Using black yarn:
R1
Ch 11.
Starting in the second chain:
9 sc, 3 sc in the final chain.
Continue along the opposite side:
8 sc, inc. (22)
R2
inc, 8 sc, 3 inc, 8 sc, 2 inc. (28)
R3–11
sc around. (28)
R12
(5 sc, dec) ×4. (24)
R13–15
sc around. (24)
R16
(4 sc, dec) ×4. (20)
R17–18
sc around. (20)
FO, leaving a long sewing tail.
Flatten the ears completely.
Do not stuff them.
🪡 Attaching the Ears
Position one ear on each side of the head between approximately Head Rounds 8 and 15.
The upper edge should sit slightly behind the eye line.
Sew across the narrow upper section only, allowing the rest of the ear to hang freely.
Angle the ears slightly backward so they lie against the sides of the head.
The ears should reach approximately to the lower edge of the head.
🧍 Body
The body is a softly rounded pear shape with a narrower neck and full seated belly.
Using white yarn:
R1
MR 6. (6)
R2
inc ×6. (12)
R3
(1 sc, inc) ×6. (18)
R4
(2 sc, inc) ×6. (24)
R5
(3 sc, inc) ×6. (30)
R6
(4 sc, inc) ×6. (36)
R7
(5 sc, inc) ×6. (42)
R8–16
sc around. (42)
Begin stuffing firmly.
R17
(5 sc, dec) ×6. (36)
R18–20
sc around. (36)
R21
(4 sc, dec) ×6. (30)
R22–23
sc around. (30)
R24
(3 sc, dec) ×6. (24)
R25
(2 sc, dec) ×6. (18)
Finish stuffing, keeping the lower belly broad.
FO, leaving a long tail for attaching the head.
💪 Arms — Make 2
The arms are short, softly tapered, and rounded at the paws.
Using white yarn:
R1
MR 6. (6)
R2
inc ×6. (12)
R3
(1 sc, inc) ×6. (18)
R4–6
sc around. (18)
R7
(4 sc, dec) ×3. (15)
R8–13
sc around. (15)
R14
(3 sc, dec) ×3. (12)
R15
sc around. (12)
Stuff the paw lightly.
Leave the upper arm almost unstuffed so it hangs naturally.
Flatten the opening.
FO, leaving a sewing tail.
🦶 Oversized Feet — Make 2
The feet are large horizontal ovals with rounded toes.
Using white yarn:
R1
Ch 10.
Starting in the second chain:
8 sc, 3 sc in the final chain.
Continue along the opposite side:
7 sc, inc. (20)
R2
inc, 7 sc, 3 inc, 7 sc, 2 inc. (26)
R3
(3 sc, inc) ×6, 2 sc. (32)
R4
(4 sc, inc) ×6, 2 sc. (38)
R5–9
sc around. (38)
R10
(4 sc, dec) ×6, 2 sc. (32)
R11
(3 sc, dec) ×6, 2 sc. (26)
Stuff firmly, keeping the front broad and rounded.
R12
(2 sc, dec) ×6, 2 sc. (20)
FO, leaving a long sewing tail.
Flatten the rear opening while keeping the toe end fully rounded.
Optional: insert a small plastic-canvas oval inside the sole.
🖤 Toe Lines
Using black embroidery thread, stitch three short curved lines across the top front of each foot.
Space them evenly.
Pull the stitches only slightly so the feet remain smooth and plump.
🐕 Tail
The tail is short, narrow, and lies along the display surface behind the body.
Using white yarn:
R1
MR 6. (6)
R2
(1 sc, inc) ×3. (9)
R3–8
sc around. (9)
R9
(1 sc, dec) ×3. (6)
R10–11
sc around. (6)
Stuff very lightly.
FO, leaving a sewing tail.
Curve the tail gently and attach it low on the back.
❤️ Red Collar
Using red yarn:
Ch enough stitches to fit snugly around the neck, approximately 34–38 chains.
Join without twisting.
R1–2
sc around.
FO.
Place the collar over the head-to-body seam and sew it at several points.
The collar should look narrow and slightly raised.
🪡 Assembly
Attach the Head
Center the head over the narrow body opening.
Because the muzzle is long and front-heavy, tilt the head slightly backward before sewing.
Add extra stuffing between the pieces if necessary.
Sew around the neck opening several times.
The red collar will cover the seam.
Attach the Arms
Position the arms high on the body just beneath the collar.
Angle them downward and slightly forward.
Sew securely across each flattened upper opening.
Attach the Feet
Place the feet low on the front sides of the body.
Angle them forward and slightly outward.
The broad toe ends should rest completely on the display surface.
Sew the flattened rear openings to the lower body.
Add one hidden stitch between each foot and the body if extra support is needed.
Attach the Tail
Sew the tail low on the back.
Curve it toward one side so the tip remains visible beside the body.
Add the Collar
Wrap the collar around the neck seam and join it at the back.
Center it beneath the head.
✨ Final Shaping
- Keep the head large and rounded.
- Let the long muzzle project well beyond the face.
- Tilt the muzzle slightly upward.
- Keep the nose centered and rounded.
- Allow the lower jaw to remain visible beneath the snout.
- Let the ears hang flat against the sides.
- Angle the head slightly backward to balance the muzzle.
- Turn the arms inward gently.
- Position the oversized feet well forward.
- Keep the red collar narrow and level.
- Check that the dog sits securely without tipping.
💡 Helpful Tips
- Pin the snout carefully before sewing it permanently.
- Check the muzzle from several angles during assembly.
- Stuff the snout firmly at the nose end and more softly near the head.
- Reinforce the head-to-body seam because the muzzle adds weight.
- Keep the ears completely unstuffed.
- Use fine embroidery thread for the facial features.
- Stuff the feet firmly for sitting stability.
- Add plastic pellets to the lower body if the figure leans forward.
- Avoid pulling the smile or eye stitches too tightly.
🧼 Care Instructions
Spot clean gently with a damp cloth.
Allow the amigurumi to air dry completely.
Avoid machine washing when plastic canvas or weighted pellets are used.
Store upright and avoid placing pressure on the muzzle, ears, or nose.
🎉 Final Thoughts
Your sleepy seated Snoopy amigurumi is ready to bring a little nostalgic charm to your home. 🐶❤️
With his oversized rounded head, carefully sculpted long snout, plump black nose, floppy ears, tiny relaxed smile, red collar, short arms, large oval feet, and sweet seated pose, this handmade pup is full of gentle personality.
Happy Crocheting! 🧶🐾