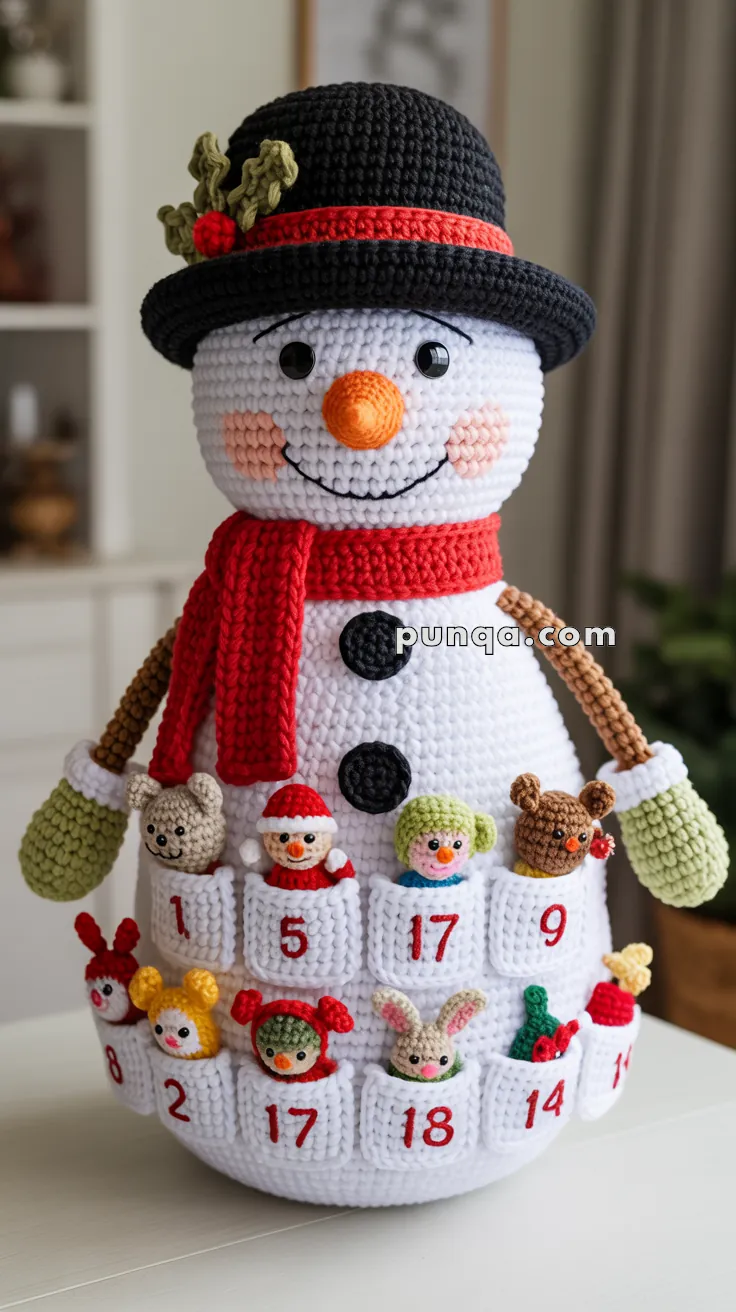
Count down to Christmas in the most delightful way with the Amigurumi Snowman Advent Calendar, a crochet project that’s bursting with festive charm! ⛄🧶 This cheerful snowman brings together cozy crochet textures, bright winter details, and 24 tiny pocket friends that tuck neatly into numbered crocheted pockets. With his classic black hat, bright red scarf, rosy cheeks, and twig arms, he makes a heartwarming centerpiece for holiday décor and a joyful tradition for families.
The pattern includes everything you need to create a full display—snowman, hat, scarf, arms, mittens, pockets, berries, holly, buttons, and 24 mini characters to surprise and delight each day. Whether perched in the living room, gifted to loved ones, or treasured as a handmade heirloom, the Amigurumi Snowman Advent Calendar is a magical way to crochet celebration, coziness, and a sprinkle of handmade wonder—one loop at a time! 🎄✨🧵
❄️ Crochet Snowman Advent Calendar Pattern
Turn the countdown to Christmas into a handmade tradition with this crochet snowman advent calendar. The finished snowman has a large rounded head, a tall pear-shaped body, a black bowler-style hat with a red band and holly, a thick red scarf, twig-like brown arms, oversized green mittens, and rows of functional numbered pockets filled with miniature Christmas friends. ☃️🎄
The construction is designed so the snowman has enough body volume to support the pockets without looking flat. The head and body are made separately and joined at the neck, while the arms are fully crocheted and lightly stuffed. Each miniature pocket toy also includes an actual tiny body so the characters can be removed from their pockets and played with or displayed individually.
✨ Skill Level
Intermediate to Advanced Intermediate
You should be comfortable with:
- Working in continuous rounds
- Increasing and decreasing
- Crocheting large stuffed shapes
- Working small amigurumi pieces
- Color changes
- Sewing and positioning multiple components
- Embroidery
- Surface details
- Making functional pockets
Because this is a large project with 24 miniatures, it is best approached as a collection of small projects rather than something to complete in one sitting.
📏 Finished Size
Using Aran/worsted-weight yarn and a 4 mm hook, the finished snowman measures approximately:
- 55–60 cm / 22–24 in tall, including hat
- 34–38 cm / 13½–15 in wide across the lower body
- Approximately 48–55 cm / 19–22 in wide from mitten to mitten
The mini pocket characters measure approximately 6–8 cm / 2½–3 in tall, depending on their ears, hats, or antlers.
🧶 Required Yarn Amounts
For the complete snowman, pockets, and 24 miniature characters, allow approximately:
- White: 600–700 g — head, body, pockets, mitten cuffs and mini details
- Black: 140–160 g — hat, buttons and embroidery
- Bright red: 160–190 g — scarf, hat band, numbers and mini accessories
- Orange: 20–25 g — carrot nose and mini noses
- Medium brown: 60–75 g — arms and miniature animals
- Light green: 60–70 g — mittens
- Olive green: 15–20 g — holly
- Beige/tan: 30–40 g — miniature animals
- Additional red, green, pink, yellow, blue, gray and cream: approximately 10–20 g each for miniature characters
You will also need approximately 900–1,100 g of polyester fiberfill for the large snowman and all 24 miniatures.
Buying a little extra white yarn is recommended because tension and the exact pocket placement can significantly affect consumption.
🧰 Materials
- 4 mm crochet hook
- 2.5–3 mm hook for miniature characters, optional
- Two 14–16 mm black safety eyes for snowman
- 4–6 mm safety eyes or black embroidery thread for minis
- Polyester fiberfill
- Tapestry needle
- Embroidery needle
- Stitch markers
- Pins
- Scissors
- Pink blush or pink yarn
- Optional plastic canvas for stabilizing the base
- Optional covered craft wire or pipe cleaners for the arms
For an advent calendar intended for young children, embroidered eyes are preferable to small safety eyes on the removable characters.
🧵 Abbreviations — US Terms
MR — magic ring
sc — single crochet
inc — 2 sc in one stitch
dec — invisible decrease
hdc — half double crochet
dc — double crochet
ch — chain
sl st — slip stitch
BLO — back loop only
FLO — front loop only
FO — fasten off
st / sts — stitch / stitches
Work in continuous rounds unless otherwise stated.
☃️ Main Snowman Body
The body is a broad pear shape: narrow at the neck, gently widening through the chest, and becoming much fuller at the lower half. This provides enough surface area for the advent pockets.
Begin at the bottom with white.
R1
8 sc in MR. (8)
R2
inc ×8. (16)
R3
(sc, inc) ×8. (24)
R4
(2 sc, inc) ×8. (32)
R5
(3 sc, inc) ×8. (40)
R6
(4 sc, inc) ×8. (48)
R7
(5 sc, inc) ×8. (56)
R8
(6 sc, inc) ×8. (64)
R9
(7 sc, inc) ×8. (72)
R10
(8 sc, inc) ×8. (80)
R11
(9 sc, inc) ×8. (88)
R12
(10 sc, inc) ×8. (96)
R13
(11 sc, inc) ×8. (104)
R14
(12 sc, inc) ×8. (112)
R15–24
sc around. (112)
This creates the broad rounded lower body.
R25
(12 sc, dec) ×8. (104)
R26–29
sc around. (104)
R30
(11 sc, dec) ×8. (96)
R31–34
sc around. (96)
R35
(10 sc, dec) ×8. (88)
R36–39
sc around. (88)
R40
(9 sc, dec) ×8. (80)
R41–44
sc around. (80)
R45
(8 sc, dec) ×8. (72)
R46–48
sc around. (72)
R49
(7 sc, dec) ×8. (64)
R50–52
sc around. (64)
R53
(6 sc, dec) ×8. (56)
R54–55
sc around. (56)
R56
(5 sc, dec) ×8. (48)
R57–58
sc around. (48)
Begin stuffing. Keep the lower body very firm so it can support the pockets and removable characters.
R59
(4 sc, dec) ×8. (40)
R60
sc around. (40)
FO, leaving a long sewing tail.
The 40-stitch opening forms the neck attachment area.
🎄 Stabilizing the Body
If the snowman will be displayed upright, cut a circle of plastic canvas slightly smaller than the bottom diameter and place it inside before completing the stuffing.
Pack stuffing particularly firmly around the base and sides. The center can remain slightly softer.
☃️ Snowman Head
Using white:
R1
6 sc in MR. (6)
R2
inc ×6. (12)
R3
(sc, inc) ×6. (18)
R4
(2 sc, inc) ×6. (24)
R5
(3 sc, inc) ×6. (30)
R6
(4 sc, inc) ×6. (36)
R7
(5 sc, inc) ×6. (42)
R8
(6 sc, inc) ×6. (48)
R9
(7 sc, inc) ×6. (54)
R10
(8 sc, inc) ×6. (60)
R11
(9 sc, inc) ×6. (66)
R12
(10 sc, inc) ×6. (72)
R13–22
sc around. (72)
Insert the safety eyes between R17–18, approximately 12 stitches apart.
R23
(10 sc, dec) ×6. (66)
R24
(9 sc, dec) ×6. (60)
R25
(8 sc, dec) ×6. (54)
R26
(7 sc, dec) ×6. (48)
R27
(6 sc, dec) ×6. (42)
Stuff firmly, paying particular attention to the cheeks.
R28
(5 sc, dec) ×6. (36)
R29
(4 sc, dec) ×6. (30)
FO with a long tail.
Do not close the opening. The broad lower opening helps create a stable connection with the body.
🥕 Carrot Nose
The nose is short, plump and rounded rather than a very long carrot.
Using orange:
R1
6 sc in MR. (6)
R2
inc ×6. (12)
R3
(sc, inc) ×6. (18)
R4–6
sc around. (18)
R7
(sc, dec) ×6. (12)
Stuff lightly.
R8
dec ×6. (6)
FO.
Sew horizontally to the center of the face.
😊 Face Details
Using black yarn or embroidery thread:
- Embroider a long U-shaped smile beneath the nose.
- Add one gently curved eyebrow above each eye.
- Apply pink blush or embroider pale pink cheek patches.
The expression should remain open and cheerful.
🧣 Red Scarf
The scarf is thick and wide enough to cover the head/body join.
Using bright red:
Ch 131
Row 1
hdc in second ch from hook and across. (130)
Rows 2–10
ch 1, turn, BLO hdc across. (130)
FO.
Wrap the scarf snugly around the neck.
Allow one end to hang significantly lower than the other. Tack the scarf discreetly to the body so the weight of the yarn cannot pull it out of position.
⚫ Snowman Buttons — Make 2
Two large black buttons are visible down the upper body.
Using black:
R1
6 sc in MR. (6)
R2
inc ×6. (12)
R3
(sc, inc) ×6. (18)
R4
sc around. (18)
FO.
Sew the buttons vertically down the chest, leaving enough space below for the advent pockets.
🪵 Stick Arms — Make 2
The arms are long, narrow brown tubes emerging from the upper sides of the body.
Using brown:
R1
6 sc in MR. (6)
R2
inc ×6. (12)
R3–22
sc around. (12)
Stuff lightly as you work.
R23
(2 sc, dec) ×3. (9)
R24–27
sc around. (9)
FO with a long tail.
For display-only versions, a covered pipe cleaner can be inserted before closing.
Sew one arm securely to each side of the upper body, immediately below scarf level.
Angle both arms slightly downward.
🧤 Green Mittens — Make 2
Mitten Hand
Using light green:
R1
6 sc in MR. (6)
R2
inc ×6. (12)
R3
(sc, inc) ×6. (18)
R4–8
sc around. (18)
R9
(4 sc, dec) ×3. (15)
R10–12
sc around. (15)
R13
(3 sc, dec) ×3. (12)
Stuff.
FO with a sewing tail.
👍 Mitten Thumb — Make 2
Using green:
R1
6 sc in MR. (6)
R2–4
sc around. (6)
FO.
Stuff very lightly and sew to the inner side of the mitten.
🤍 Mitten Cuffs — Make 2
Using white:
Ch 19
Join to form a ring, taking care not to twist.
R1–3
sc around. (18)
FO.
Slide a cuff over each arm/mitten connection and stitch in place.
The white cuff should flare slightly over the top of the mitten.
🎩 Black Bowler-Style Hat
The hat has a rounded crown rather than a tall cylindrical top-hat silhouette.
Hat Crown
Using black:
R1
6 sc in MR. (6)
R2
inc ×6. (12)
R3
(sc, inc) ×6. (18)
R4
(2 sc, inc) ×6. (24)
R5
(3 sc, inc) ×6. (30)
R6
(4 sc, inc) ×6. (36)
R7
(5 sc, inc) ×6. (42)
R8
(6 sc, inc) ×6. (48)
R9
(7 sc, inc) ×6. (54)
R10
(8 sc, inc) ×6. (60)
R11
BLO sc around. (60)
R12–19
sc around. (60)
R20
(8 sc, dec) ×6. (54)
R21
sc around. (54)
🎩 Hat Brim
R22
FLO (8 sc, inc) ×6. (60)
R23
(9 sc, inc) ×6. (66)
R24
(10 sc, inc) ×6. (72)
R25
(11 sc, inc) ×6. (78)
R26
(12 sc, inc) ×6. (84)
R27
sc around. (84)
FO.
Steam or lightly block the brim if necessary.
❤️ Hat Band
Using red:
Ch 61.
Row 1: sc in second ch from hook and across. (60)
Rows 2–3: sc across. (60)
FO.
Wrap around the base of the crown and sew in place.
🌿 Holly Leaves — Make 3
Using olive green:
Ch 11.
Beginning in second chain:
sl st, sc, hdc, dc, hdc, sc, hdc, dc, sc, sl st.
Working along the opposite side of the foundation chain, repeat the sequence back toward the beginning.
FO.
Pinch the base to give the leaf a slightly folded appearance.
🔴 Holly Berries — Make 3
Using red:
R1
6 sc in MR. (6)
R2
sc around. (6)
FO and close.
Group the leaves and berries together on one side of the hat band.
🎁 Advent Pockets — Make 24
The pockets need enough depth to hold complete miniature characters, so they are larger than simple flat appliqués.
Using white:
Ch 15
Row 1
sc in second ch from hook and across. (14)
Rows 2–10
ch 1, turn, sc across. (14)
Do not fasten off.
Work sc down one side, across the bottom and up the opposite side.
Do not crochet across the top edge.
FO with a long sewing tail.
🔢 Pocket Numbers
Using red yarn, embroider the numbers 1 through 24 before sewing the pockets to the snowman.
Keep the numerals large and centered.
🧷 Attaching the 24 Pockets
Arrange the pockets around the lower two-thirds of the body.
Because the snowman is three-dimensional, all 24 pockets do not need to be visible simultaneously from the front.
Arrange them in approximately three staggered horizontal bands, continuing around both sides and toward the back.
Sew only:
- Left side
- Bottom
- Right side
Leave the entire upper edge open.
Allow a little looseness in the center of each pocket so it can expand around its miniature character.
🧸 Miniature Pocket Friends
Each pocket contains a complete tiny amigurumi, not simply a head.
The same basic body can be customized into bears, bunnies, reindeer, elves, snowmen, dolls and other Christmas creatures.
Using a 2.5–3 mm hook makes the characters small enough for the pockets.
🧸 Basic Mini Body
Choose the appropriate body color.
R1
6 sc in MR. (6)
R2
inc ×6. (12)
R3
(sc, inc) ×6. (18)
R4–7
sc around. (18)
R8
(sc, dec) ×6. (12)
Stuff lightly.
R9
dec ×6. (6)
FO and close.
The finished body should be a small rounded capsule.
🧸 Basic Mini Head
R1
6 sc in MR. (6)
R2
inc ×6. (12)
R3
(sc, inc) ×6. (18)
R4–6
sc around. (18)
Insert 4–6 mm eyes or embroider them.
R7
(sc, dec) ×6. (12)
Stuff.
R8
dec ×6. (6)
FO and close.
Sew the head firmly to the mini body.
🐾 Mini Arms — Make 2 Per Character
R1
5 sc in MR. (5)
R2–3
sc around. (5)
FO.
Do not stuff.
Sew to the upper sides of the body.
🐾 Mini Feet — Optional, Make 2
R1
6 sc in MR. (6)
R2
sc around. (6)
FO.
Flatten and sew beneath the body.
For very small characters, the feet can be omitted so the miniature slides easily into its pocket.
🎄 Mini Character Variations
The following pieces transform the basic head-and-body construction into a collection of different pocket friends.
🐻 Teddy Bear
Use beige, tan or brown for head and body.
Bear Ears — Make 2
R1: 6 sc in MR. (6)
R2: inc ×6. (12)
Fold slightly and sew to the upper sides of the head.
Bear Muzzle
Using cream:
R1: 6 sc in MR. (6)
R2: inc ×6. (12)
FO.
Sew to the lower face and embroider a tiny black nose and smile.
🐰 Bunny
Use cream or pale beige for head and body.
Long Ears — Make 2
R1: 5 sc in MR. (5)
R2: (sc, inc) twice, sc. (7)
R3–7: sc around. (7)
R8: dec, 3 sc, dec. (5)
FO.
Flatten and sew upright.
Add a few pink stitches inside each ear.
🦌 Reindeer
Use medium brown.
Ears — Make 2
R1: 5 sc in MR. (5)
R2: sc around. (5)
Flatten and sew to head.
Antlers
Using dark brown:
Ch 5.
sl st back down the chain.
At the second chain, ch 2 and sl st back to form a branch.
Make two.
Sew behind the ears.
Add an orange or red embroidered nose.
☃️ Mini Snowman
Make the body and head in white.
Add:
- Tiny orange embroidered carrot nose
- Black eyes
- Red scarf
- Small red-and-white hat
Tiny Scarf
Ch 18.
sl st or sc back along the chain.
Wrap around the neck and tack securely.
🎅 Santa
Make the head in skin tone and body in red.
Santa Hat
Using red:
R1: 5 sc in MR. (5)
R2–3: sc around. (5)
R4: (sc, inc) twice, sc. (7)
R5: sc around. (7)
R6: (2 sc, inc) twice, sc. (9)
R7: sc around. (9)
R8: (2 sc, inc) ×3. (12)
R9: (sc, inc) ×6. (18)
Switch to white.
R10: sc around. (18)
FO.
Add a tiny white pom-pom to the point.
🧝 Elf
Make a skin-tone head and green body.
Add a green pointed hat using the Santa-hat instructions, substituting green for red.
Add:
- Pink cheeks
- Tiny embroidered smile
- Optional pointed ears
- Red collar
🐭 Mouse
Use gray or beige.
Mouse Ears — Make 2
R1: 6 sc in MR. (6)
R2: inc ×6. (12)
FO.
Sew high on the head.
Embroider a small pink nose.
🐧 Penguin
Make the head and body black.
Crochet a tiny white face patch:
R1: 6 sc in MR. (6)
R2: inc ×6. (12)
FO and sew to face.
Add an orange beak with several embroidery stitches.
🐥 Chick
Make head and body yellow.
Embroider black eyes and a tiny orange beak.
Wings — Make 2
R1: 6 sc in MR. (6)
R2: sc around. (6)
Flatten and sew to body sides.
👧 Little Christmas Doll
Use skin tone for the head and a festive color for the body.
Add yarn hair using short strands sewn around the head.
For little buns:
R1: 6 sc in MR. (6)
R2: inc ×6. (12)
R3: sc around. (12)
Stuff lightly and sew one to each side of the head.
Add tiny bows if desired.
🧸 Hooded Pocket Friend
Make the basic head and body.
Crochet a contrasting hood:
R1: 6 sc in MR. (6)
R2: inc ×6. (12)
R3: (sc, inc) ×6. (18)
R4–6: sc around. (18)
FO.
Fit over the back and sides of the head, leaving the face exposed.
Add ears, bows or antlers to create different characters.
🎄 Creating All 24 Characters
Use the variations above repeatedly with different colors and accessories rather than making 24 identical toys.
A balanced set can include several:
- Bears
- Bunnies
- Reindeer
- Snowmen
- Elves
- Santa characters
- Mice
- Penguins
- Chicks
- Dolls
- Hooded woodland creatures
Vary the hats, ears, bows and colors so every day’s surprise looks different. 🎁
🪡 Main Snowman Assembly
1. Join Head and Body
Center the head over the 40-stitch neck opening.
Pin thoroughly before sewing.
Sew around the neck twice for strength.
Add extra stuffing through the opening before completing the seam if the head feels unstable.
2. Add the Scarf
Wrap it around the neck so the join is completely concealed.
Allow the long scarf end to hang down the snowman’s left side.
3. Attach the Arms
Sew the brown arms to opposite sides of the upper body, just beneath the scarf.
Use several passes through the body fabric because the mittens add weight.
4. Add Mittens
Sew a green mitten onto each arm.
Cover each connection with a white cuff.
5. Add Buttons
Position the two large black buttons vertically on the upper body.
6. Attach the Pockets
Pin all 24 pockets before sewing any permanently.
Maintain roughly equal spacing while allowing them to follow the curve of the body.
7. Add the Hat
Place the hat low enough for the brim to sit just above the eyebrows.
Sew it discreetly to the head at several points.
8. Fill the Calendar
Place one complete miniature character into each numbered pocket.
Keep the head and accessories visible above the pocket edge.
✨ Final Shaping
Massage the stuffing so the lower body forms a broad, stable pear shape.
The upper body should taper naturally toward the scarf rather than forming a straight cylinder.
Keep the head broad and round, with the cheeks slightly fuller than the crown.
Curve the arms gently downward and forward so the mittens sit beside the body.
Shape the hat brim into a gentle downward curve.
Finally, adjust each pocket so the upper edge remains open and the miniature character can be removed without stretching the stitches.
🎄 Finished Snowman Advent Calendar
The completed crochet snowman advent calendar becomes much more than a seasonal plush. With a substantial stuffed body, expressive snowman face, long crocheted arms, chunky mittens, removable miniature toys and 24 functional numbered pockets, it creates an interactive Christmas decoration that can return year after year. ☃️🎁
Fill each pocket with its tiny crocheted friend before December begins, or add sweets, handwritten activities and small surprises alongside the characters. From the jaunty holly-trimmed black hat to the last miniature tucked into pocket 24, every part adds another little piece of handmade Christmas magic. 🎄🧶❤️


Love it
un super merci il sera pour l année prochaine!!merci
hermoso gracias por compartir