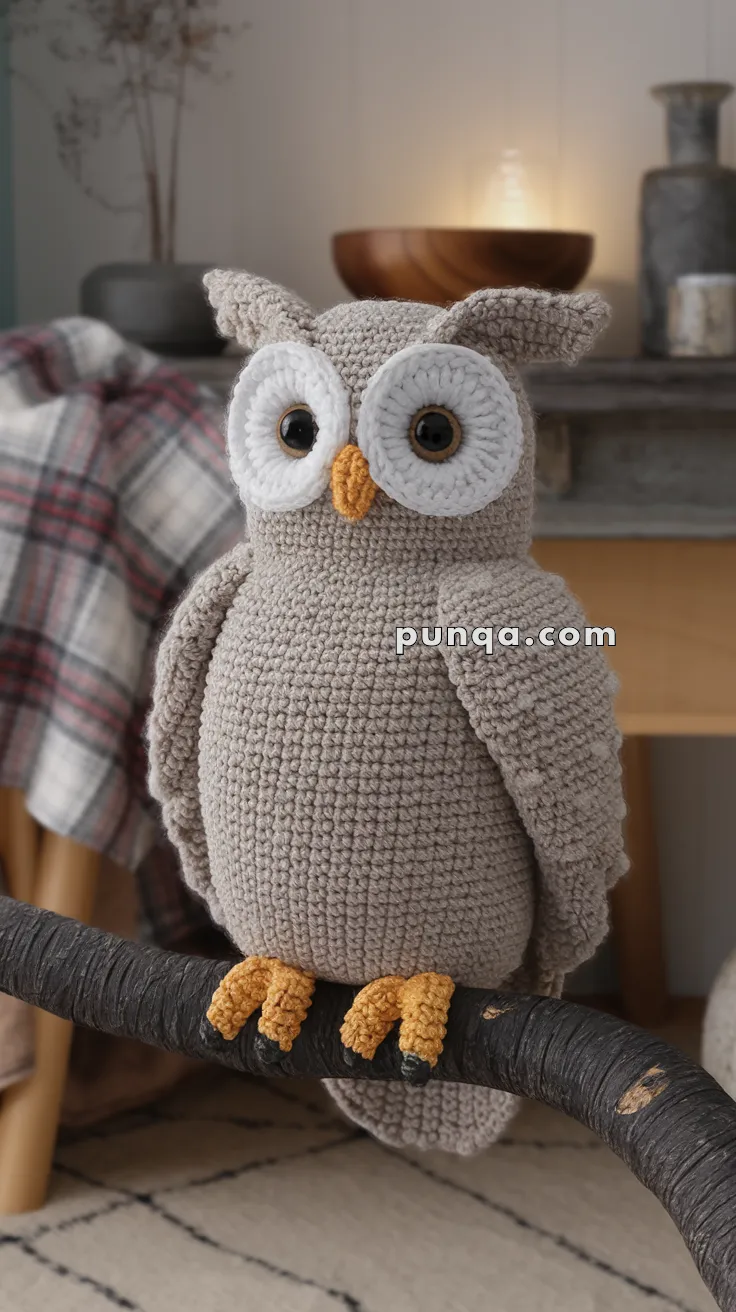
Bring the majestic charm of a Snowy Owl to life with this Amigurumi Snowy Owl crochet pattern! 🦉✨ With its fluffy feathers, piercing eyes, and graceful presence, this design captures the essence of this stunning bird in yarn form. Whether you’re crafting for a nature-inspired décor piece, a heartfelt gift, or simply love owl-themed amigurumi, this FREE pattern is a fantastic addition to your collection.
Designed for crocheters of all skill levels, this pattern allows for customization in feather textures, color variations, and even tiny accessories like embroidered details or a miniature snowy perch to enhance its personality. Choose classic white and gray for a realistic look or experiment with pastel hues for a whimsical twist! Whether displayed as part of a winter-themed setup or gifted to a fellow crochet enthusiast, this amigurumi snowy owl is sure to impress.
Grab your hook, select your favorite yarn, and let’s bring this elegant bird to life—one stitch at a time! 🧶✨
🦉 Amigurumi Snowy Owl Crochet Pattern
Make your own wise and whimsical snowy owl with this cozy amigurumi crochet pattern! With its oversized eyes, soft wings, and perched feet, this owl is perfect for woodland-themed decor, holiday gifts, or fans of magical creatures.
✨ Skill Level
Intermediate – includes shaping, layered eye construction, and structured assembly.
📏 Finished Size
Approx. 27–30 cm (10.5–12 inches) tall
🧶 Materials & Yarn Amount
- Warm grey / taupe (body, wings, ears, tail): 110–120 g
- White (large eye rings): 45 g
- Golden yellow (beak & feet): 20–25 g
- Black (pupils & claw tips): small amount
Supplies:
- 3.0–3.5 mm crochet hook
- 14–16 mm safety eyes
- Polyester stuffing (~250 g)
- Yarn needle, stitch markers
🧵 Abbreviations
MR – magic ring
sc – single crochet
inc – increase
dec – invisible decrease
sl st – slip stitch
ch – chain
FO – fasten off
🦉 Head & Body (One Piece)
With main color:
R1: MR, 6 (6)
R2: inc ×6 (12)
R3: (1 sc, inc) ×6 (18)
R4: (2 sc, inc) ×6 (24)
R5: (3 sc, inc) ×6 (30)
R6: (4 sc, inc) ×6 (36)
R7: (5 sc, inc) ×6 (42)
R8: (6 sc, inc) ×6 (48)
R9–22: sc around (48)
This creates a full, rounded lower body
Upper Body & Head Shaping
R23: (6 sc, dec) ×6 (42)
R24–26: sc around (42)
R27: (5 sc, dec) ×6 (36)
R28–30: sc around (36)
R31: (4 sc, dec) ×6 (30)
R32–34: sc around (30)
Begin stuffing firmly, especially base
R35: (3 sc, dec) ×6 (24)
R36: (2 sc, dec) ×6 (18)
R37: (1 sc, dec) ×6 (12)
R38: dec ×6 (6)
FO
Shape into a slightly oval silhouette by gently compressing sides
👁 Eye Frames (Large & Raised – Make 2)
With white yarn:
R1: MR, 6
R2: inc ×6 (12)
R3: (1 sc, inc) ×6 (18)
R4: (2 sc, inc) ×6 (24)
R5: sc around (24)
FO
These should be thick and slightly raised, not flat
Eye Placement
Insert safety eyes through center of each disc
Position discs close together on upper face
Sew securely so they sit slightly forward
🐥 Beak (Small Triangle Shape)
With yellow yarn:
R1: MR, 4
R2: (1 sc, inc) ×2 (6)
R3–4: sc around (6)
FO
Lightly stuff and sew centered between eyes
🦉 Ear Tufts (Make 2)
With main color:
R1: MR, 4
R2: inc ×4 (8)
R3: (1 sc, inc) ×4 (12)
R4–7: sc around (12)
Do not stuff
Flatten slightly
Attach angled outward on top corners
🪶 Wings (Curved & Textured – Make 2)
With main color:
R1: MR, 6
R2: (1 sc, inc) ×3 (9)
R3: (2 sc, inc) ×3 (12)
R4: (3 sc, inc) ×3 (15)
R5–12: sc around (15)
Flatten lightly
Do not overstuff
Attach along sides so they curve downward and hug the body
🪶 Tail (Flat Paddle Shape)
With main color:
R1: MR, 6
R2: inc ×6 (12)
R3: (1 sc, inc) ×6 (18)
R4–7: sc around (18)
Flatten completely
FO
Attach low on back
🦶 Feet (Perched Style)
Toes (Make 6)
With yellow yarn:
R1: MR, 6
R2–4: sc around (6)
FO
Curve slightly while shaping
Assemble Feet
Group 3 toes per foot
Sew side-by-side in a slight arc
Attach firmly to front base
Claw Tips
With black yarn:
Embroider small pointed tips
🧩 Assembly
1️⃣ Attach eye discs and insert eyes
2️⃣ Sew beak neatly between eyes
3️⃣ Attach ear tufts angled outward
4️⃣ Sew wings along sides (slightly forward placement)
5️⃣ Attach flat tail at lower back
6️⃣ Attach feet at front base for perched stance
🌟 Final Shaping Tips
- Keep base wide and well-stuffed
- Slightly flatten sides for realistic form
- Position eyes evenly for calm expression
- Let wings rest naturally along body
- Ensure feet are stable and forward-facing
💖 Final Thoughts
This owl design blends soft shaping with bold features to create a peaceful, lifelike companion. The oversized eye frames, balanced body, and gently draped wings give it a calm presence that feels both cozy and elegant. Whether displayed on a shelf or gifted to someone special, this handmade owl brings warmth, charm, and a quiet woodland spirit into any space. 🦉✨