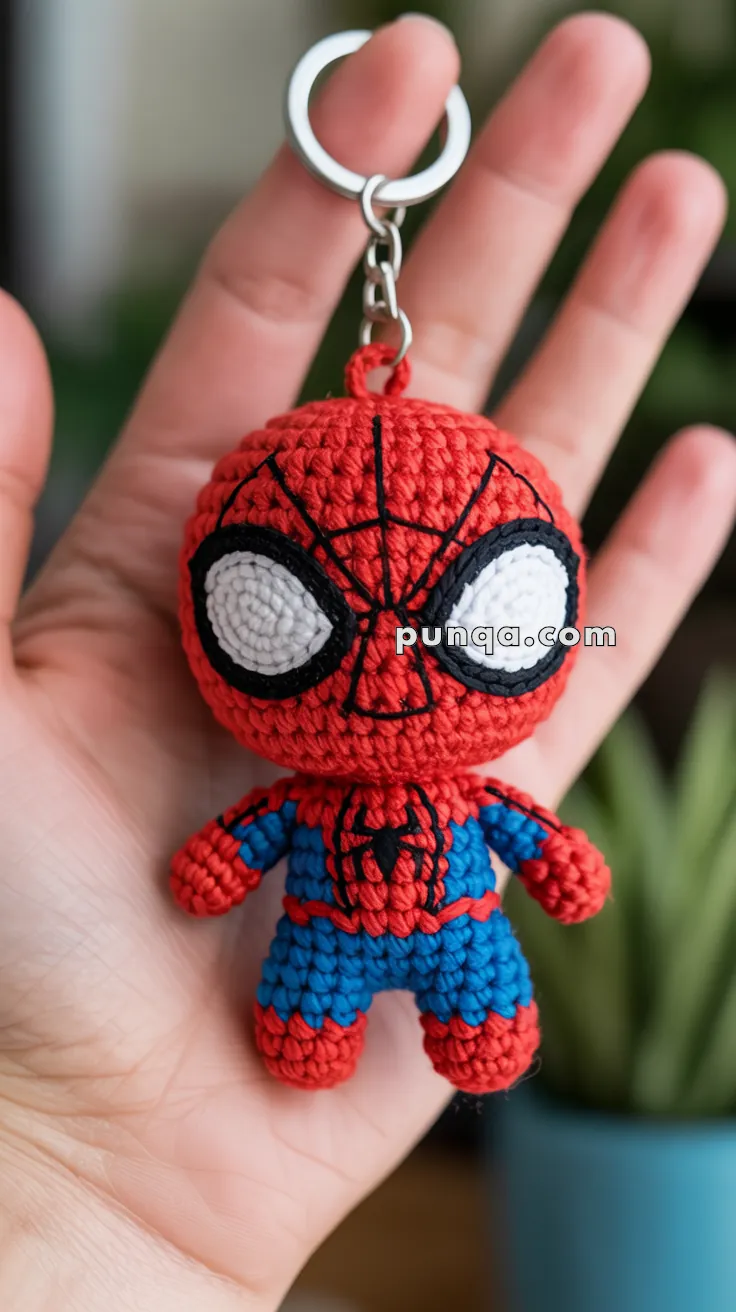
Swing into handmade heroism with the Amigurumi Spider-Man Keychain, a pint-sized powerhouse packed with personality! 🕷️🧶 With his iconic red-and-blue suit, expressive eyes, and tiny stitched web details, this mini Spidey is ready to tag along on your keys, bags, or gift wraps. Whether you’re a lifelong Marvel fan or just love crafting bold characters, this keychain brings superhero charm to every stitch.
This pattern is perfect for crocheters who enjoy quick, detailed projects with a splash of comic book flair. You can customize the suit’s webbing, play with facial expressions, or even make a whole team of mini heroes to keep Spidey company. Whether you’re gifting it to a fellow fan or adding a heroic touch to your everyday essentials, the Spider-Man Keychain is a fun and fearless way to celebrate creativity—one loop at a time! 💥🧵
🕷️ Amigurumi Spider-Man Keychain Crochet Pattern
Create a tiny web-slinging superhero with an oversized mask, dramatic almond-shaped eyes, embroidered web lines, a compact red-and-blue suit, and a reinforced loop for attaching the finished figure to a keyring. ❤️💙
This design uses true keychain proportions: the head is much larger than the torso, the limbs are short and slightly curved, and the body is lightly stuffed so the finished charm remains small without feeling bulky.
✨ Skill Level
Intermediate
This project includes:
- Small-scale amigurumi shaping
- Frequent color changes
- Layered eye appliqués
- Fine surface embroidery
- Tiny limb assembly
- Reinforced keychain construction
📏 Finished Size
Using sport-weight cotton yarn and a 2.25–2.5 mm hook, the finished figure measures approximately:
- 9–10 cm (3½–4 in) tall without hardware
- 13–15 cm (5–6 in) including the keyring and chain
🧶 Yarn Requirements
Sport-weight mercerized cotton is recommended.
❤️ Red — 22–25 g
💙 Bright Blue — 10–12 g
🖤 Black — 4–5 g
🤍 White — 3–4 g
Polyester fiberfill — approximately 12–18 g
🧵 Materials
- 2.25–2.5 mm crochet hook
- Polyester fiberfill
- Tapestry needle
- Fine embroidery needle
- Stitch marker
- Pins
- Scissors
- Metal keyring
- Jump ring and short keychain connector
- Optional fabric glue for securing embroidery ends
Safety eyes are not needed. The eyes are made entirely from crocheted appliqués.
🔤 Abbreviations — US Terms
MR — Magic Ring
sc — Single Crochet
inc — Increase: 2 sc in one stitch
dec — Invisible Decrease
sl st — Slip Stitch
ch — Chain
hdc — Half Double Crochet
BLO — Back Loop Only
FO — Fasten Off
Work in continuous rounds unless stated otherwise.
🕷️ Oversized Masked Head
Using red yarn:
R1
MR 6.
(6)
R2
inc ×6.
(12)
R3
(1 sc, inc) ×6.
(18)
R4
(2 sc, inc) ×6.
(24)
R5
(3 sc, inc) ×6.
(30)
R6
(4 sc, inc) ×6.
(36)
R7–13
sc around.
(36)
R14
(4 sc, dec) ×6.
(30)
R15
(3 sc, dec) ×6.
(24)
Begin stuffing firmly.
R16
(2 sc, dec) ×6.
(18)
R17
(1 sc, dec) ×6.
(12)
Finish stuffing. Keep the front smooth and the sides gently rounded.
R18
dec ×6.
(6)
FO and close.
Gently press the sides so the head becomes slightly wider than it is deep.
🖤 Black Eye Bases — Make 2
The black appliqués form the bold outer eye borders.
Using black yarn:
R1
Ch 7.
Starting in the second chain:
5 sc, 3 sc in the final chain.
Continue along the opposite side:
4 sc, inc.
(14)
R2
inc, 4 sc, 3 inc, 4 sc, 2 inc.
(20)
FO, leaving a long sewing tail.
Flatten each oval and pinch one end into a soft point.
🤍 White Eye Centers — Make 2
Using white yarn:
R1
Ch 6.
Starting in the second chain:
4 sc, 3 sc in the final chain.
Continue along the opposite side:
3 sc, inc.
(12)
R2
inc, 3 sc, 3 inc, 3 sc, 2 inc.
(18)
FO.
Flatten each piece and gently pinch one end.
Sew each white piece onto a black base, leaving an even black border visible around it.
👀 Attaching the Eyes
Position the eyes across the middle of the face.
- Pointed ends face inward and slightly downward.
- Outer upper corners angle upward.
- Leave approximately one stitch between the closest black edges.
- Keep the eyes large enough to dominate the face.
Pin both eyes before sewing either one permanently.
🕸️ Mask Web Embroidery
Use fine black yarn or embroidery thread.
First embroider the main radial lines:
- One vertical line from the top center to between the eyes.
- Continue that line down toward the chin.
- Two diagonal lines from the upper center toward the outer eye edges.
- Two lines from between the eyes toward the lower cheeks.
- One short line extending toward each temple.
Connect these lines with shallow curved stitches:
- Two curved rows across the forehead
- One curved row between and beside the eyes
- One curved row across the lower face
Keep the stitches relaxed so the head does not pucker.
🧍 Compact Suit Body
The body has a red upper torso, blue lower section, and a narrow red belt.
Begin with red yarn:
R1
MR 6.
(6)
R2
inc ×6.
(12)
R3
(1 sc, inc) ×6.
(18)
R4–7
sc around.
(18)
Switch to blue.
R8–10
sc around.
(18)
Switch to red.
R11
BLO sc around.
(18)
Switch back to blue.
R12
sc around.
(18)
R13
(1 sc, dec) ×6.
(12)
Stuff lightly.
R14
dec ×6.
(6)
FO, leaving a long sewing tail.
🕷️ Chest Spider Emblem
Using black embroidery thread:
- Stitch a narrow vertical oval at the center of the red chest.
- Add a smaller oval above it.
- Work four angled legs on each side.
- Extend the upper legs toward the shoulders and the lower legs toward the belt.
Keep the emblem centered and narrow.
❤️ Chest Web Lines
Embroider three or four black radial lines from the upper chest toward the shoulders and waist.
Add two shallow curved connecting lines.
Avoid covering the spider emblem.
💪 Arms — Make 2
The arms include red gloves, blue sleeves, and a small red shoulder section.
Begin with red yarn:
R1
MR 6.
(6)
R2–3
sc around.
(6)
Switch to blue.
R4–6
sc around.
(6)
Switch to red.
R7
sc around.
(6)
Do not stuff, or add only a tiny wisp to the glove.
Flatten the upper opening.
FO, leaving a sewing tail.
🕸️ Arm Details
Using black embroidery thread:
- Add one short line around each glove.
- Work one vertical web line along the red hand.
- Add two tiny diagonal stitches.
- Extend one black line over the red shoulder section.
🦵 Legs — Make 2
The legs have rounded red boots and short blue thighs.
Begin with red yarn:
R1
MR 6.
(6)
R2
inc ×6.
(12)
R3–4
sc around.
(12)
Switch to blue.
R5–7
sc around.
(12)
R8
(2 sc, dec) ×3.
(9)
Stuff the red boot firmly and the blue section lightly.
Flatten the top.
FO, leaving a sewing tail.
🕸️ Boot Details
Using black embroidery thread:
- Work one short vertical line down the front of each boot.
- Add two small diagonal connecting stitches.
- Add one narrow line around the top edge of the red section.
🪡 Main Assembly
Attach the Head
Center the head directly over the red torso.
There should be almost no visible neck.
Sew around the connection several times because the oversized head is heavier than the body.
Attach the Arms
Sew the arms high on the sides of the torso.
Angle them slightly outward and downward.
The red gloves should sit close to waist level.
Attach the Legs
Position the legs beneath the blue lower body.
Leave a small gap between them and turn the boots slightly outward.
Sew securely through the flattened blue ends.
🕸️ Shoulder and Suit Embroidery
After attaching the limbs, connect the red shoulder sections to the chest design with black web lines.
Add short black web markings to the blue-and-red boundaries only where visible. The embroidery should remain fine and uncluttered.
🔗 Reinforced Hanging Loop
Using red yarn:
Loop
Ch 10.
Join with a sl st to form a ring.
Work one round of sl st around the loop for extra strength.
FO, leaving two long tails.
Place the loop at the exact center of the head.
Pass both tails through several stitches at the top and secure them inside the head or beneath the embroidery with multiple knots.
Attach the jump ring through the crocheted loop, then connect the metal chain and keyring.
Do not attach the metal ring directly through a single head stitch.
✨ Final Shaping
- Keep the head noticeably larger than the body.
- Angle the eyes evenly toward the center.
- Straighten the main vertical web line.
- Make sure the chest emblem remains visible.
- Turn the gloves slightly forward.
- Angle both boots outward evenly.
- Confirm that the keychain loop is centered.
- Tug the hardware gently to test the attachment.
💡 Helpful Tips
- Work with tight tension to prevent stuffing from showing.
- Use fine embroidery thread rather than full-thickness yarn for the web.
- Pin both eye pieces before sewing.
- Embroider the head only after attaching the eyes.
- Use minimal stuffing in the arms and upper legs.
- Reinforce both the neck seam and hanging loop several times.
- Secure embroidery ends beneath nearby appliqués whenever possible.
🧼 Care Instructions
Spot clean with a damp cloth and allow the keychain to air dry.
Avoid machine washing because the metal hardware may damage the crochet fabric.
Inspect the hanging loop periodically when the charm is used every day.
🌟 Final Thoughts
Your miniature web-slinging superhero is ready to swing into action! 🕷️❤️💙
With his oversized mask, bold layered eyes, fine web embroidery, tiny spider emblem, red gloves and boots, and compact blue suit, this keychain-sized character packs plenty of heroic detail into a very small project.
Happy Crocheting! 🧶🕸️