Welcome to the playful and woodland-inspired world of amigurumi! 🐿️✨ Today, I’m excited to share my free crochet pattern for an Amigurumi Squirrel—a charming and energetic creation perfect for nature lovers, autumn décor, or anyone who enjoys crafting adorable and expressive plush designs! 🍂 Whether you love stitching up woodland creatures, creating textured and lifelike figures, or simply want to add a mischievous squirrel to your handmade lineup, this pattern will guide you through crafting a beautifully sculpted plush with fluffy ears, a bushy tail, and a tiny acorn for extra charm! 🌰
This design embraces warm hues, soft textures, and delightful details to bring a lively and heartwarming presence to your crochet projects! 🧶✨ I’ve carefully outlined each step to ensure your Amigurumi Squirrel turns out just right—ready to scamper into your collection or become a treasured handmade gift! 🎁 So grab your hooks and let’s stitch up an adorable squirrel! 🐿️
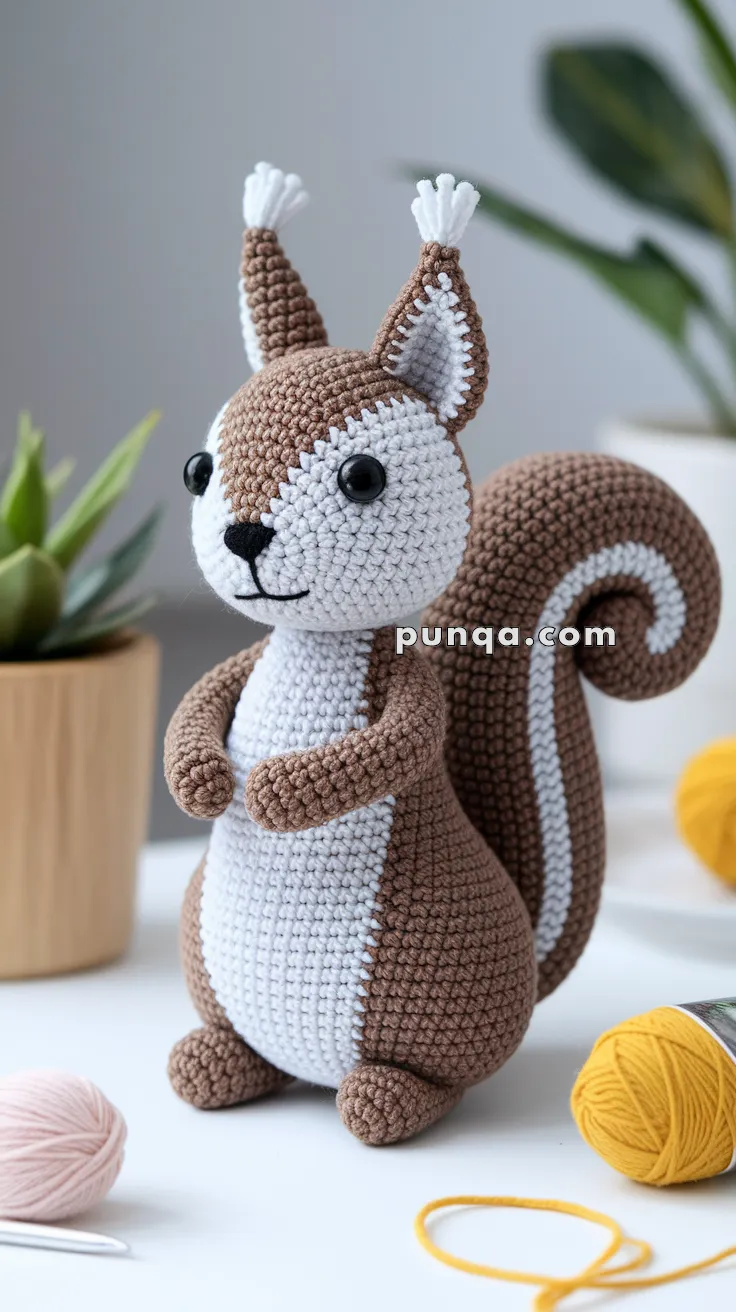
🐿️ Amigurumi Realistic Squirrel Crochet Pattern
This elegant standing squirrel features clean two-tone shaping, a tall upright posture, delicate ear tufts, rounded feet, expressive cheeks, and a signature curled tail with a crisp white stripe. The construction is carefully balanced so the squirrel stands independently while maintaining a soft, natural silhouette. This design is ideal for woodland displays, gifts, or collectors who appreciate refined amigurumi shaping. 🌰✨
✨ Skill Level
Intermediate
You should be comfortable with:
-
Continuous spiral rounds
-
Clean color changes within rounds
-
Shaping with increases and decreases
-
Sewing parts securely
-
Tail shaping and positioning
📏 Finished Size
Using DK cotton yarn and a 2.5–3.0 mm hook:
-
Height: 24–28 cm (9.5–11 in)
-
Tail height: approx. same as body height
🧶 Materials
Yarn (DK cotton recommended):
-
Medium brown – head top, sides, back, arms, legs, tail outer
-
White – face, muzzle, belly, inner ears, tail stripe
-
Black – nose and mouth embroidery
Supplies:
-
2.5–3.0 mm crochet hook
-
10–12 mm safety eyes
-
Fiberfill stuffing
-
Yarn needle
-
Stitch markers
-
Scissors
Optional:
-
Flexible wire for tail support (optional)
🧵 Abbreviations (US Terms)
-
MR – magic ring
-
sc – single crochet
-
inc – increase
-
dec – invisible decrease
-
ch – chain
-
sl st – slip stitch
-
FO – fasten off
🧸 Head (Integrated Two-Tone Face)
Start with brown yarn.
Round 1: MR, 6 sc (6)
Round 2: inc x6 (12)
Round 3: (1 sc, inc) x6 (18)
Round 4: (2 sc, inc) x6 (24)
Round 5: (3 sc, inc) x6 (30)
Round 6: (4 sc, inc) x6 (36)
Begin face color shaping:
Rounds 7–13:
Work 14 centered front stitches in white, remaining 22 in brown.
Maintain straight vertical alignment.
Insert safety eyes between Rounds 9–10, positioned at the color boundary between white and brown.
Round 14: (4 sc, dec) x6 (30)
Round 15: (3 sc, dec) x6 (24)
Round 16: (2 sc, dec) x6 (18)
Stuff firmly, especially cheeks.
Round 17: (1 sc, dec) x6 (12)
Round 18: dec x6 (6)
FO and close.
👃 Nose and Mouth
Embroider a small triangular black nose centered at the top of the white muzzle area.
Embroider a gentle curved smile extending slightly to each side.
👂 Ears (Make 2)
Outer Ear (Brown)
Round 1: MR, 4 sc (4)
Round 2: inc x4 (8)
Round 3: (1 sc, inc) x4 (12)
Round 4: (2 sc, inc) x4 (16)
Round 5: sc around (16)
FO.
Inner Ear (White)
Round 1: MR, 4 sc (4)
Round 2: inc x4 (8)
Round 3: (1 sc, inc) x4 (12)
Round 4: sc around (12)
FO.
Sew inner ear centered inside outer ear.
Fold base slightly before attaching.
Attach ears high on head.
Ear Tufts
Cut 5–6 white strands per ear.
Attach at ear tip.
Trim evenly into short upright tuft.
🧍 Body (Integrated Vertical Belly)
Start with brown yarn.
Round 1: MR, 6 sc (6)
Round 2: inc x6 (12)
Round 3: (1 sc, inc) x6 (18)
Round 4: (2 sc, inc) x6 (24)
Round 5: (3 sc, inc) x6 (30)
Round 6: (4 sc, inc) x6 (36)
Rounds 7–18:
Work 14 center front stitches in white, remaining stitches brown.
This creates the narrow vertical belly panel.
Round 19: (4 sc, dec) x6 (30)
Round 20: (3 sc, dec) x6 (24)
Round 21: (2 sc, dec) x6 (18)
Stuff firmly, especially lower body.
Round 22: (1 sc, dec) x6 (12)
FO leaving long tail.
🦶 Feet and Legs (Make 2)
Foot Base
Round 1: MR, 6 sc (6)
Round 2: inc x6 (12)
Round 3: (1 sc, inc) x6 (18)
Rounds 4–6: sc around (18)
Stuff firmly.
Round 7: (1 sc, dec) x6 (12)
FO.
Leg Extension
Attach brown yarn at top center.
Rounds 1–6: sc around (12)
Lightly stuff.
FO leaving tail.
Attach legs slightly toward front underside for upright balance.
✋ Arms (Make 2)
Round 1: MR, 6 sc (6)
Round 2: (1 sc, inc) x3 (9)
Rounds 3–11: sc around (9)
Lightly stuff.
FO leaving tail.
Attach arms high on torso so paws meet naturally at chest.
🌀 Tail (Tubular with Integrated Stripe)
Start with brown yarn.
Round 1: MR, 6 sc (6)
Round 2: inc x6 (12)
Round 3: (1 sc, inc) x6 (18)
Round 4: (2 sc, inc) x6 (24)
Round 5: (3 sc, inc) x6 (30)
Rounds 6–28:
Work 6 centered stitches in white, remaining stitches brown.
This creates a clean continuous stripe.
Lightly stuff only first third of tail.
Leave upper tail unstuffed so it curves naturally.
FO leaving long tail.
Curl into upright spiral and secure with stitching.
Attach to lower back.
🧩 Assembly
Attach head securely to body.
Attach ears high on head.
Attach arms so paws rest near belly center.
Attach legs so feet sit flat and balanced.
Attach tail low on back, curving upward behind body.
Adjust stuffing and positioning.
🌟 Finishing Touches
Shape cheeks gently with fingers.
Trim ear tufts evenly.
Ensure tail spiral curves smoothly upward.
Align belly stripe straight down center.
Check balance so squirrel stands securely.
🍂 Finished Amigurumi
Your squirrel now stands proudly with elegant proportions, clean color separation, expressive face, delicate ear tufts, and its iconic curled striped tail. This refined woodland companion makes a beautiful display piece, heartfelt handmade gift, or treasured addition to any amigurumi collection.


Muchas gracias por compartir tú patrón muy claras
Muy bonito trabajo. Felicidades.
Très bel ouvrage – bravo