Celebrate freedom and creativity with this Amigurumi Statue of Liberty crochet pattern! Whether you’re crafting for patriotic decor, history lovers, or simply enjoy making iconic figures, this free pattern lets you stitch up a charming Lady Liberty full of personality. With her flowing robe, delicate crown, and signature torch held high, this crochet creation captures the essence of one of the world’s most recognizable symbols. Perfect for gifting, displaying as a tribute to American heritage, or simply celebrating the joy of crochet, this amigurumi Statue of Liberty is a unique and meaningful project—one stitch at a time! 🗽✨
Designed for customization, this pattern allows you to experiment with different shades of green, embroidered details, or even tiny accessories like a miniature book or golden flame for extra charm. Craft a classic version with soft neutral tones, create a vibrant design for a playful aesthetic, or even stitch up multiple statues for a themed display! Whether gifted to a fellow crochet enthusiast, displayed as a cherished keepsake, or made simply for the joy of crafting, this Amigurumi Statue of Liberty is a thoughtful and inspiring project—perfect for bringing artistry and history to every stitch! 🧶💙
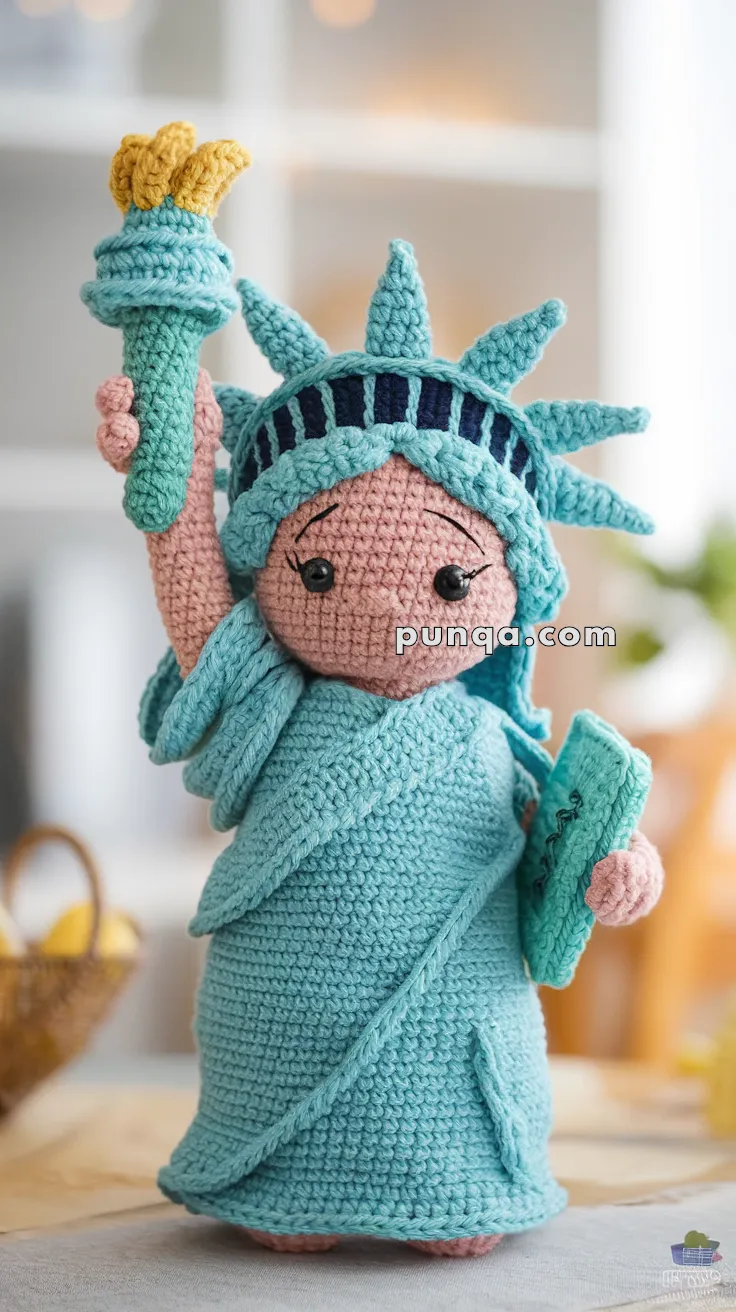
🗽 Amigurumi Statue of Liberty Crochet Pattern
Bring history and handmade charm together with this adorable Statue of Liberty doll! Standing proudly with her crown, torch, and tablet, she makes the perfect patriotic decoration or gift. This project features detailed robe folds, a textured torch, and expressive features, offering a fun challenge for intermediate crocheters.
✨ Skill Level
Intermediate – shaping, layered construction, sculpting details, and structured accessories.
📏 Finished Size
Approx. 26–30 cm (10–12 inches) tall
🧶 Materials & Yarn Amount
- Light teal (robe, crown, torch handle, tablet): 120–130 g
- Skin tone (head, arms, feet): 45–50 g
- Medium brown (hair): 25 g
- Dark navy (crown accents): 5 g
- Yellow (torch flame): 8–10 g
- Black embroidery thread (lashes, brows, tablet detail): small amount
Supplies:
- 2.5–3.0 mm crochet hook
- 6–8 mm safety eyes
- Polyester stuffing (~220 g)
- Yarn needle, stitch markers
🧵 Abbreviations
MR – magic ring
sc – single crochet
inc – increase
dec – invisible decrease
ch – chain
sl st – slip stitch
BLO – back loop only
FO – fasten off
👣 Legs & Lower Body (One Piece Base)
With skin tone:
R1: MR, 6 (6)
R2: inc ×6 (12)
R3: (1 sc, inc) ×6 (18)
R4–5: sc around (18)
Make 2 legs
Join with 3 ch
R6: sc around (42)
R7–10: sc around (42)
👗 Core Body (Hidden Under Robe)
Switch to teal:
R11: (5 sc, dec) ×6 (36)
R12–14: sc around (36)
R15: (4 sc, dec) ×6 (30)
R16–18: sc around (30)
R19: (3 sc, dec) ×6 (24)
Stuff firmly
R20: (2 sc, dec) ×6 (18)
😊 Head (Soft Rounded with Slight Chin)
Switch to skin tone:
R21: inc ×6 (12)
R22: (1 sc, inc) ×6 (18)
R23: (2 sc, inc) ×6 (24)
R24: (3 sc, inc) ×6 (30)
R25: (4 sc, inc) ×6 (36)
R26–32: sc around (36)
👉 Insert eyes between R27–28 (6 stitches apart)
👉 Embroider soft brows and lashes
Head Shaping
R33: (4 sc, dec) ×6 (30)
R34: (3 sc, dec) ×6 (24)
R35: (2 sc, dec) ×6 (18)
Stuff firmly
R36: (1 sc, dec) ×6 (12)
R37: dec ×6 (6)
FO
💇 Hair (Key Missing Element Fixed ✔️)
With medium brown:
Hair Cap (Full Coverage)
R1: MR, 6
R2: inc ×6 (12)
R3: (1 sc, inc) ×6 (18)
R4: (2 sc, inc) ×6 (24)
R5: (3 sc, inc) ×6 (30)
R6–8: sc around (30)
FO
Front Framing Hair (Important Detail)
Make 2 panels:
Ch 12
Row 1–6: sc across
👉 Sew along each side of face
👉 Curve slightly inward to frame cheeks
Back Hair Volume
Attach short strands across back of cap
Trim to neck length
👉 Sew hair cap securely
👉 Leave front hairline visible under crown
✋ Arms (Make 2)
With skin tone:
R1: MR, 6
R2: (sc, inc) ×3 (9)
R3–7: sc around (9)
Switch to teal:
R8–15: sc around (9)
Light stuffing
FO
👉 One arm angled upward (torch side)
👉 One arm forward holding tablet
👗 Robe (Wrapped Construction – Photo Accurate ✔️)
Instead of flat panels, the robe is built directly onto the body
Attach teal yarn at waist:
R1: BLO sc around (24)
R2: (3 sc, inc) ×6 (30)
R3: (4 sc, inc) ×6 (36)
R4: (5 sc, inc) ×6 (42)
R5–18: sc around (42)
Draped Overlay (Layered Fold)
Ch 40
Row 1–6: sc across
FO
👉 Wrap diagonally from shoulder across torso
👉 Tack lightly for natural folds
Shoulder Fold Detail
Ch 18
Row 1–5: sc across
Sew at shoulder to create layered fabric look
👑 Crown (Accurate Structure)
Base
Ch 42, join
R1–3: sc around
Vertical Panels (Front Detail)
Using navy yarn:
Surface crochet evenly spaced vertical bars
Spikes (Make 7)
Ch 6
Work: sc, hdc, dc, tr
FO
Attach evenly
👉 Crown sits slightly lifted, not tight to head
👉 Hair must remain visible at front
🔥 Torch
Handle
With teal:
R1: MR, 6
R2: inc ×6 (12)
R3–6: sc around (12)
FO
Flame
With yellow:
R1: MR, 5
R2: inc ×5 (10)
R3–5: sc around (10)
FO
Attach securely
📖 Tablet
With teal:
Ch 12
Row 1–12: sc across
FO
👉 Lightly stuff or stiffen
👉 Embroider subtle markings
🧩 Assembly
1️⃣ Sew head to body
2️⃣ Attach hair cap and shape front framing pieces
3️⃣ Position crown above hairline (not covering it)
4️⃣ Attach arms (one raised, one forward)
5️⃣ Wrap robe overlay and secure folds
6️⃣ Attach torch and tablet
7️⃣ Final embroidery details
🌟 Final Shaping Tips
- Keep face round and gentle
- Ensure hair is visible beneath crown edges
- Shape robe folds softly (not stiff)
- Slightly bend raised arm for natural pose
- Balance base so doll stands securely
💖 Final Thoughts
This refined design brings together soft sculpting, layered fabric effects, and iconic details for a beautifully balanced figure. The addition of visible hair, a wrapped robe structure, and dimensional crown creates a more lifelike and polished result while still maintaining that charming handmade style.
A meaningful and elegant crochet piece that stands out with both character and craftsmanship. 🗽✨