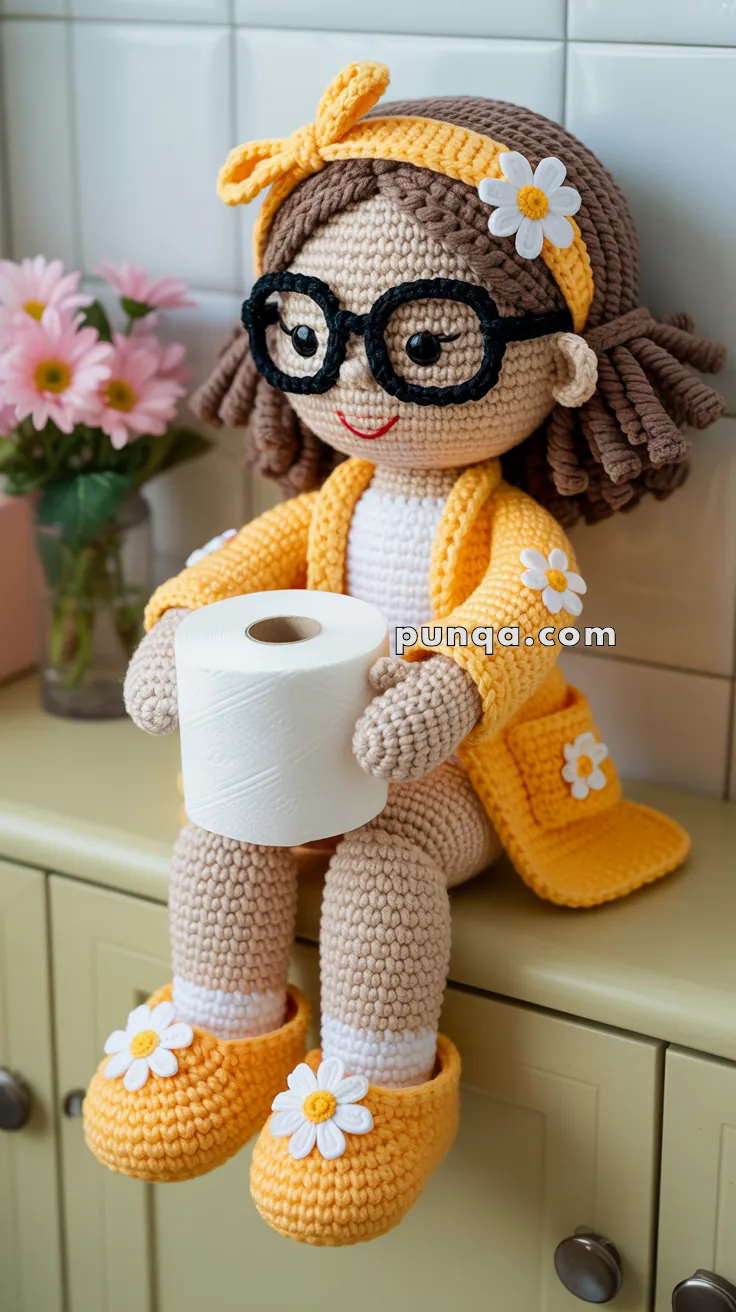
Brighten up your bathroom with the Amigurumi Sunny Daisy Bathroom Doll, a cheerful crochet companion who’s ready to add charm and giggles to your daily routine! ☀️🧻 With her bold glasses, sunny yellow robe, daisy-dotted slippers, and soft brown hair, Sunny Daisy isn’t just stylish—she’s also practical, perfectly designed to hold your toilet paper roll with flair. Whether perched on a shelf or sitting pretty on the tank, she brings a splash of sunshine to even the smallest space.
This pattern is a joyful blend of whimsy and function, ideal for crocheters who love playful home décor with personality. You can customize her robe color, add accessories like a tiny book or bath brush, or even stitch up a matching set for guest bathrooms. Whether you’re crafting a conversation starter or gifting a handmade smile, the Sunny Daisy Bathroom Doll is a delightful way to stitch up charm—one sunny loop at a time! 🧶🌼
🌼 Amigurumi Sunny Daisy Bathroom Doll Crochet Pattern
Bring sunshine and smiles into your bathroom with this adorable Sunny Daisy Bathroom Doll! ☀️🧻
With her oversized glasses, curly brown hair, cheerful yellow robe, daisy slippers, and sweet smile, she’s both decorative and practical. Designed as a shelf-sitting toilet paper holder, this charming doll comfortably hugs a standard toilet paper roll while adding cozy handmade personality to your home.
✨ Skill Level
Intermediate
This pattern includes:
✔️ Amigurumi shaping
✔️ Curly yarn hair
✔️ Thumb shaping
✔️ Glasses construction
✔️ Clothing construction
✔️ Toilet paper holder positioning
📏 Finished Size
Approximately 35–40 cm (14–16 inches) tall when seated.
🧶 Yarn Requirements
Worsted Weight Yarn
🧡 Skin Tone — 180 g
💛 Sunshine Yellow — 220 g
🤎 Medium Brown — 120 g
🤍 White — 80 g
🖤 Black — 40 g
🌼 Small amount yellow-orange for flower centers
🧵 Materials Needed
🪝 3.0–3.5 mm crochet hook
👀 14 mm safety eyes
🧸 Polyester stuffing
🪡 Tapestry needle
📍 Stitch markers
🧵 Black embroidery thread
🌸 Pink blush
🧻 Standard toilet paper roll
Optional: flexible craft wire
🔤 Abbreviations (US Terms)
MR – Magic Ring
sc – Single Crochet
inc – Increase
dec – Invisible Decrease
ch – Chain
sl st – Slip Stitch
BLO – Back Loop Only
FLO – Front Loop Only
FO – Fasten Off
🧍 Head
Using skin-tone yarn.
R1
MR 6
(6)
R2
inc x6
(12)
R3
(1 sc, inc) × 6
(18)
R4
(2 sc, inc) × 6
(24)
R5
(3 sc, inc) × 6
(30)
R6
(4 sc, inc) × 6
(36)
R7
(5 sc, inc) × 6
(42)
R8
(6 sc, inc) × 6
(48)
R9
(7 sc, inc) × 6
(54)
R10–20
sc around
(54)
Insert safety eyes between R13–14 with 9 stitches between them.
R21
(7 sc, dec) × 6
(48)
R22
(6 sc, dec) × 6
(42)
R23
(5 sc, dec) × 6
(36)
R24
(4 sc, dec) × 6
(30)
Stuff firmly.
R25
(3 sc, dec) × 6
(24)
R26
(2 sc, dec) × 6
(18)
R27
(1 sc, dec) × 6
(12)
R28
dec × 6
(6)
FO.
👃 Nose
Using skin-tone yarn.
R1
MR 6
R2
sc around
R3
(1 sc, dec) × 2
Lightly stuff.
FO.
Sew directly between glasses.
👂 Ears (Make 2)
Using skin-tone yarn.
R1
MR 6
R2
inc around
(12)
R3
sc around
(12)
FO.
Flatten slightly.
Sew just below eye level.
😊 Face Details
Using red embroidery thread:
😊 Embroider a small curved smile.
🌸 Add blush beneath cheeks.
💇 Curly Hair
Using brown yarn.
Create approximately 75 curls.
For each curl:
Ch 22
Work 3 sc into every chain.
The strip will naturally spiral.
Make varying lengths from 18–24 chains.
Attach densely across entire scalp.
Arrange curls to frame the face.
Allow curls to rest on shoulders.
🎀 Headband
Using yellow yarn.
Foundation
Ch 75
Rows 1–6
sc across
FO.
Wrap around forehead and sew closed.
🎀 Bow
Using yellow yarn.
Ch 20
Rows 1–7:
sc across
Wrap center tightly.
Sew onto left side of headband.
🌼 Hair Flower
Center
Using yellow.
MR 8
Join.
Petals
Using white.
(ch 5, sl st)
Repeat 8 times.
Sew beside bow.
🧸 Body
Using skin-tone yarn.
R1
MR 6
R2
inc x6
(12)
R3
(1 sc, inc) × 6
(18)
R4
(2 sc, inc) × 6
(24)
R5
(3 sc, inc) × 6
(30)
R6
(4 sc, inc) × 6
(36)
R7–12
sc around
(36)
Switch to white.
R13–20
sc around
(36)
Stuff firmly.
FO.
💪 Arms With Thumbs (Make 2)
Using skin-tone yarn.
Thumb
R1 MR 4
R2 sc around
FO.
Hand
R1 MR 6
R2 inc around
(12)
Attach thumb.
R3–5 sc around
(12)
Stuff lightly.
Arm
R6–22 sc around
(12)
Stuff lightly.
FO.
Attach bent forward.
The hands should gently cradle a toilet paper roll.
🦵 Legs (Make 2)
Using skin-tone yarn.
R1
MR 6
R2
inc x6
(12)
R3
(1 sc, inc) × 6
(18)
R4
(2 sc, inc) × 6
(24)
R5–22
sc around
(24)
🧦 Socks
Switch to white.
R23–27
sc around
(24)
👡 Daisy Slippers
Switch to yellow.
R28
BLO sc around
(24)
R29
(3 sc, inc) × 6
(30)
R30
(4 sc, inc) × 6
(36)
R31–34
sc around
(36)
R35
(4 sc, dec) × 6
(30)
R36
(3 sc, dec) × 6
(24)
Stuff toe firmly.
FO.
These oversized slippers create the rounded shape seen on the finished doll.
🌼 Slipper Flowers (Make 2)
Center
MR 8 using yellow.
Petals
Using white.
(ch 5, sl st)
Repeat 8 times.
Sew on slipper tops.
🧥 Daisy Robe
Using yellow yarn.
Back Panel
Ch 32
Rows 1–34:
sc across
Front Panels (Make 2)
Ch 12
Rows 1–34:
sc across
Sleeves (Make 2)
Ch 18
Rows 1–20:
sc across
Fold and seam.
Attach to robe.
Ch 10
Rows 1–8:
sc across
Sew onto lower front.
🌼 Robe Flowers
Make 3 daisies.
Sew:
🌼 One on sleeve
🌼 One on pocket
🌼 One near lower hem
👓 Oversized Glasses
Using black yarn.
Lens Rings (Make 2)
Ch 28
Join into ring.
Work 28 sc around.
FO.
Join rings with:
Ch 4 bridge.
Create side arms with chains.
Sew securely around eyes.
🪡 Assembly
✔️ Sew head to body
✔️ Attach ears
✔️ Attach nose
✔️ Add glasses
✔️ Sew hair
✔️ Attach headband
✔️ Add flower
✔️ Attach arms
✔️ Attach legs
✔️ Dress doll in robe
✔️ Add pocket
✔️ Add daisies
✔️ Attach slippers
✔️ Position toilet paper roll
🌸 Finishing Touches
Brush a small amount of blush onto the cheeks.
Arrange curls naturally around the face.
Shape the robe so it hangs open in front.
Position arms around a toilet paper roll and secure if desired.
Check that the doll sits comfortably on a shelf edge with legs dangling freely.
💕 Final Thoughts
Congratulations! 🌼☀️
Your Sunny Daisy Bathroom Doll is now ready to brighten your bathroom with handmade charm. From her curly hair and oversized glasses to her cozy daisy robe and cheerful slippers, every detail adds warmth and personality.
Place her on a shelf, countertop, or cabinet edge, tuck a toilet paper roll into her arms, and enjoy a whimsical bathroom companion that is both functional and adorable. 🧻🧶🌼💛
Happy Crocheting! 🪝✨