Ride the waves of creativity with this Amigurumi Surfer crochet pattern! Whether you’re crafting for beach lovers, ocean-inspired decor, or simply enjoy making dynamic character amigurumi, this free pattern lets you stitch up a fun-loving surfer ready to catch the perfect wave. With their laid-back stance, detailed surfboard, and breezy beach vibes, this crochet surfer captures the thrill of the sea in every stitch. Perfect for gifting to fellow ocean enthusiasts, decorating a coastal-themed space, or simply celebrating the joy of crochet, this amigurumi surfer is ready to bring a splash of adventure to your handmade collection! 🌊🏄✨
Designed for customization, this pattern allows you to experiment with different surfboard designs, textured stitches for realistic waves, or even tiny accessories like sunglasses or a beach towel for extra charm. Craft a classic surfer with sun-kissed tones, create a vibrant tropical version, or even stitch up a full seaside scene with swirling waves and marine creatures! Whether displayed as a playful accent, gifted to a fellow crochet lover, or made simply for the joy of crafting, this Amigurumi Surfer is a dynamic and exciting project—perfect for bringing the spirit of the ocean to every stitch! 🧶🌞
🏄 Ocean Wave Surfer Amigurumi Crochet Pattern
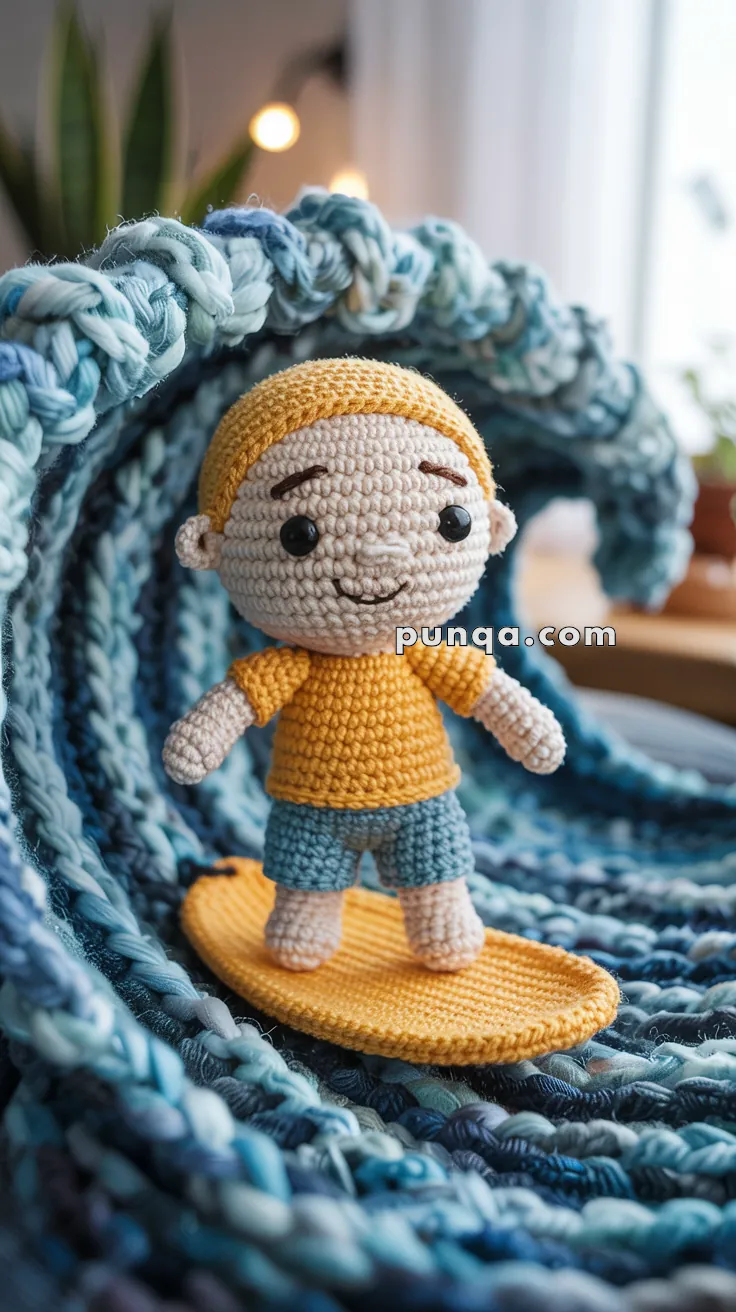
This cheerful little surfer features a large rounded head, tiny cap, striped swim shorts, a curved surfboard, and a giant curling ocean wave backdrop made from thick textured crochet strands. The oversized wave tunnel creates dramatic movement behind the surfer while the tiny doll proportions keep the entire display playful and whimsical.
The finished scene includes:
- a standing surfer doll
- textured curling wave tunnel
- rounded surfboard
- striped swim shorts
- oversized ocean backdrop
- dimensional foam details
✨ Skill Level
Intermediate to Advanced
This pattern includes:
- sculpted doll shaping
- color transitions
- wave construction
- dimensional assembly
- structural shaping
📏 Finished Size
Surfer Doll
Approximately 16–19 cm (6–7.5 inches) tall
Wave Scene
Approximately 30–38 cm (12–15 inches) wide
🧶 Materials
Yarn (DK Cotton Recommended)
Soft Peach
Approx. 70–90 g
Used for:
- head
- arms
- legs
- ears
Mustard Yellow
Approx. 50–70 g
Used for:
- shirt
- cap
- surfboard
Ocean Blues (4–5 Shades)
Approx. 220–300 g total
Used for:
- wave structure
- textured wave strands
- striped shorts
Use:
- navy
- denim blue
- aqua
- turquoise
- pale sky blue
White
Approx. 25 g
Used for:
- wave foam details
Brown
Approx. 10 g
Used for:
- eyebrows
- smile
🧵 Additional Supplies
- 2.5–3 mm crochet hook
- 8 mm black safety eyes
- Polyester stuffing
- Yarn needle
- Stitch markers
- Thick floral wire or pipe cleaner
- Hot glue (optional)
- Plastic canvas (optional structural support)
🔤 Abbreviations (US Terms)
- MR – magic ring
- sc – single crochet
- inc – increase
- dec – invisible decrease
- sl st – slip stitch
- ch – chain
- BLO – back loop only
- FO – fasten off
🌊 Design Notes
This surfer display is designed with:
- a tiny rounded surfer
- oversized curling wave
- textured thick yarn wave strands
- striped swim shorts
- rounded surfboard
- minimal embroidered face
The wave should appear much larger than the surfer.
The surfer should stand directly inside the wave tunnel.
🧒 Head
The head is oversized, smooth, and perfectly round.
Soft Peach
R1: MR 6 (6)
R2: inc x6 (12)
R3: (sc, inc) x6 (18)
R4: (2 sc, inc) x6 (24)
R5: (3 sc, inc) x6 (30)
R6: (4 sc, inc) x6 (36)
R7–R15: sc around (36)
Insert safety eyes between R10–11 with 7 stitches between them.
The eyes should sit low on the face.
R16: (4 sc, dec) x6 (30)
R17: (3 sc, dec) x6 (24)
Stuff firmly.
R18: (2 sc, dec) x6 (18)
R19: (sc, dec) x6 (12)
R20: dec x6 (6)
FO and close tightly.
😊 Face Details
Nose
Using peach yarn:
embroider a tiny horizontal nose bump centered between eyes.
Smile
Using brown yarn:
embroider a gentle curved smile beneath nose.
Eyebrows
Embroider short angled eyebrows above eyes.
Keep expression minimal and cheerful.
🟡 Tiny Cap
The cap sits tightly against the head.
Mustard Yellow
R1: MR 6
R2: inc x6 (12)
R3: (sc, inc) x6 (18)
R4–R7: sc around (18)
FO.
Sew onto crown.
👂 Ears (Make 2)
Soft Peach
R1: MR 5
FO leaving long tail.
Attach low beside eyes.
👕 Body & Shirt
The body is tiny and rounded with the shirt worked directly into the shorts.
Mustard Yellow
R1: MR 6 (6)
R2: inc x6 (12)
R3: (sc, inc) x6 (18)
R4: (2 sc, inc) x6 (24)
R5–R10: sc around (24)
Stuff lightly.
🩳 Changing from Shirt to Shorts
The shorts begin immediately beneath the yellow shirt section.
Clean Color Change Method
At the LAST stitch of the yellow round:
- Insert hook into stitch
- Yarn over with yellow
- Pull through stitch
- BEFORE final pull-through, drop yellow yarn
- Pull through using blue yarn
This creates a crisp clean waistband edge.
🩳 Striped Shorts
Use alternating blue shades every round.
Shorts Section
R11–R14: sc around (24)
Alternate:
- turquoise
- denim blue
- aqua
- pale blue
The shorts should appear softly striped rather than solid.
🦵 Creating Leg Openings
Flatten body evenly.
Round 15
Ch 5, skip 5 stitches, sc 7, ch 5, skip 5 stitches, sc 7
This creates two leg openings.
🦵 Legs (Make 2)
Attach yarn inside each leg opening.
Soft Peach
R1–R8: sc around opening (12)
Stuff lightly.
FO.
The legs should remain short and rounded.
💪 Arms (Make 2)
Start with Peach
R1: MR 6
R2–R5: sc around (6)
Switch to Mustard Yellow
R6–R11: sc around (6)
Stuff lightly near hands only.
FO leaving long tail.
The arms should angle slightly outward.
🏄 Surfboard
The surfboard is long, rounded, and narrow with soft pointed ends.
Mustard Yellow
Ch 28
Row 1
Sc in 2nd ch from hook and across (27)
Rows 2–10
Sc across.
🔻 Board Shaping
Decrease both ends gradually:
dec, sc across to last 2 sts, dec
Repeat several rows until ends become rounded.
FO.
The surfboard should remain long and smooth.
🌊 Wave Base Circle
The base supports the surfer and wave tunnel.
Dark Ocean Blue
R1: MR 6
R2: inc x6 (12)
R3: (sc, inc) x6 (18)
R4: (2 sc, inc) x6 (24)
Continue increasing evenly until base measures:
approximately 20–24 cm wide.
FO.
🌊 Textured Curling Wave Tunnel
The wave is heavily textured and sculptural.
Use Multiple Blue Shades Held Together
Hold:
- 2–3 strands together
OR - combine chunky textured yarns
Ch 90–110
Row 1
Sc across.
Rows 2–20
Sc across.
Increase ONLY along ONE long edge every few stitches.
This naturally forces the panel to curl inward.
The increased edge becomes the outer wave crest.
🌊 Creating the Thick Ocean Texture
The wave texture is one of the most important details.
To achieve the chunky ocean appearance:
- use loose tension
- mix yarn textures
- twist shades together
- allow strands to overlap naturally
The wave should appear thick and layered like moving water.
🌊 How to Attach the Wave to the Base
Step 1 — Shape the Tunnel
Curve the long wave panel into a hollow tunnel shape.
The increased edge becomes the dramatic curling crest.
Step 2 — Add Internal Support
Insert:
- thick floral wire
OR - pipe cleaner
inside the upper wave edge.
This helps hold the curl shape.
Step 3 — Sew Lower Edge to Base
Position the wave around the BACK HALF of the base circle.
Using matching blue yarn:
- whip stitch the lower wave edge securely to the base
- reinforce several times
The wave should stand upright without collapsing.
Step 4 — Secure the Curl
Bring the top curl inward.
Sew the inner curl tip near the base edge.
This creates the large hollow wave tunnel appearance.
Step 5 — Add Foam Details
Using white yarn:
- chain spirals
- create curly cords
- stitch small loops along the crest
This creates ocean foam texture.
🧩 Final Assembly
Attach Head
Sew securely to body.
Attach Arms
Position slightly below neck.
Attach Legs
Keep feet close together.
Attach Surfboard
Sew both feet directly onto surfboard.
Attach Surfer to Base
Sew surfboard securely onto center front of base.
Position Wave
Wave tunnel should curve dramatically behind surfer.
🌟 Finishing Tips
- Keep the wave oversized compared to the surfer
- Use mixed yarn textures for realistic water movement
- Shape the curl before final sewing
- Add extra foam spirals for motion
- Slightly steam wave if needed
💙 Final Thoughts
This ocean surfer crochet scene combines playful amigurumi charm with dramatic sculptural wave details. The oversized curling tunnel wave, striped swim shorts, rounded surfboard, and cheerful tiny surfer create a dynamic seaside display full of movement and personality. Whether used as summer décor, beach-themed nursery art, or a whimsical handmade centerpiece, this wave-riding surfer brings sunshine, motion, and coastal magic to any crochet collection.