Hey there! 😊 Let me dive right into the delightful world of amigurumi, especially the joy of crafting a swallow amigurumi pattern. Amigurumi, if you’re new to the term, is the Japanese art of crocheting small, stuffed yarn creatures. It’s such a fun and rewarding hobby that allows us to create adorable miniatures that are perfect for gifting, decorating, or simply cuddling. The swallow, with its graceful wings and delightful symbolism of freedom and hope, makes for a perfect amigurumi project. It brings a piece of nature’s beauty into our homes, all while offering a satisfying challenge to our crochet skills.
Starting an amigurumi project involves choosing the right yarn and colors that capture the swallow’s charm. I love selecting a soft yarn that feels good to the touch and adds that extra warmth to the finished piece. As we crochet, stitch by stitch, a small masterpiece begins to emerge from what was once just a ball of yarn. The process requires focus and creativity, but the result—a charming, handcrafted swallow—is entirely worth it. There’s something incredibly fulfilling about seeing the project come to life, knowing you’ve crafted each piece with care. Plus, each little swallow carries a personal touch, making it uniquely yours. 🧶💖
🐦 Amigurumi Swallow Crochet Pattern
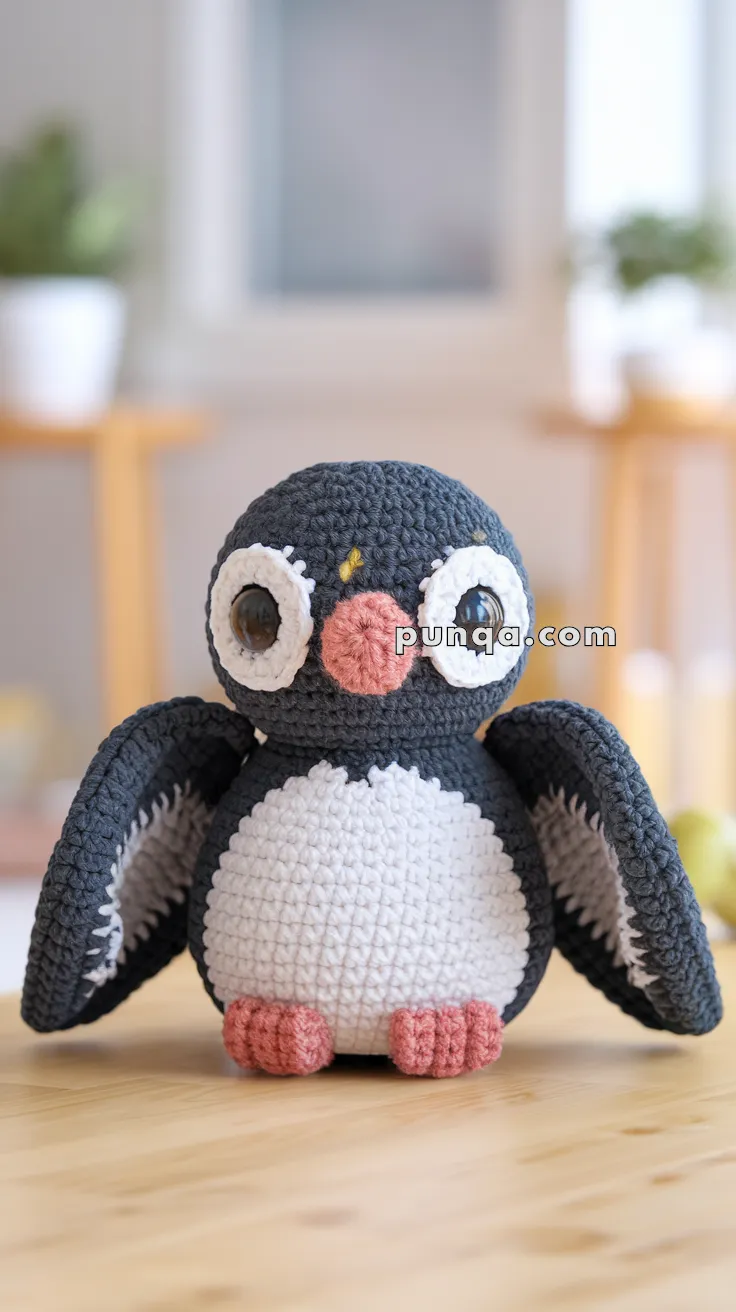
Bring the beauty of spring indoors with this adorable amigurumi swallow! 🤍 Featuring a delightfully plump body, oversized expressive eyes, softly curved wings, and tiny pink feet, this charming little bird is full of personality. The contrasting white tummy, embroidered feather detail, and rounded pink beak give this project an irresistibly sweet look that’s perfect for nursery décor, seasonal displays, or a thoughtful handmade gift.
Designed with smooth shaping and beginner-friendly construction, this swallow is worked mostly in simple single crochet with a few separate pieces that come together for a polished, professional finish.
✨ Skill Level
Intermediate
This pattern includes:
- 🐦 One-piece head and body
- 👀 Large layered eyes
- 🪽 Stuffed curved wings
- 🤍 Separate belly appliqué
- 🩷 Rounded beak and feet
- 🧵 Multi-piece assembly
📏 Finished Size
Using DK cotton yarn and a 3.0 mm crochet hook, the finished swallow measures approximately:
17–18 cm (6¾–7 in) tall
22 cm (8½ in) wide with wings attached.
🧶 Yarn Requirements
🖤 Charcoal Grey – 65 g
🤍 White – 40 g
🩷 Dusty Pink – 12 g
💛 Yellow – 1 g
Small amount of black embroidery thread
🧵 Materials
- 3.0 mm crochet hook
- 12 mm black safety eyes
- Polyester fiberfill
- Yarn needle
- Stitch markers
- Scissors
Optional:
- Small amount of plastic pellets for extra stability
🔤 Abbreviations (US Terms)
MR – Magic Ring
sc – Single Crochet
inc – Increase
dec – Invisible Decrease
sl st – Slip Stitch
ch – Chain
hdc – Half Double Crochet
FO – Fasten Off
Work in continuous rounds unless otherwise stated.
🐦 Head & Body
The swallow is worked as one continuous piece to create its signature rounded silhouette.
Using charcoal grey yarn.
R1
MR 6
(6)
R2
inc x6
(12)
R3
(1 sc, inc) ×6
(18)
R4
(2 sc, inc) ×6
(24)
R5
(3 sc, inc) ×6
(30)
R6
(4 sc, inc) ×6
(36)
R7
(5 sc, inc) ×6
(42)
R8
(6 sc, inc) ×6
(48)
R9–18
sc around
(48)
Insert safety eyes after attaching the white eye rings.
R19
(6 sc, dec) ×6
(42)
R20
(5 sc, dec) ×6
(36)
Begin stuffing firmly.
R21
(4 sc, dec) ×6
(30)
R22
(3 sc, dec) ×6
(24)
Continue stuffing until the body is very plump.
R23
(2 sc, dec) ×6
(18)
R24
(1 sc, dec) ×6
(12)
R25
dec ×6
(6)
Fasten off.
The finished body should resemble a rounded egg with no visible neck.
🤍 Belly Panel
Rather than changing colors while crocheting the body, the white tummy is made separately and sewn on for a smooth finish.
Using white yarn.
R1
Chain 8.
Beginning in the second chain:
6 sc
3 sc in the final chain.
Continue on the opposite side:
5 sc
inc
(16)
R2
inc
5 sc
3 inc
5 sc
2 inc
(22)
R3
sc around
R4
inc
9 sc
inc
9 sc
(24)
R5
(3 sc, inc) ×6
(30)
R6–11
sc around
(30)
Fasten off, leaving a long sewing tail.
Lightly stretch the panel into an oval before sewing.
Position it so the upper edge begins just beneath the eyes and the lower edge reaches the base of the body.
👀 Eye Rings (Make 2)
The oversized eyes are one of the swallow’s sweetest features.
Using white yarn.
R1
MR 6
R2
inc around
(12)
R3
(1 sc, inc) ×6
(18)
R4
sc around
(18)
Fasten off.
Place the safety eyes through the center of each ring before attaching them to the head.
Position the eyes close together with approximately 4 stitches between them.
🩷 Beak
The beak is a soft, flat circle that projects only slightly from the face.
Using dusty pink yarn.
R1
MR 6
R2
inc around
(12)
R3
(1 sc, inc) ×6
(18)
Fasten off.
Lightly stuff the center with a tiny amount of fiberfill.
Sew directly beneath the eyes.
Using black embroidery thread, stitch a short horizontal line across the center to define the beak.
💛 Forehead Feather Detail
Using yellow embroidery floss or fine yarn:
Work two short satin stitches above the beak between the eyes to create the tiny feather marking.
Keep this detail very subtle.
😊 Face Details
Using black embroidery thread:
🖤 Add a tiny stitch to emphasize the lower edge of the beak if desired.
🖤 Optional: embroider tiny white highlights on the pupils for extra sparkle.
At this stage your swallow should already have its adorable expression, with oversized eyes, a rounded pink beak, and its characteristic little yellow feather mark.
🪽 Wings (Make 2)
The swallow’s wings are one of its defining features. Each wing is lightly stuffed and gently curved, with a dark outer surface and a contrasting white inner feather panel. Instead of lying flat against the body, they are sewn slightly open to give the bird a relaxed resting pose.
Using charcoal grey yarn.
Outer Wing
R1
MR 6
(6)
R2
inc around
(12)
R3
(1 sc, inc) ×6
(18)
R4
(2 sc, inc) ×6
(24)
R5
(3 sc, inc) ×6
(30)
R6–9
sc around
(30)
R10
(3 sc, dec) ×6
(24)
R11–12
sc around
(24)
Flatten slightly.
Do not close the opening.
Fasten off.
Inner Feather Panel (Make 2)
Using white yarn.
R1
MR 6
R2
inc around
(12)
R3
(1 sc, inc) ×6
(18)
R4
(2 sc, inc) ×6
(24)
R5
sc around
(24)
Fasten off.
Place the white panel inside the grey wing.
Sew only around the outer edge, leaving a narrow grey border visible all the way around.
Lightly stuff the upper half of each wing before closing.
The finished wings should feel soft and slightly padded while keeping their curved shape.
✨ Wing Shaping
Before attaching the wings:
- Curve each wing gently inward.
- Keep the lower tip pointing slightly forward.
- The upper edge should remain rounded.
- Avoid overstuffing, as the wings should drape naturally rather than stand stiffly.
🩷 Feet (Make 2)
The swallow has tiny rounded feet with subtle embroidered toes rather than long individual claws.
Using dusty pink yarn.
R1
MR 6
(6)
R2
inc around
(12)
R3–4
sc around
(12)
Stuff firmly.
Flatten the opening.
Fasten off.
Make a second identical foot.
🧵 Embroidered Toes
Using matching pink yarn:
Embroider three short vertical stitches across the front of each foot.
These stitches should be evenly spaced and only a few rows long, creating the appearance of tiny toes.
🪶 Preparing the Wings
Place both finished wings beside the body before sewing.
The top of each wing should align approximately level with the lower edge of the eyes.
The bottom edge should extend just below the middle of the belly.
The wings should sit slightly away from the body instead of lying completely flat.
🪡 Preparing for Assembly
Before joining all the pieces together, check that you have:
✅ Main body
✅ White belly panel
✅ Two completed eyes
✅ Pink beak
✅ Two curved wings
✅ Two feet
At this stage:
- The belly should already be sewn onto the body.
- The eyes and beak should be securely attached.
- The feet should remain unattached until after the wings are positioned.
💡 Designer Tips
A few simple adjustments make a big difference to the finished bird.
🪽 Lightly massage the stuffing inside each wing to keep the outer edge rounded.
🐦 Keep the wings symmetrical by checking their angle before sewing.
🤍 The white inner panels should remain fully visible when viewed from the front.
🩷 Position both feet close together beneath the belly for the cutest seated pose.
🧶 Stuff the feet firmly so they support the rounded body without collapsing.