Create a cozy and whimsical crochet piece with this Amigurumi Sweet Honey Home Hanging Bee Nest pattern! Inspired by the charm of a buzzing beehive, this delightful design captures the warmth of nature with its soft textures, intricate details, and cheerful golden hues. Whether you’re crafting for bee lovers, adding a playful touch to your decor, or simply enjoy making nature-inspired amigurumi designs, this pattern lets you stitch up a charming hanging beehive bursting with personality! Perfect for brightening up any space, this crochet piece brings a touch of handmade sweetness to your surroundings. 🐝✨
Designed for customization, this pattern allows you to experiment with different shades of honey gold, embroidered details, or even tiny accessories like miniature bees or flowers for extra flair. Craft a classic beehive with warm earthy tones, create a playful version with pastel hues, or even stitch up a full set of nature-inspired amigurumi for a delightful display! Whether gifted as a thoughtful keepsake, displayed as a cheerful accent, or made simply for the joy of crafting, this Amigurumi Sweet Honey Home Hanging Bee Nest is a fun and creative project—perfect for bringing a touch of handmade nature to every stitch! 🧶💖✨
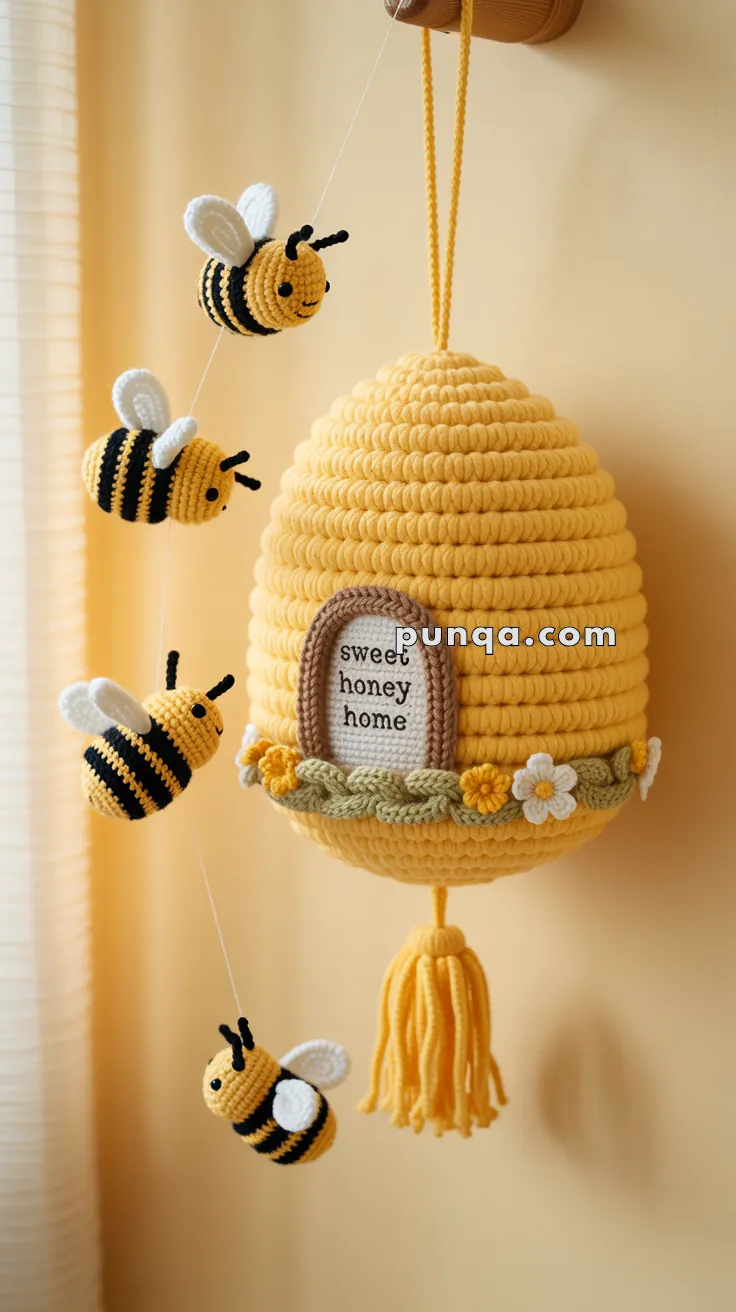
🐝 Amigurumi Sweet Honey Home Hanging Bee Nest Crochet Pattern
Turn your space into a cheerful, handmade haven with this Sweet Honey Home Hanging Nest! Featuring a charming striped bee family, floral trim, and a textured golden dome, this amigurumi wall decor brings joy, warmth, and whimsy to any room. With a sturdy, puffed hive and flying bees on threads, it’s a perfect project for nurseries, playrooms, or cozy craft corners.
✨ Skill Level
🧶 Intermediate
You will use:
• working in continuous rounds
• structured shaping
• surface layering (door + frame + garland)
• decorative appliqués
• simple embroidery
📏 Finished Size
Approx. 30–36 cm (12–14 inches) tall including tassel and hanging loop.
🧶 Yarn Requirements
Worsted weight yarn.
Golden yellow (hive + tassel + hanging cord): 170–200 g (approx. 320–360 m)
White (door panel, wings, flowers): 25 g (approx. 50 m)
Brown (door frame): 20 g (approx. 40 m)
Sage/olive green (leaf garland): 25 g (approx. 50 m)
Bright yellow (bee bodies): 20 g (approx. 40 m)
Black (bee stripes, antennae): 15 g (approx. 30 m)
Mustard + soft yellow (flower centers): small amounts
Polyester stuffing: 200–250 g
🧰 Tools and Supplies
3.5–4.0 mm crochet hook
Tapestry needle
Stitch marker
Embroidery needle
Plastic canvas / foam circle for structure
Thin cotton thread (for hanging bees)
🧵 Abbreviations (US Terms)
MR – magic ring
sc – single crochet
inc – increase
dec – invisible decrease
sl st – slip stitch
ch – chain
hdc – half double crochet
dc – double crochet
FO – fasten off
🍯 Hive Body (Spiral Rib Texture)
Using golden yellow yarn.
Round 1: MR, 6 sc (6)
Round 2: inc ×6 (12)
Round 3: (1 sc, inc) ×6 (18)
Round 4: (2 sc, inc) ×6 (24)
Round 5: (3 sc, inc) ×6 (30)
Round 6: (4 sc, inc) ×6 (36)
Round 7: (5 sc, inc) ×6 (42)
Round 8: (6 sc, inc) ×6 (48)
Rounds 9–26: sc around (48)
👉 Important Texture Detail
To match the rounded “rope-like” hive ridges:
• Work 2 rounds normal, 1 round in BLO, repeat
• Keep stitches tight and consistent
This creates thick horizontal bands rather than sharp ridges.
Round 27: (6 sc, dec) ×6 (42)
Round 28: (5 sc, dec) ×6 (36)
Round 29: (4 sc, dec) ×6 (30)
Round 30: (3 sc, dec) ×6 (24)
Insert structure + stuff firmly.
Round 31: (2 sc, dec) ×6 (18)
Round 32: (1 sc, dec) ×6 (12)
Round 33: dec ×6 (6)
FO and close.
🧱 Structure Tip
Insert a firm circular insert at the base and optionally a second small one near the top. This keeps the hive smooth, rounded, and upright when hanging.
🚪 Door Panel (White Insert)
Using white yarn.
Ch 9
Row 1: sc in 2nd ch and across (8)
Rows 2–7: ch 1, turn, sc across (8)
Shape curved top:
Row 8: dec, 4 sc, dec (6)
Row 9: dec, 2 sc, dec (4)
Row 10: sc 4
Row 11: dec, sc, dec (3)
FO.
Embroider text using black thread.
🟤 Door Frame (Thick Raised Rim)
The frame is soft, padded, and rounded, not flat.
Using brown yarn.
Step 1: Crochet a Tube Cord
Ch 24
Round 1: sl st in each chain to end
Round 2: working into back loops only, sl st around
FO.
👉 This creates a thick, rope-like cord.
Step 2: Shape the Frame
Curve the cord into a rounded arch shape:
• sides straight
• top softly curved
• bottom slightly wider
Step 3: Attach
Place the cord around the white door and sew carefully.
Use tight stitches so it sits slightly raised.
👉 This produces the puffy ring border around the door.
🌿 Leaf Garland Ring (Wrapped Around Hive)
This is a continuous decorative ring sitting slightly raised from the surface.
Using olive/green yarn.
Ch 65–75 (fit to hive circumference).
Leaf Stitch Pattern
In same stitch:
sl st, sc, hdc, dc, hdc, sc, sl st
Skip next stitch.
Repeat across entire chain.
FO.
Placement
Wrap the garland horizontally around the hive:
• positioned just under the door
• slightly lifted from surface (do not pull tight)
Sew lightly so it keeps dimension.
🌼 Flowers (Make 5–6)
Using white or yellow yarn:
MR
(ch 2, 2 dc, ch 2, sl st) ×5
FO.
Add small embroidered centers.
Attach along the garland.
🐝 Bees (Make 4)
Body
Using yellow:
Round 1: MR, 6 sc (6)
Round 2: inc ×6 (12)
Round 3: (1 sc, inc) ×6 (18)
Rounds 4–6: sc around (18)
👉 Change color every 2 rounds (yellow ↔ black)
Round 7: (1 sc, dec) ×6 (12)
Round 8: dec ×6 (6)
Stuff and FO.
Wings (Make 2 per bee)
Using white yarn:
Ch 5, sl st into first chain
Sew to body sides.
Antennae
Attach short black yarn strands and knot tips.
Face
Embroider tiny eyes and a curved smile.
Hanging
Attach thin thread to bee tops.
Sew threads to the upper side of the hive, spacing evenly.
Vary lengths for movement.
🎀 Hanging Cord
Using yellow yarn:
Ch 45
Make a second strand.
Attach both strands at top center for a double hanging cord.
🧶 Bottom Tassel
Cut 14–18 strands (20–22 cm).
Attach at bottom center.
Wrap top tightly with yarn and trim ends evenly.
🧩 Final Assembly
Sew the white door panel to the hive front.
Attach the padded brown frame around it.
Wrap and secure the leafy garland.
Add flowers along the garland.
Attach bees at varying heights.
Add hanging cord and tassel.
✨ Finishing Touches
Shape the hive gently with your hands.
Keep the garland slightly lifted for dimension.
Balance bee placement for a natural floating effect.
Smooth the door frame so it appears evenly rounded.
🍯 A Cozy Handmade Honey Home
This textured honey hive wall hanging is full of warmth and detail—from the soft spiral ridges to the raised door frame and blooming garland. The tiny bees bring movement and life, while the golden tones create a cozy, cheerful feel.
A beautiful handmade piece that adds sweetness, texture, and a touch of nature-inspired charm to any space. 🐝💛🌼