Bring a dash of classic cartoon mischief to your crochet collection with this Amigurumi Sylvester the Cat pattern! 🐱🎬 With his signature black-and-white fur, oversized red nose, and that eternally flustered expression, Sylvester is ready to leap off the screen and into your yarn stash. Whether you’re a lifelong Looney Tunes fan or just love crafting expressive characters, this iconic feline is a playful and nostalgic project that’s sure to spark smiles and maybe a few “Sufferin’ succotash!” moments.
Designed with bold shapes and animated charm, this pattern invites you to explore fun colorwork, sculpted features, and whimsical extras like a tiny Tweety companion or a mischievous pose. Customize Sylvester with your favorite yarns or add embroidered details to bring out his personality. Whether perched on a shelf, gifted to a cartoon lover, or starring in a handmade toon-town scene, this Sylvester Amigurumi is a joyful and satisfying project—perfect for stitching up a little animated magic, one loop at a time! 🧶✨📺
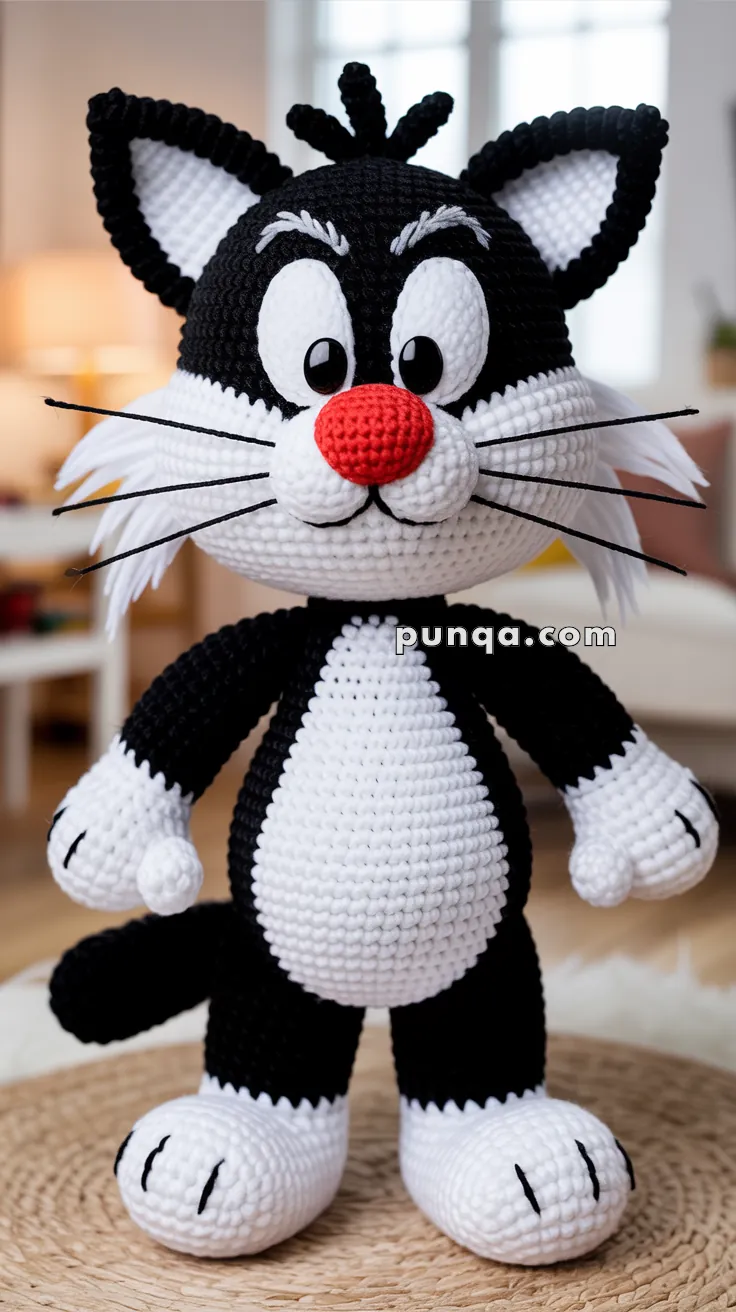
🐾 Amigurumi Sylvester-Inspired Tuxedo Cat Crochet Pattern
Create a wonderfully expressive black-and-white tuxedo cat with an oversized cartoon head, tall pointed ears, huge oval eyes, a bright red round nose, full white muzzle, dramatic cheek fluff, long whiskers, chunky paws, a white teardrop-shaped belly, and a thick curved black tail. 🐱❤️
This version is designed with exaggerated classic-cartoon proportions: the head is much larger than the torso, the feet are broad and rounded, the arms hang loosely beside the body, and the facial features sit close together at the center of the face for a mischievous, animated expression.
The white muzzle is worked as two separate stuffed cheek pieces rather than one single oval. This gives the face the distinctive double-cheek shape, creates a natural center groove under the nose, and makes the mouth embroidery much cleaner.
✨ Skill Level
Intermediate to Advanced
This project includes:
- Oversized head shaping
- Large layered eyes
- Separate stuffed muzzle cheeks
- Dimensional red nose
- Double-layered ears
- Crocheted cheek-fur tufts
- Large hands and feet
- Separate belly appliqué
- Three-dimensional fingers
- Embroidered eyebrows and claws
- Long whisker installation
- Standing-pose assembly
📏 Finished Size
Using bulky chenille or plush yarn with a 4 mm crochet hook, the finished cat measures approximately:
- 38–42 cm / 15–16½ in tall
- 22–25 cm / 8½–10 in across the head including ears
- 18–20 cm / 7–8 in across the feet
Finished size varies with yarn thickness, tension, stuffing, and ear placement.
🧶 Required Yarn Amount
For one finished cat:
- 🖤 Black chenille/plush yarn — approximately 240–280 g
- 🤍 White chenille/plush yarn — approximately 190–220 g
- ❤️ Bright red chenille/plush yarn — approximately 20–25 g
- 🩶 Pale gray or white smooth yarn for eyebrows — approximately 3–5 g
- 🖤 Smooth black yarn or embroidery floss — approximately 5 g
Polyester fiberfill — approximately 350–450 g
If using worsted-weight cotton instead of plush yarn, the finished cat will be smaller and will require substantially less yarn.
🧵 Materials
- 4 mm crochet hook
- Optional 3.5 mm hook for the eye panels and small details
- Two 20–24 mm black safety eyes
- Polyester fiberfill
- Tapestry needle
- Long doll-making needle
- Stitch markers
- Pins
- Scissors
- Black nylon cord, fishing line, or stiff embroidery cord for whiskers
- Optional plastic pellets for standing stability
- Optional plastic canvas for the feet
For a child-safe version, embroider the eyes and whiskers instead of using hard components.
🔤 Abbreviations — US Terms
MR — Magic Ring
sc — Single Crochet
inc — Increase: 2 sc in one stitch
dec — Invisible Decrease
sl st — Slip Stitch
ch — Chain
hdc — Half Double Crochet
dc — Double Crochet
tr — Treble Crochet
BLO — Back Loop Only
FLO — Front Loop Only
FO — Fasten Off
st — Stitch
Work in continuous rounds unless stated otherwise.
🐱 Oversized Head
The head is broad, round, and slightly wider through the cheeks than at the crown.
Using black yarn:
R1
MR 6.
(6)
R2
inc ×6.
(12)
R3
(1 sc, inc) ×6.
(18)
R4
(2 sc, inc) ×6.
(24)
R5
(3 sc, inc) ×6.
(30)
R6
(4 sc, inc) ×6.
(36)
R7
(5 sc, inc) ×6.
(42)
R8
(6 sc, inc) ×6.
(48)
R9
(7 sc, inc) ×6.
(54)
R10
(8 sc, inc) ×6.
(60)
R11
(9 sc, inc) ×6.
(66)
R12
(10 sc, inc) ×6.
(72)
R13–23
sc around.
(72)
R24
(10 sc, dec) ×6.
(66)
R25
(9 sc, dec) ×6.
(60)
R26
(8 sc, dec) ×6.
(54)
R27
(7 sc, dec) ×6.
(48)
Begin stuffing firmly.
R28
(6 sc, dec) ×6.
(42)
R29
(5 sc, dec) ×6.
(36)
Continue stuffing. Keep the forehead high and the lower-front face slightly flatter for the muzzle pieces.
R30
(4 sc, dec) ×6.
(30)
R31
(3 sc, dec) ×6.
(24)
R32
(2 sc, dec) ×6.
(18)
R33
(1 sc, dec) ×6.
(12)
R34
dec ×6.
(6)
FO and close.
Gently shape the head into a large rounded oval.
👀 White Eye Panels — Make 2
The eyes are tall, narrow ovals rather than circles.
Using white yarn:
R1
Ch 10.
Starting in the second chain:
8 sc, 3 sc in final chain.
Continue down opposite side:
7 sc, inc.
(20)
R2
inc, 7 sc, 3 inc, 7 sc, 2 inc.
(26)
R3
2 sc, inc, 7 sc, (2 sc, inc) ×3, 7 sc, (2 sc, inc) ×2.
(32)
R4
sc around.
(32)
FO, leaving a long sewing tail.
Flatten each eye into a tall oval.
⚫ Pupils
Insert one safety eye through each white panel.
Position the pupil:
- Slightly below center
- Slightly toward the inner edge
- At approximately the same height on both eyes
Secure the washer behind the white panel.
If using embroidered pupils, work a dense black oval approximately 2–2.5 cm tall.
🪡 Attaching the Eyes
Place the eye panels close together in the center of the head.
They should:
- Sit vertically
- Nearly touch at their inner edges
- Start well above the muzzle
- Angle slightly inward at the bottom
Pin both before sewing.
Sew around each outer edge using white yarn.
Do not stuff the eye panels.
🤍 Muzzle Cheeks — Make 2
Each muzzle half is a separate rounded white oval.
Using white yarn:
R1
MR 6.
(6)
R2
inc ×6.
(12)
R3
(1 sc, inc) ×6.
(18)
R4
(2 sc, inc) ×6.
(24)
R5
(3 sc, inc) ×6.
(30)
R6–8
sc around.
(30)
R9
(3 sc, dec) ×6.
(24)
Add light stuffing.
R10
(2 sc, dec) ×6.
(18)
FO, leaving a long sewing tail.
Do not close the opening.
Make two identical pieces.
🪡 Attaching the Muzzle
Pin the two white muzzle pieces side by side beneath the eyes.
The inner edges should touch and form a visible vertical groove.
The muzzle should:
- Cover most of the lower face
- Project clearly forward
- Extend slightly beyond the eyes at both sides
- Remain symmetrical
- Sit high enough that the red nose overlaps both cheeks
Sew the upper and outer edges first.
Add a little more stuffing if necessary before sewing the lower edges.
❤️ Oversized Red Nose
Using red yarn:
R1
MR 6.
(6)
R2
inc ×6.
(12)
R3
(1 sc, inc) ×6.
(18)
R4
(2 sc, inc) ×6.
(24)
R5
(3 sc, inc) ×6.
(30)
R6–8
sc around.
(30)
R9
(3 sc, dec) ×6.
(24)
R10
(2 sc, dec) ×6.
(18)
Stuff firmly.
FO, leaving a long sewing tail.
Sew the nose directly over the upper center of the two muzzle cheeks.
It should overlap both white pieces equally.
😸 Mouth
Using black embroidery yarn:
- Make a short vertical stitch beneath the red nose.
- Bring the line down into the groove between the two muzzle cheeks.
- Add one shallow curve toward the left.
- Add a matching curve toward the right.
The finished mouth should form a soft upside-down Y.
👂 Outer Ears — Make 2
The ears are tall triangular pieces worked flat so they remain pointed rather than cylindrical.
Using black yarn:
Row 1
Ch 19.
Starting in the second chain, sc across.
(18)
Row 2
Ch 1, turn, dec, 14 sc, dec.
(16)
Row 3
Ch 1, turn, sc across.
(16)
Row 4
Ch 1, turn, dec, 12 sc, dec.
(14)
Row 5
sc across.
(14)
Row 6
dec, 10 sc, dec.
(12)
Row 7
sc across.
(12)
Row 8
dec, 8 sc, dec.
(10)
Row 9
dec, 6 sc, dec.
(8)
Row 10
dec, 4 sc, dec.
(6)
Row 11
dec, 2 sc, dec.
(4)
Row 12
dec twice.
(2)
FO.
Join black yarn at one bottom corner and sc evenly around both sloping edges.
Work 2 sc at the tip.
FO, leaving a long sewing tail.
🤍 Inner Ears — Make 2
Using white yarn:
Row 1
Ch 15.
Starting in second chain, sc across.
(14)
Row 2
dec, 10 sc, dec.
(12)
Row 3
sc across.
(12)
Row 4
dec, 8 sc, dec.
(10)
Row 5
dec, 6 sc, dec.
(8)
Row 6
dec, 4 sc, dec.
(6)
Row 7
dec, 2 sc, dec.
(4)
Row 8
dec twice.
(2)
FO.
Sew one white panel onto each black ear, leaving a thick black border visible.
🪡 Attaching the Ears
Pin the ears high on the head.
Angle them:
- Upward
- Slightly outward
- With their inner edges leaning gently toward the center
Pinch each lower edge before sewing to create a shallow cup.
Sew firmly through the folded bases.
🖤 Top Hair Tufts — Make 3
Using black yarn:
Large Center Tuft
Ch 12.
Starting in second chain, sl st back.
FO.
Side Tufts — Make 2
Ch 9.
Starting in second chain, sl st back.
FO.
Fold each chain slightly to make it thicker.
Sew the large tuft at the crown center and the two smaller tufts angled outward.
For an even fuller result, crochet each tuft as a narrow 4-stitch tube instead of a simple chain.
🤍 Cheek-Fur Tufts — Make 2
The side cheek fluff is long and feathery.
Using white yarn:
Base
Ch 10.
Starting in second chain, sc across.
(9)
Do not turn.
At several stitches across the base, work long fringe chains:
- Ch 9, sl st back
- Ch 11, sl st back
- Ch 13, sl st back
- Ch 11, sl st back
- Ch 9, sl st back
FO.
Make two.
Sew one beneath each ear, extending sideways behind the white muzzle.
Separate the strands gently with your fingers for a fuller appearance.
🩶 Eyebrows — Make 2
Using pale gray or white smooth yarn:
Ch 10.
Starting in second chain, sl st loosely back.
FO.
Curve each eyebrow slightly.
Sew above each eye, angling the inner ends downward to create the mischievous expression.
Alternatively, embroider each eyebrow with several thick stitches.
🐈 Compact Body
The body is black and much smaller than the head.
Using black yarn:
R1
MR 6.
(6)
R2
inc ×6.
(12)
R3
(1 sc, inc) ×6.
(18)
R4
(2 sc, inc) ×6.
(24)
R5
(3 sc, inc) ×6.
(30)
R6
(4 sc, inc) ×6.
(36)
R7
(5 sc, inc) ×6.
(42)
R8
(6 sc, inc) ×6.
(48)
R9–18
sc around.
(48)
R19
(6 sc, dec) ×6.
(42)
R20–22
sc around.
(42)
R23
(5 sc, dec) ×6.
(36)
R24–25
sc around.
(36)
Begin stuffing firmly.
R26
(4 sc, dec) ×6.
(30)
R27
(3 sc, dec) ×6.
(24)
FO, leaving a long head-attachment tail.
🤍 White Belly Panel
The belly is a large white teardrop appliqué covering most of the torso front.
Using white yarn:
R1
Ch 16.
Starting in second chain:
14 sc, 3 sc in final chain.
Continue along opposite side:
13 sc, inc.
(32)
R2
inc, 13 sc, 3 inc, 13 sc, 2 inc.
(38)
R3
(5 sc, inc) ×6, 2 sc.
(44)
R4–8
sc around.
(44)
R9
(5 sc, dec) ×6, 2 sc.
(38)
R10
sc around.
(38)
R11
(4 sc, dec) ×6, 2 sc.
(32)
R12
sc around.
(32)
FO.
Flatten the panel vertically.
Pin it to the torso with the narrow end at the chest and the widest section over the belly.
Sew around the entire edge.
💪 Arms — Make 2
The arms are black through the upper section with large white hands.
Begin with white yarn.
R1
MR 6.
(6)
R2
inc ×6.
(12)
R3
(1 sc, inc) ×6.
(18)
R4
(2 sc, inc) ×6.
(24)
R5–8
sc around.
(24)
R9
(2 sc, dec) ×6.
(18)
Switch to black.
R10–19
sc around.
(18)
R20
(4 sc, dec) ×3.
(15)
R21
sc around.
(15)
Stuff the hands firmly and the arms lightly.
Flatten the shoulder opening.
FO, leaving a long sewing tail.
🤍 Thumb — Make 2
Using white yarn:
R1
MR 5.
(5)
R2–3
sc around.
(5)
FO.
Lightly stuff or leave unstuffed.
Sew one thumb to the inner side of each hand.
Angle the thumbs slightly upward.
✋ Hand Claw Lines
Using black embroidery yarn, stitch two short curved lines across each white hand.
Keep the lines near the outer edge of the hand.
🦵 Legs — Make 2
The legs are short, thick, and black.
Using black yarn:
R1
MR 6.
(6)
R2
inc ×6.
(12)
R3
(1 sc, inc) ×6.
(18)
R4
(2 sc, inc) ×6.
(24)
R5–13
sc around.
(24)
R14
(2 sc, dec) ×6.
(18)
R15–17
sc around.
(18)
Stuff firmly.
FO, leaving a long sewing tail.
🦶 Oversized Feet — Make 2
Using white yarn:
R1
Ch 10.
Starting in second chain:
8 sc, 3 sc in final chain.
Continue along opposite side:
7 sc, inc.
(20)
R2
inc, 7 sc, 3 inc, 7 sc, 2 inc.
(26)
R3
2 sc, inc, 7 sc, (2 sc, inc) ×3, 7 sc, (2 sc, inc) ×2.
(32)
R4
(7 sc, inc) ×4.
(36)
R5–9
sc around.
(36)
R10
10 sc, dec ×8, 10 sc.
(28)
R11
sc around.
(28)
Stuff firmly, especially at the toe.
FO, leaving a long tail.
Sew one foot to the bottom of each black leg.
Keep the long oval direction pointing forward.
🖤 Foot Claw Lines
Using black embroidery yarn, stitch three long curved toe lines on the upper front of each white foot.
Space them evenly.
🐈 Tail
The tail is thick and curved rather than extremely thin.
Using black yarn:
R1
MR 6.
(6)
R2
inc ×6.
(12)
R3
(1 sc, inc) ×6.
(18)
R4–10
sc around.
(18)
R11
(4 sc, dec) ×3.
(15)
R12–22
sc around.
(15)
R23
(3 sc, dec) ×3.
(12)
R24–31
sc around.
(12)
R32
(2 sc, dec) ×3.
(9)
R33–36
sc around.
(9)
Stuff lightly as you work.
FO and close.
Curve the tail gently.
Sew it low on one side of the back so it extends outward beside the leg.
🧵 Whiskers
Cut six pieces of black nylon cord or stiff thread approximately 15–17 cm / 6–6¾ in long.
Use three whiskers on each side.
Position each set:
- One angled slightly upward
- One almost horizontal
- One angled slightly downward
Insert them beside the muzzle cheeks.
Secure them firmly from behind the facial appliqués.
For a completely soft toy, embroider long whisker lines instead.
🪡 Head-to-Body Assembly
Center the head over the torso.
Because the head is extremely large, reinforce the neck carefully.
Before sewing completely:
- Add extra stuffing to the upper body.
- Pin the head.
- Check the doll from the front and side.
- Tilt the head only very slightly forward.
- Sew around the neck twice.
Add several hidden vertical stitches from the upper back into the lower head for additional support.
🪡 Attaching the Arms
Sew the arms high on the body sides.
Angle them downward and slightly outward.
The hands should sit roughly level with the lower belly.
The white-black color transition should remain clearly visible.
🪡 Attaching the Legs
Position the legs beneath the body.
Keep them parallel and slightly apart.
The black leg section should remain visible between the body and white feet.
Sew securely before adding the feet if you prefer easier positioning.
⚖️ Standing Stability
The large head requires a stable lower body.
For best results:
- Stuff the legs firmly.
- Stuff the feet very firmly.
- Flatten the bottom of each foot.
- Insert a plastic-canvas oval into each sole.
- Place a small sealed pouch of plastic pellets in the lower body if desired.
- Keep the legs directly beneath the body rather than far apart.
- Let the tail lightly touch the display surface if extra support is needed.
🪡 Recommended Assembly Order
For the cleanest finish:
- Crochet and stuff the head.
- Make the eyes and install the pupils.
- Attach both eye panels.
- Crochet and sew the two muzzle cheeks.
- Attach the red nose.
- Embroider the mouth.
- Make and attach the ears.
- Add the cheek-fur tufts.
- Add the eyebrows.
- Attach the top hair tufts.
- Complete the body.
- Sew on the white belly.
- Make and attach the arms.
- Add the thumbs and hand markings.
- Complete the legs and feet.
- Embroider the toe markings.
- Attach the tail.
- Sew the head to the body.
- Insert the whiskers last.
✨ Final Shaping
For the strongest cartoon silhouette:
- Keep the head dramatically oversized.
- Position the ears high and wide.
- Keep the eyes tall and close together.
- Place the pupils low and slightly inward.
- Let the red nose overlap both muzzle cheeks.
- Keep the muzzle very full and dimensional.
- Extend the white cheek tufts sideways.
- Angle the eyebrows inward for the expressive look.
- Keep the body narrower than the head.
- Center the white belly.
- Make the hands and feet noticeably oversized.
- Curve the tail gently to one side.
- Keep the legs straight enough for a standing pose.
💡 Helpful Tips
Pin every facial piece before sewing. Moving the eyes or muzzle only one or two stitches can dramatically change the expression.
Install the muzzle before the red nose so you can center the nose precisely over the cheek seam.
Do not overstuff the eye panels or ears; they should remain flat.
Use smooth cotton or embroidery floss instead of chenille for eyebrows, mouth lines, and claws.
When sewing chenille pieces, use the core thread of the yarn if the fluffy outer fibers begin to shed.
For a cleaner face, use matching sewing yarn to attach the white eye and muzzle pieces rather than pulling thick plush yarn through every edge stitch.
🧼 Care Instructions
Spot clean gently with a damp cloth.
Allow the doll to air dry completely.
Reshape the ears, muzzle, feet, and tail while damp.
Avoid machine washing when safety eyes, plastic canvas, pellets, wire, or stiff whiskers are used.
🌟 Final Thoughts
Your mischievous tuxedo cat is ready to take center stage. 🐱❤️
With his enormous rounded black head, towering pointed ears, dramatic white eyes, plump double muzzle, bright red nose, sweeping whiskers, fluffy white cheeks, compact black body, large white belly, mitten-like hands, chunky feet, and curved tail, this amigurumi has all the exaggerated charm of a classic animated cat while remaining soft and wonderfully cuddly.
Happy crocheting! 🧶✨



Thank you for sharing the pattern , I was looking for it