Soft, cuddly, and full of love—this Amigurumi Valentine’s Day Teddy Bear crochet pattern is the perfect way to craft a heartfelt gift! With its gentle expression, tiny embroidered details, and adorable heart accents, this charming bear is ready to spread warmth and affection. Whether you’re making it for a loved one, a seasonal décor piece, or simply enjoy creating sweet amigurumi designs, this FREE pattern is a wonderful addition to your crochet collection.
Designed for intermediate crocheters, this pattern allows for customization in fur texture, heart placement, and even tiny accessories like a bow or scarf to enhance its personality. Choose classic red and pink hues for a traditional Valentine’s look or experiment with soft pastels for a dreamy aesthetic! Whether displayed as part of a romantic setup or gifted to someone special, this amigurumi teddy bear is sure to bring smiles. Grab your hook, select your favorite yarn, and let’s create a little bundle of love! 🧸❤️✨🧶
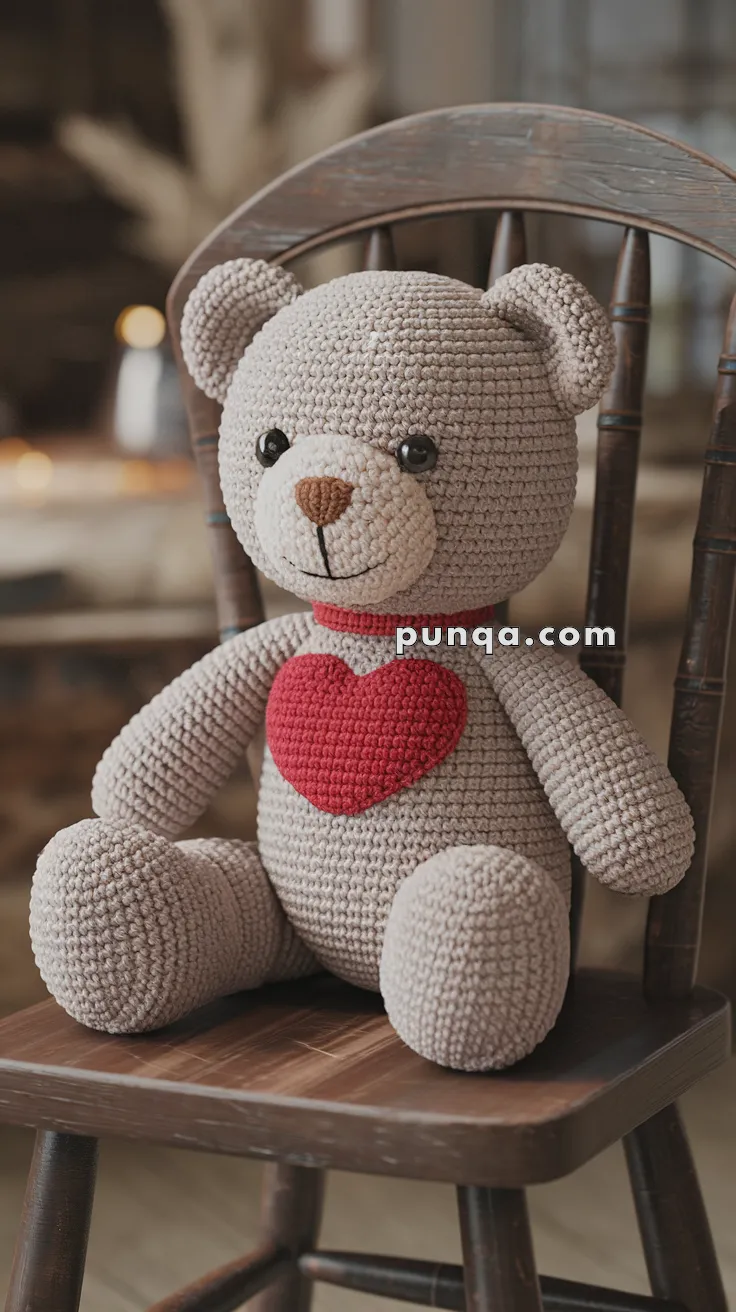
🧸 Amigurumi Valentine Teddy Bear Crochet Pattern
Create a timeless teddy bear filled with handmade love. ❤️ This cuddly seated bear features a large softly rounded head, gently cupped ears, a broad cream muzzle, an embroidered brown nose, oversized oval feet, relaxed arms, a narrow red collar, and a plush heart resting proudly on the chest.
Its warm neutral palette and classic proportions make it a beautiful Valentine’s Day gift, anniversary keepsake, nursery decoration, or comforting handmade companion. 🧶💕
✨ Skill Level
Intermediate
This pattern includes:
- 🧸 Large-head amigurumi shaping
- 🐽 Raised oval muzzle construction
- 🪡 Facial embroidery
- 🦶 Oversized seated feet
- ❤️ Dimensional heart construction
- 🧣 Separate collar
- ✨ Careful multi-piece assembly
📏 Finished Size
Using worsted-weight yarn and a 3.5 mm crochet hook, the finished bear measures approximately:
31–33 cm (12¼–13 inches) tall while seated
The final size may vary depending on yarn, hook size, tension, and stuffing.
🧶 Yarn Requirements
Use worsted-weight cotton, cotton-blend, or smooth acrylic yarn.
🤎 Warm Taupe or Light Greige — 210 g
🤍 Cream — 25 g
❤️ Deep Red — 45 g
🟤 Medium Brown — 3 g
🖤 Black embroidery yarn — small amount
Polyester fiberfill — approximately 200–240 g
🧵 Materials
- 3.5 mm crochet hook
- Two 12–14 mm black safety eyes
- Polyester fiberfill
- Tapestry needle
- Stitch markers
- Pins for positioning
- Scissors
- Optional plastic pellets for additional sitting stability
- Optional plastic canvas for reinforcing the feet
Safety eyes are not suitable for children under three. Embroider the eyes when making the bear for a young child.
🔤 Abbreviations — US Terms
MR — Magic Ring
sc — Single Crochet
inc — Increase: 2 sc in one stitch
dec — Invisible Decrease
sl st — Slip Stitch
ch — Chain
BLO — Back Loop Only
FLO — Front Loop Only
FO — Fasten Off
Work in continuous rounds unless instructed otherwise.
🧠 Head
The head is large and broad, with a gently flattened face and full lower cheeks.
Using warm taupe yarn:
R1
MR 6.
(6)
R2
inc ×6.
(12)
R3
(1 sc, inc) ×6.
(18)
R4
(2 sc, inc) ×6.
(24)
R5
(3 sc, inc) ×6.
(30)
R6
(4 sc, inc) ×6.
(36)
R7
(5 sc, inc) ×6.
(42)
R8
(6 sc, inc) ×6.
(48)
R9
(7 sc, inc) ×6.
(54)
R10
(8 sc, inc) ×6.
(60)
R11–21
sc around.
(60)
Insert the safety eyes between Rounds 14 and 15, leaving approximately 11 stitches between them.
R22
(8 sc, dec) ×6.
(54)
R23
(7 sc, dec) ×6.
(48)
R24
(6 sc, dec) ×6.
(42)
Begin stuffing firmly.
R25
(5 sc, dec) ×6.
(36)
R26
(4 sc, dec) ×6.
(30)
Continue stuffing, keeping the forehead smooth and the lower face full.
R27
(3 sc, dec) ×6.
(24)
R28
(2 sc, dec) ×6.
(18)
R29
(1 sc, dec) ×6.
(12)
R30
dec ×6.
(6)
FO and close.
Massage the stuffing so the head is wider through the cheeks and slightly flatter across the face.
🐽 Cream Muzzle
The muzzle is a broad horizontal oval with gentle projection.
Using cream yarn:
R1
Ch 10.
Beginning in the second chain:
8 sc, 3 sc in the final chain.
Continue along the opposite side:
7 sc, inc.
(20)
R2
inc, 7 sc, 3 inc, 7 sc, 2 inc.
(26)
R3
sc around.
(26)
R4
(3 sc, inc) ×6, 2 sc.
(32)
R5–7
sc around.
(32)
R8
(6 sc, dec) ×4.
(28)
Lightly stuff.
FO, leaving a long sewing tail.
Position the muzzle low on the face. The upper edge should sit approximately one round beneath the eyes.
Sew around the edge, adding a little extra stuffing before closing the final stitches.
👃 Embroidered Nose
Using medium-brown yarn, embroider a softly rounded triangular nose at the upper center of the muzzle.
Make several horizontal satin stitches, gradually widening toward the top.
The finished nose should measure approximately 2 cm wide.
🙂 Mouth
Using black embroidery yarn:
- Work one short vertical line downward from the nose.
- From its lower end, embroider a gentle curve toward the left.
- Repeat toward the right.
Keep the smile soft and subtle.
👂 Ears — Make 2
The ears are large, thick, and gently cupped.
Using warm taupe yarn:
R1
MR 6.
(6)
R2
inc ×6.
(12)
R3
(1 sc, inc) ×6.
(18)
R4
(2 sc, inc) ×6.
(24)
R5
(3 sc, inc) ×6.
(30)
R6–8
sc around.
(30)
R9
(3 sc, dec) ×6.
(24)
Do not fully stuff. Add only a thin layer of stuffing near the rounded edge.
Flatten the opening and FO, leaving a long sewing tail.
Sew the ears high on the sides of the head. Angle them slightly forward and leave their inner edges softly cupped.
🧍 Body
The torso is pear-shaped, with a broad lower belly and narrower shoulders.
Using warm taupe yarn:
R1
MR 6.
(6)
R2
inc ×6.
(12)
R3
(1 sc, inc) ×6.
(18)
R4
(2 sc, inc) ×6.
(24)
R5
(3 sc, inc) ×6.
(30)
R6
(4 sc, inc) ×6.
(36)
R7
(5 sc, inc) ×6.
(42)
R8
(6 sc, inc) ×6.
(48)
R9
(7 sc, inc) ×6.
(54)
R10–18
sc around.
(54)
Begin stuffing firmly.
R19
(7 sc, dec) ×6.
(48)
R20–22
sc around.
(48)
R23
(6 sc, dec) ×6.
(42)
R24–26
sc around.
(42)
R27
(5 sc, dec) ×6.
(36)
R28–30
sc around.
(36)
R31
(4 sc, dec) ×6.
(30)
R32–33
sc around.
(30)
R34
(3 sc, dec) ×6.
(24)
Finish stuffing firmly, concentrating extra stuffing in the lower belly.
FO, leaving a long tail for attaching the head.
💪 Arms — Make 2
The arms are long, rounded at the paws, and slightly tapered toward the shoulders.
Using warm taupe yarn:
R1
MR 6.
(6)
R2
inc ×6.
(12)
R3
(1 sc, inc) ×6.
(18)
R4–8
sc around.
(18)
R9
(4 sc, dec) ×3.
(15)
R10–17
sc around.
(15)
R18
(3 sc, dec) ×3.
(12)
R19–23
sc around.
(12)
Stuff the paws and lower arms firmly. Keep the upper five rounds more lightly stuffed.
Flatten the opening.
FO, leaving a long sewing tail.
🦶 Legs and Oversized Feet — Make 2
Each piece forms a large oval foot and short upper leg suitable for the seated pose.
Using warm taupe yarn:
R1
Ch 11.
Beginning in the second chain:
9 sc, 3 sc in the final chain.
Continue along the opposite side:
8 sc, inc.
(22)
R2
inc, 8 sc, 3 inc, 8 sc, 2 inc.
(28)
R3
(3 sc, inc) ×7.
(35)
R4
(4 sc, inc) ×7.
(42)
R5–9
sc around.
(42)
R10
(5 sc, dec) ×6.
(36)
R11–14
sc around.
(36)
R15
(4 sc, dec) ×6.
(30)
R16–18
sc around.
(30)
R19
(3 sc, dec) ×6.
(24)
R20–22
sc around.
(24)
Stuff very firmly, keeping the broad front rounded and the upper opening flatter.
FO, leaving a long sewing tail.
Optional: insert a thin oval of plastic canvas inside the sole before closing.
❤️ Dimensional Heart
The chest heart is large, plump, and gently flattened against the torso.
Using red yarn:
First Lobe
R1
MR 6.
(6)
R2
inc ×6.
(12)
R3
(1 sc, inc) ×6.
(18)
R4
(2 sc, inc) ×6.
(24)
R5–6
sc around.
(24)
FO.
Second Lobe
Repeat Rounds 1–6, but do not fasten off.
Join the Lobes
R7
Work 24 sc around the second lobe and 24 sc around the first lobe.
(48)
Use the first lobe’s tail to close the gap between them.
R8
sc around.
(48)
R9
(6 sc, dec) ×6.
(42)
R10
(5 sc, dec) ×6.
(36)
R11
sc around.
(36)
Begin stuffing lightly.
R12
(4 sc, dec) ×6.
(30)
R13
(3 sc, dec) ×6.
(24)
R14
(2 sc, dec) ×6.
(18)
R15
(1 sc, dec) ×6.
(12)
Add a final small amount of stuffing.
R16
dec ×6.
(6)
FO and close.
Gently flatten the back while keeping the front full and rounded.
🧣 Narrow Red Collar
Using red yarn:
Row 1
Ch enough stitches to fit snugly around the neck, approximately 36–40 chains.
Beginning in the second chain, sc across.
Row 2
Ch 1, turn, sc across.
FO, leaving a sewing tail.
Wrap the collar around the neck seam and join at the back.
Tack it discreetly to the body so it remains flat and level.
🪡 Assembly
Pin all pieces before sewing permanently.
Attach the Head
Center the head directly on the narrow upper body.
Add a little extra stuffing between the pieces if needed.
Sew firmly around the entire opening.
The bear should have almost no visible neck once the collar is added.
Attach the Ears
Place the ears high on the head and angle them slightly forward.
Check that both are evenly positioned before sewing.
Attach the Legs
Sew the large feet to the lower front sides of the body.
Angle them outward so the bear sits naturally.
The broad soles should rest fully on the surface.
Attach the Arms
Position the arms just beneath the shoulders.
Angle them downward and slightly forward so the paws rest beside the heart.
Attach the Heart
Center the heart on the upper belly.
The lobes should sit just beneath the collar, with the point extending toward the center of the torso.
Sew around the back edge using small hidden stitches.
✨ Final Shaping
- Massage the head into a broad rounded shape.
- Press gently below the eyes to emphasize the cheeks.
- Shape the muzzle into a smooth horizontal oval.
- Cup the ears slightly forward.
- Turn the feet outward evenly.
- Curve the arms gently toward the torso.
- Keep the heart centered and full.
- Confirm that the bear sits securely without leaning.
💕 Final Thoughts
Your Valentine Teddy Bear is ready to share a warm handmade hug. 🧸❤️
With its oversized rounded head, sweet cream muzzle, embroidered brown nose, softly cupped ears, large seated paws, narrow red collar, and full dimensional heart, this classic bear makes a thoughtful keepsake for someone special.
Happy Crocheting! 🧶💕