✨ Skill Level
Advanced — includes sculpted shaping, panel construction, structural reinforcement, and precise assembly.
📏 Finished Size
Approximately 30–35 cm (12–14 in) long using worsted yarn and a 3.5 mm hook.
🧶 Materials
Yarn Colors
-
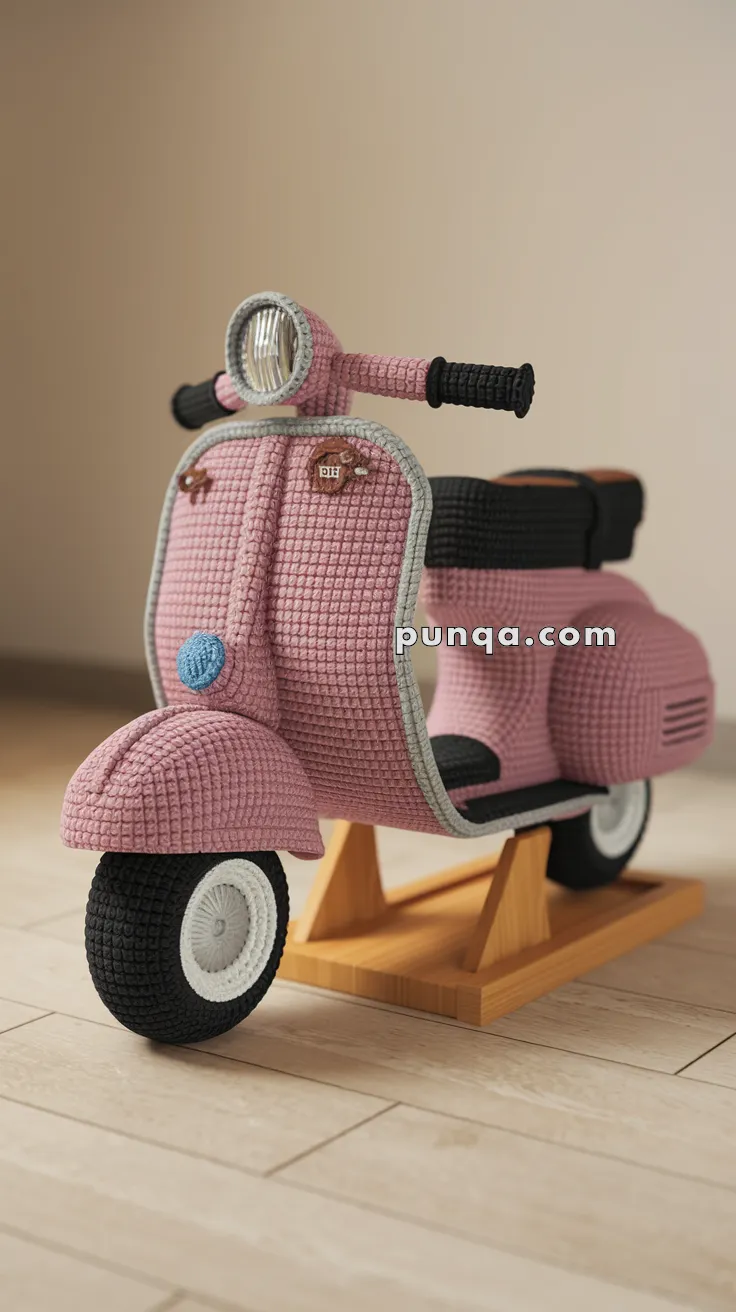
Dusty pink — main body and fender
-
Black — tires, grips, seat
-
White — wheel rims and headlight interior
-
Light grey — body trim edging
-
Blue — small front emblem
-
Brown — tiny decorative badge
Supplies
-
3.5 mm crochet hook
-
Fiberfill stuffing
-
Plastic canvas or firm cardboard (internal panels)
-
Pipe cleaners or floral wire (handlebars)
-
Clear plastic dome or button (headlight lens)
-
Tapestry needle, stitch markers, scissors
🧵 Abbreviations (US Terms)
MR = magic ring
sc = single crochet
inc = increase
dec = decrease
BLO = back loop only
ch = chain
sl st = slip stitch
FO = fasten off
🧱 Structural Notes
Flat inserts are placed inside the scooter body and foot platform to keep edges crisp and upright. Pipe cleaners inside the handlebars help maintain shape and stability.
🔧 Pattern Instructions
🛵 Front Fender (Pink)
R1: MR 6
R2: inc ×6 (12)
R3: (1 sc, inc) ×6 (18)
R4–6: sc around (18)
R7: (2 sc, inc) ×6 (24)
R8–12: sc around (24)
Lightly stuff and shape into a smooth dome. FO.
🧱 Main Body Panels (Make 2 – Pink)
Ch 22
Row 1: sc across (21)
Rows 2–20: sc across, ch 1, turn
Add light grey edging with surface slip stitch around each panel.
Place structural insert between panels and join edges with sc, leaving the bottom open for stuffing. Stuff lightly and close.
🛵 Foot Platform (Pink with Grey Trim)
Ch 30
Row 1: sc across (29)
Rows 2–7: sc across
Add grey edging. Insert structural panel and sew to the lower body.
🪑 Seat (Black)
R1: MR 6
R2: inc ×6 (12)
R3: (1 sc, inc) ×6 (18)
R4–9: sc around (18)
R10: BLO sc around
Stuff firmly and shape into a rounded rectangle. Sew to the top rear body.
🛞 Wheels (Make 2)
Tire (Black)
R1: MR 6
R2: inc ×6 (12)
R3: (1 sc, inc) ×6 (18)
R4: (2 sc, inc) ×6 (24)
R5–7: sc around (24)
Rim (White)
Attach white yarn BLO and sc around 2 rounds.
Make two identical sides. Insert cardboard circle and join to form a thick wheel.
🪝 Handlebars
Grips (Make 2 – Black)
R1: MR 6
R2–10: sc around
Insert pipe cleaner.
Handlebar Tube (Pink)
Ch 16, join to form ring
2 rounds sc
Insert grips into both ends and secure.
💡 Headlight Assembly
Housing (Grey)
R1: MR 6
R2: inc ×6 (12)
R3: (1 sc, inc) ×6 (18)
R4–5: sc around
Inner Light
1 round white
Lightly stuff.
Attach a clear dome or button over the front and sew to handlebar center.
🧰 Decorative Details
Add a small blue circular emblem to the front shield. Stitch a tiny brown badge above it. Outline the body edges with grey trim for a clean finish.
🧵 Assembly
-
Sew front fender to lower shield
-
Attach body panels around structural insert
-
Sew foot platform securely
-
Mount wheels evenly beneath body
-
Attach seat to rear top
-
Fix handlebars and headlight in place
-
Add trim and decorative accents
🌟 Final Thoughts
This retro amigurumi scooter blends sculpted crochet with structured construction to create a playful yet refined display piece. The curved body, chunky wheels, and crisp trim lines give it a charming handcrafted personality.
Careful shaping and reinforcement ensure the scooter stands beautifully as a decorative model, making it a memorable handmade gift or centerpiece. 🧶🛵✨