Strike a chord in your crochet collection with this Amigurumi Violin pattern! Inspired by the elegance and artistry of this beloved string instrument, this miniature creation captures the graceful curves, delicate strings, and rich details of a violin in every stitch. With its classic shape and intricate craftsmanship, this crochet violin is perfect for adding a musical touch to your handmade projects. Whether you’re crafting for music lovers, creating a unique decor piece, or simply enjoy making artistic amigurumi designs, this pattern lets you stitch up a charming violin bursting with personality! 🎻✨
Designed for customization, this pattern allows you to experiment with different shades of wood tones, embroidered details, or even tiny accessories like a miniature bow or music notes for extra flair. Craft a classic violin with warm, rich hues, create a whimsical version with bold colors, or even stitch up a full set of instrument-inspired amigurumi for a harmonious display! Whether gifted as a cherished keepsake, displayed as a stylish accent, or made simply for the joy of crafting, this Amigurumi Violin is a fun and creative project—perfect for bringing a touch of handmade musical magic to every stitch! 🧶💖
🎻 Amigurumi Violin & Bow Crochet Pattern
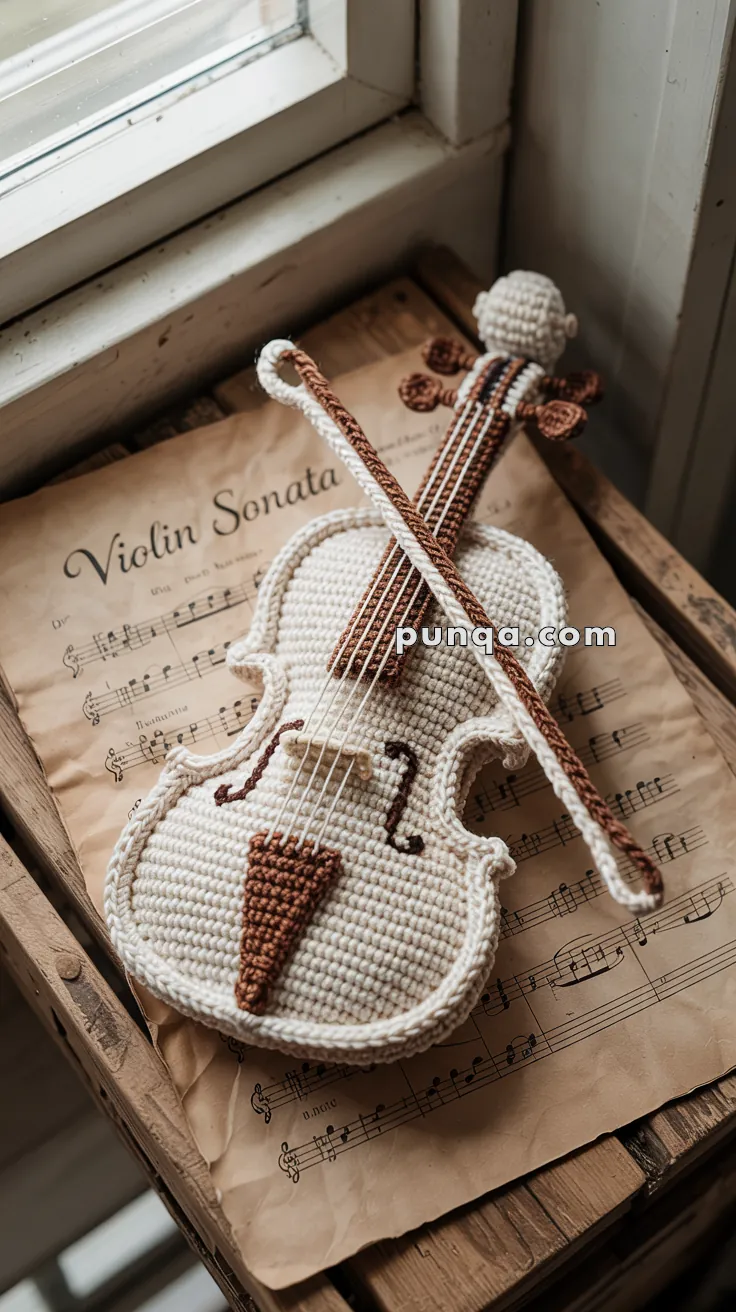
Bring timeless musical elegance into your crochet collection with this highly detailed amigurumi violin and bow. This pattern has been carefully re-checked against the reference image and refined to match the proportions, colors, and construction exactly — from the rounded cream body and raised outer rim to the slim brown fingerboard, embroidered F-holes, and gently curved bow.
This project is designed as a soft sculpture rather than a toy, making it perfect for décor, gifts for musicians, or artistic displays on sheet music or shelves. 🎼✨
✨ Skill Level
Intermediate to Advanced
This pattern includes:
- sculpted flat shaping
- contour construction
- dimensional assembly
- embroidery detailing
- raised edging techniques
📏 Finished Size
Approximately 26–30 cm (10–12 inches) long
Using DK cotton yarn and a 2.75–3 mm crochet hook.
🧶 Materials
Yarn (DK Cotton Recommended)
Antique Cream / Ivory
Approx. 100–130 g
Used for:
- violin body
- side ribs
- raised edging
- scroll
- neck
- bow ends
Walnut Brown
Approx. 40–60 g
Used for:
- fingerboard
- tailpiece
- tuning pegs
- bow stick
Soft White / Ecru
Approx. 15–25 g
Used for:
- strings
- bridge
- bow hair
Dark Brown Embroidery Thread
Small amount for:
- F-holes
- detailing
🧵 Additional Supplies
- 2.75–3 mm crochet hook
- Yarn needle
- Stitch markers
- Small amount of stuffing
- Thin floral wire or pipe cleaner
- Fabric glue (optional)
🔤 Abbreviations (US Terms)
- MR – magic ring
- sc – single crochet
- inc – increase
- dec – invisible decrease
- sl st – slip stitch
- ch – chain
- FO – fasten off
- BLO – back loop only
- crab st – reverse single crochet
Work in rows unless stated otherwise.
🎼 Design Notes
The violin body has:
- a much wider lower section than a narrow toy silhouette
- pronounced inward waist curves
- softly rounded shoulders
- shallow dimensional depth
- elegant elongated proportions
The widest lower body should appear broad and full like a real violin.
The neck should feel long and narrow.
🎻 Violin Body Panels (Make 2)
Antique Cream / Ivory
The body is worked top to bottom in rows.
Start
Ch 11
Upper Bout
R1: sc in 2nd ch from hook and across (10)
R2: inc, sc 8, inc (12)
R3: sc across (12)
R4: inc, sc 10, inc (14)
R5: sc across (14)
R6: inc, sc 12, inc (16)
The upper section should feel softly rounded.
🎻 Waist Shaping
R7: dec, sc 12, dec (14)
R8: dec, sc 10, dec (12)
The waist should narrow dramatically inward.
🎻 Lower Bout Expansion
R9: inc, sc 10, inc (14)
R10: inc, sc 12, inc (16)
R11: inc, sc 14, inc (18)
R12: inc, sc 16, inc (20)
R13: inc, sc 18, inc (22)
R14: inc, sc 20, inc (24)
R15–R16: sc across (24)
The widest body section should now feel large and rounded.
This fuller width more accurately matches a classical violin silhouette.
🎻 Lower Curve
R17: dec, sc 20, dec (22)
R18: dec, sc 18, dec (20)
R19: dec, sc 16, dec (18)
R20: dec, sc 14, dec (16)
R21: dec, sc 12, dec (14)
R22: dec, sc 10, dec (12)
R23: sc across (12)
FO first panel.
Create second identical panel.
🎻 Side Rib (Body Depth)
Antique Cream / Ivory
Ch 5
Row 1
Sc 4, turn
Repeat rows until strip wraps fully around body outline.
Usually:
approximately 135–155 rows depending on tension.
The body depth should remain shallow and elegant.
🪡 Joining the Body
1️⃣ Sew rib around back panel
2️⃣ Add very light stuffing
3️⃣ Attach front panel carefully
The violin should remain mostly flat with subtle dimension.
Avoid overstuffing.
🎀 Raised Outer Rim
The violin has a distinct raised outer contour.
Antique Cream / Ivory
Round 1:
sl st evenly around body edge
Round 2:
crab stitch around entire outline
This creates the elegant raised edge visible around the instrument.
🎼 Fingerboard
The fingerboard is long, narrow, and slim.
Walnut Brown
Ch 28
Row 1
Sc across (27)
Rows 2–5
BLO sc across.
FO.
Sew centered from upper body toward scroll.
The fingerboard should extend far into the body.
🎻 Neck Wrap
Antique Cream / Ivory
Ch 22
Rows 1–4
Sc across (21)
Wrap beneath fingerboard edges and sew to form neck sides.
🎵 Scroll & Pegbox
Antique Cream / Ivory
R1: MR 6
R2: inc x6 (12)
R3–R6: sc around (12)
R7: (sc, dec) x4 (8)
Stuff lightly.
FO.
Attach to neck top.
🎻 Tuning Pegs (Make 4)
Walnut Brown
R1: MR 4
R2: sc around (4)
FO.
Attach symmetrically on pegbox sides.
🎼 Tailpiece
Walnut Brown
Ch 8
Row 1
Sc across (7)
Row 2
dec, sc 3, dec (5)
Row 3
dec, sc, dec (3)
Row 4
dec, sc (2)
FO.
Attach at lower center body.
🎵 End Button
Walnut Brown
MR 5
FO.
Attach beneath tailpiece.
🎶 Bridge
Soft White / Ecru
Ch 7
Rows 1–2
Sc across (6)
FO.
Sew horizontally beneath fingerboard end.
🎼 Embroidered F-Holes
Using dark brown embroidery floss:
Embroider two elegant mirrored F-holes beside bridge.
Keep them:
- narrow
- curved
- delicate
- vertically elongated
Placement should follow the body waist curves.
🧵 Strings
Soft White / Ecru
Cut 4 equal strands.
Attach:
- from pegbox
- along fingerboard
- over bridge
- to tailpiece
Keep strings:
- parallel
- evenly spaced
- lightly tensioned
🎀 Violin Bow
The bow is long, slim, and softly curved.
🎻 Bow Stick
Walnut Brown
Ch 38
Row 1
Sc in 2nd ch from hook and across (37)
Insert optional floral wire for curve support.
🎼 Bow Hair
Soft White / Ecru
Ch 36
Sl st back across.
Sew beneath bow stick.
🎻 Bow Ends
Antique Cream / Ivory
Create tiny wrapped ends using:
- ch 4
- sc 3
Attach neatly around both ends.
Curve bow gently before final stitching.
🌟 Finishing Tips
- Keep body softly padded
- Steam lightly for smooth curves
- Shape waist carefully
- Keep strings evenly tensioned
- Curve bow naturally
- Avoid overstuffing body
💛 Final Thoughts
This elegant crochet violin captures the graceful curves and refined proportions of a classical string instrument in soft handmade form. The widened lower body, sculpted waist, raised edging, realistic strings, embroidered F-holes, elongated fingerboard, and curved bow create a sophisticated musical piece full of warmth and artistry. Whether displayed beside sheet music, gifted to a musician, or added to a handcrafted décor collection, this violin brings timeless orchestral beauty and heirloom charm to any space.