✨ Skill Level
Intermediate
Includes shaping, embroidery, proportion control, and finishing techniques.
📏 Finished Size
Approx. 35–40 cm (14–16 in) tall using worsted yarn and a 3.5 mm hook.
🧶 Materials & Yarn Amount
- White yarn: 230–270 g (entire tiger base)
- Black yarn: 20–30 g (stripes, facial details, ear edging)
- Pink yarn: 5 g (nose)
- White acrylic yarn: 20–30 g (cheek fluff)
- 12 mm safety eyes
- Polyester stuffing: 400–500 g
- 3.5 mm hook
- Yarn needle, stitch marker
- Slicker brush (for fluffing)
🔤 Abbreviations
MR – magic ring
sc – single crochet
inc – increase
dec – invisible decrease
sl st – slip stitch
FO – fasten off
🧸 Head (Large Rounded Shape)
With white yarn:
R1: MR, 6 sc (6)
R2: inc ×6 (12)
R3: (1 sc, inc) ×6 (18)
R4: (2 sc, inc) ×6 (24)
R5: (3 sc, inc) ×6 (30)
R6: (4 sc, inc) ×6 (36)
R7: (5 sc, inc) ×6 (42)
R8: (6 sc, inc) ×6 (48)
R9–15: sc around (48)
Insert eyes between R11–12, spaced 12–14 stitches apart.
R16: (6 sc, dec) ×6 (42)
R17: (5 sc, dec) ×6 (36)
R18: (4 sc, dec) ×6 (30)
R19: (3 sc, dec) ×6 (24)
R20: (2 sc, dec) ×6 (18)
Stuff very firmly to maintain a smooth round head.
R21: (1 sc, dec) ×6 (12)
R22: dec ×6 (6)
FO and close.
🐽 Muzzle (Wide, Rounded & Integrated Look)
With white yarn:
R1: MR, 6 sc (6)
R2: inc ×6 (12)
R3: (1 sc, inc) ×6 (18)
R4: (2 sc, inc) ×6 (24)
R5–7: sc around (24)
R8: (2 sc, dec) ×6 (18)
R9: sc around (18)
Lightly stuff — keep it soft, not overfilled.
FO and sew centered under the eyes, slightly overlapping the lower face to create a gentle forward shape (not long or tubular).
🌸 Nose & Mouth
With pink yarn:
R1: MR, 6 sc
R2: inc ×6 (12)
R3: sc around (12)
Flatten slightly and sew to top of muzzle.
With black yarn:
- Stitch a vertical line downward
- Add a soft curved split mouth
🧵 Facial Details
Embroider:
- Curved brows above eyes
- Small whisker dots on muzzle
- Soft cheek curves for expression
🐯 Head Stripes
Using black yarn, embroider:
- Center forehead stripe (slightly curved)
- Two side forehead stripes
- Two cheek stripes per side
- Small arcs near eye corners
Keep all lines slightly curved to follow the head shape.
🧶 Fluffy Cheeks
Cut 30–40 strands of white acrylic yarn (10–12 cm).
Attach along both sides of the muzzle. Brush outward using a slicker brush, then trim into soft rounded cheek tufts.
👂 Ears (Rounded, Thick)
Make 2:
R1: MR, 6 sc (6)
R2: (1 sc, inc) ×3 (9)
R3: (2 sc, inc) ×3 (12)
R4: (3 sc, inc) ×3 (15)
R5–7: sc around (15)
FO.
Flatten slightly.
Outline the outer edge using black slip stitches.
Sew high on the head, slightly angled outward.
🧍 Body (Tall & Cylindrical with Slight Belly)
With white yarn:
R1: MR, 6 sc (6)
R2: inc ×6 (12)
R3: (1 sc, inc) ×6 (18)
R4: (2 sc, inc) ×6 (24)
R5: (3 sc, inc) ×6 (30)
R6: (4 sc, inc) ×6 (36)
R7: (5 sc, inc) ×6 (42)
R8: (6 sc, inc) ×6 (48)
R9–22: sc around (48)
R23: (6 sc, dec) ×6 (42)
R24–27: sc around (42)
R28: (5 sc, dec) ×6 (36)
R29–31: sc around (36)
R32: (4 sc, dec) ×6 (30)
R33: sc around (30)
R34: (3 sc, dec) ×6 (24)
Stuff firmly with a slight forward belly.
FO.
🐾 Front Legs (Long & Straight)
Make 2:
R1: MR, 6 sc
R2: inc ×6 (12)
R3: (1 sc, inc) ×6 (18)
R4–8: sc around (18)
R9: (1 sc, dec) ×6 (12)
R10–24: sc around (12)
Stuff firmly at bottom, lightly at top.
FO.
Attach vertically to the front so they support the sitting pose.
🦵 Back Legs (Rounded Sitting Paws)
Make 2:
R1: MR, 6 sc
R2: inc ×6 (12)
R3: (1 sc, inc) ×6 (18)
R4–7: sc around (18)
R8: (1 sc, dec) ×6 (12)
Stuff firmly to create a round ball shape.
R9: dec ×6 (6)
FO and close.
Attach to lower sides, slightly forward-facing.
🐅 Tail (Slim with Gentle Curve)
R1: MR, 6 sc
R2: inc ×6 (12)
R3–28: sc around (12)
Stuff lightly.
FO.
Embroider ring stripes every 3–4 rounds.
Attach low at the back and curve naturally to one side.
🖤 Body Stripes
Embroider after assembly:
- 2–3 curved stripes on each side of torso
- 1–2 stripes on each leg
- Multiple ring stripes on tail
Keep spacing natural and slightly irregular.
🪡 Assembly
- Sew head securely to body
- Attach ears at top sides
- Sew muzzle and nose
- Attach front legs straight downward
- Attach back legs outward for stability
- Sew tail at back
- Add cheek tufts and trim
✨ Final Shaping
- Round out cheeks and muzzle gently
- Keep front legs parallel
- Adjust back paws so tiger sits firmly
- Smooth stuffing evenly for a clean silhouette
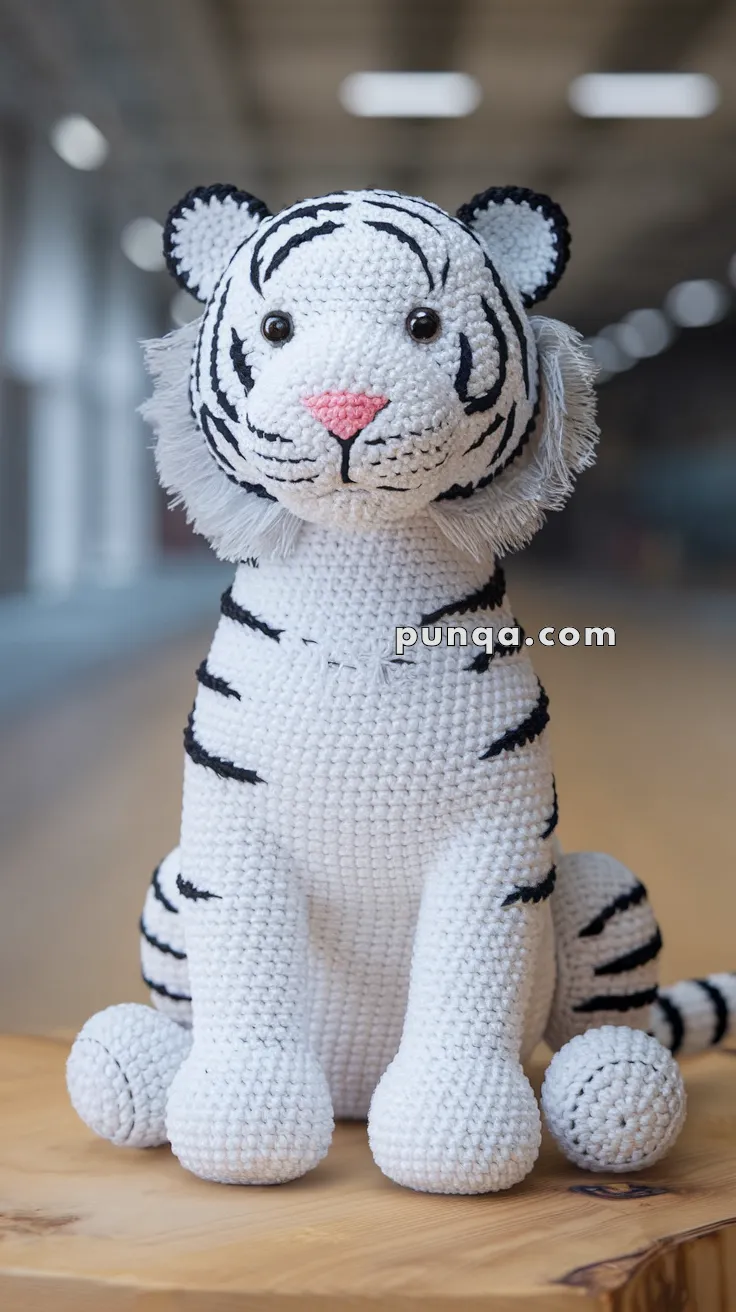
🐾 Finished Look
This white tiger features a strong upright posture, balanced proportions, rounded paws, expressive face, and soft fluffy cheeks 🐯💛 The carefully structured shaping and corrected stitch counts ensure a realistic, stable, and beautifully finished amigurumi piece.
Happy crocheting 🧶✨