Welcome to the elegant and architectural world of amigurumi! 🏗️✨ Today, I’m excited to share my free crochet pattern for an Amigurumi Eiffel Tower—a stunning and symbolic creation perfect for travel lovers, Paris enthusiasts, or anyone who enjoys crafting intricate and structured plush designs! 🧶 Whether you love stitching up iconic landmarks, experimenting with detailed shaping, or simply want to add a miniature Eiffel Tower to your handmade lineup, this pattern will guide you through crafting a beautifully sculpted plush with graceful arches, delicate latticework, and a touch of Parisian charm! 🇫🇷
This design embraces neutral tones, precise shaping, and thoughtful details to bring a sophisticated and timeless presence to your crochet projects! 🧶✨ I’ve carefully outlined each step to ensure your Amigurumi Eiffel Tower turns out just right—ready to stand tall in your collection or become a treasured handmade gift! 🎁 So grab your hooks, pick out soft grays, warm taupes, and deep charcoals, and let’s stitch up a breathtaking Eiffel Tower! 🏗️
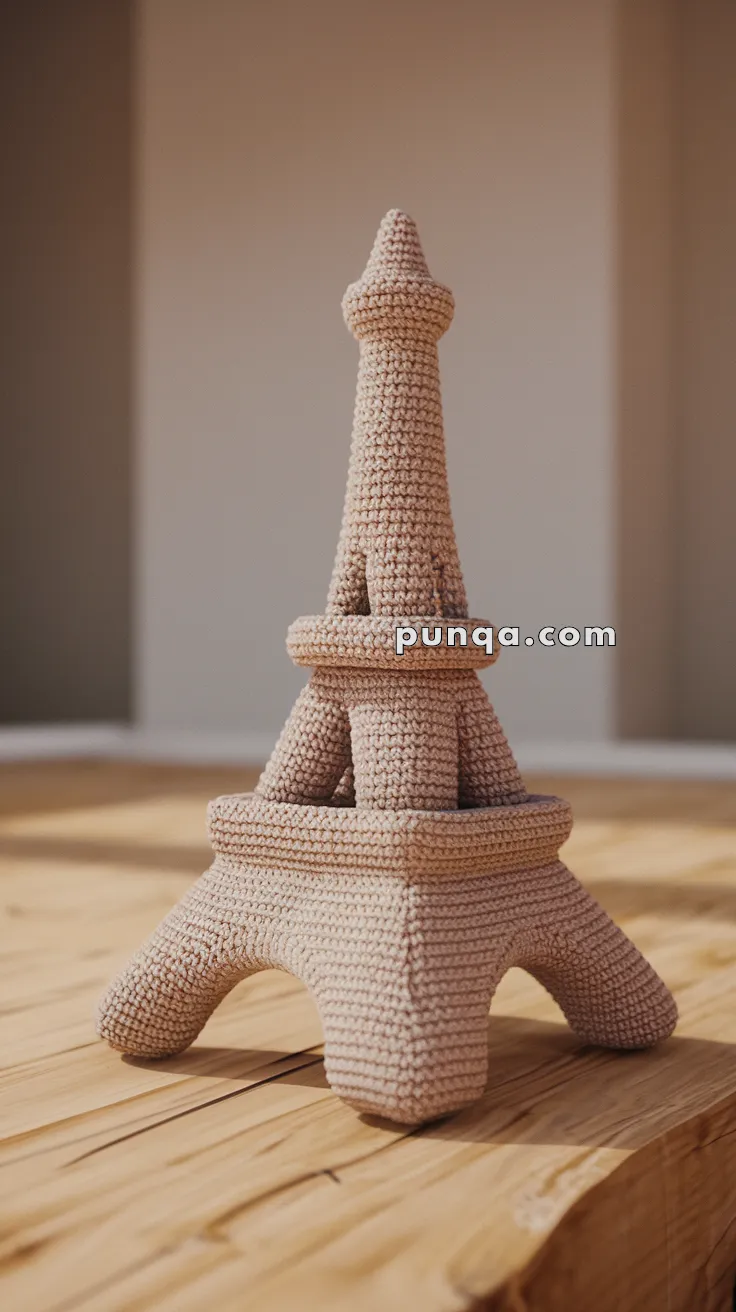
🗼 Amigurumi Eiffel Tower Crochet Pattern
Bring the charm of Paris into your home with this elegant amigurumi Eiffel Tower. This crocheted landmark features four sturdy arched legs, a thick lower viewing platform, a second smaller platform supported by angled pillars, and a tall tapered tower that finishes with a narrow pointed spire. The design focuses on architectural structure so the tower stands upright while maintaining the iconic silhouette of the famous monument.
This project makes a beautiful decorative piece for desks, shelves, travel-themed displays, or handmade gifts for lovers of Paris. 🇫🇷✨
✨ Skill Level
🧶 Advanced
This project involves:
• Structural shaping
• Multiple pieces
• Architectural assembly
• Even tension for stability
📏 Finished Size
Approximately 28–32 cm (11–12.5 inches) tall using DK yarn and a 2.5–3.0 mm hook.
🧵 Materials
DK weight yarn – Beige / Sand / Light Taupe
Required yarn amount: 200–230 grams
Additional supplies:
• 2.5–3.0 mm crochet hook
• Polyester fiberfill stuffing
• Tapestry needle
• Stitch markers
• Optional: thin floral wire or wooden skewer for internal support
Crochet tightly so the structure holds its shape.
🔤 Abbreviations (US Terms)
MR – magic ring
sc – single crochet
inc – increase (2 sc in one stitch)
dec – invisible decrease
ch – chain
sl st – slip stitch
FO – fasten off
Work in continuous rounds unless stated otherwise.
🧶 Pattern Instructions
🦶 Lower Arched Legs (Make 4)
These legs form the wide curved base that supports the tower.
Start with main yarn.
Rnd 1: MR 6 (6)
Rnd 2: inc ×6 (12)
Rnd 3: (1 sc, inc) ×6 (18)
Rnd 4: (2 sc, inc) ×6 (24)
Rnd 5: (3 sc, inc) ×6 (30)
Rnd 6–11: sc around (30)
Begin narrowing toward the platform.
Rnd 12: (3 sc, dec) ×6 (24)
Rnd 13–16: sc around (24)
Stuff firmly.
Flatten the top opening slightly for easier attachment.
FO leaving a long tail.
⭕ Lower Platform Ring
This thick circular band connects the four legs.
Ch 64 and join with sl st.
Rnd 1: sc around (64)
Rnd 2: (7 sc, inc) ×8 (72)
Rnd 3–7: sc around (72)
This creates the thick structural viewing platform.
FO leaving long tail.
🧱 Inner Support Pillars (Make 4)
These short pillars support the upper platform.
Rnd 1: MR 6
Rnd 2: inc ×6 (12)
Rnd 3–8: sc around (12)
Stuff lightly.
FO leaving sewing tail.
⭕ Upper Platform Ring
This platform sits above the support pillars.
Ch 44 and join.
Rnd 1: sc around (44)
Rnd 2: (10 sc, inc) ×4 (48)
Rnd 3–5: sc around (48)
FO leaving tail.
🗼 Upper Tower Section
This long tapered section forms the recognizable upper body of the tower.
Rnd 1: MR 6 (6)
Rnd 2: inc ×6 (12)
Rnd 3–5: sc around (12)
Rnd 6: (2 sc, inc) ×4 (16)
Rnd 7–10: sc around (16)
Rnd 11: (3 sc, inc) ×4 (20)
Rnd 12–16: sc around (20)
Start tapering.
Rnd 17: (3 sc, dec) ×4 (16)
Rnd 18–22: sc around (16)
Rnd 23: (2 sc, dec) ×4 (12)
Rnd 24–28: sc around (12)
Lightly stuff.
FO leaving long tail.
📡 Top Spire
Rnd 1: MR 6
Rnd 2–5: sc around (6)
Rnd 6: (1 sc, inc) ×3 (9)
Rnd 7–9: sc around (9)
Rnd 10: (1 sc, dec) ×3 (6)
Rnd 11–15: sc around (6)
FO and close.
The spire should remain slender and pointed.
🧩 Assembly
Step 1
Attach the four legs evenly under the lower platform ring, spacing them equally so they form the iconic outward base.
Step 2
Sew the four inner support pillars evenly on top of the lower platform.
Step 3
Attach the upper platform ring to the tops of the pillars.
Step 4
Sew the upper tower section to the center of the upper platform.
Step 5
Attach the spire at the very top.
Make sure the tower remains centered and upright during assembly.
Optional: insert a thin support wire through the center for extra stability.
✨ Finishing Touches
🧶 Adjust stuffing so the tower stands firm.
🗼 Slightly angle the legs outward to stabilize the base.
📐 Align all sections carefully so the tower remains symmetrical.
🇫🇷 A Handmade Paris Landmark
With its graceful arches, layered platforms, and elegant spire, this crocheted Eiffel Tower captures the architectural beauty of the world-famous monument. The neutral yarn gives it a soft sculptural look while highlighting the recognizable structure.
Display it on a shelf, add it to a travel-themed décor setup, or gift it to someone who dreams of Paris.
🧵✨ A little Eiffel Tower, handmade with love.


