Step into the world of mythology with this Amigurumi Harpy crochet pattern! In ancient legends, harpies were fierce and mysterious creatures, often depicted as having the body of a bird with the head of a woman. Known for their swift movements and powerful wings, these mythical beings were both feared and admired, symbolizing the forces of nature and destiny. Now, you can bring this legendary creature to life in adorable amigurumi form! With its striking wings, expressive features, and intricate details, this crochet harpy captures the essence of mystery and magic in every stitch. Perfect for gifting to fellow fantasy lovers, decorating a whimsical space, or simply celebrating the joy of handmade creations, this amigurumi harpy is sure to add a touch of enchantment—one stitch at a time! 🦅✨
Designed for customization, this pattern allows you to experiment with different color combinations, embroidered details, or even tiny accessories like a miniature crown or talons for extra personality. Craft a classic harpy with rich golden hues, create a whimsical version with pastel tones, or even stitch up a full set of mythical creatures for a stunning display! Whether gifted as a cherished keepsake, displayed as a powerful accent, or made simply for the joy of crafting, this Amigurumi Harpy is a fun and creative project—perfect for bringing a touch of handmade magic to every stitch! 🧶💖

🦅 Amigurumi Harpy Crochet Pattern
This majestic and fierce harpy amigurumi brings mythology to life with beautifully detailed wings, powerful talons, a sharp beak, and cascading hair. Perfect for advanced crafters who love fantasy creatures, she’s a magical addition to any crochet collection! 🧶🪽✨
✨ Skill Level
Advanced – Includes shaping, feather layering, realistic claw sculpting, and multi-part assembly.
📏 Finished Size
Approx. 10–12 inches (25–30 cm) tall using DK yarn and a 2.5–3 mm hook.
🧶 Materials
Yarn (DK or sport weight):
- Light beige / pale cream – head, main body
- Optional slightly warmer beige/tan – body (if you’d like a subtle contrast from the face)
- Golden yellow – legs, talon bases, some wing feathers
- Cream / off-white – underwing panels, neck ruff
- Dusty rose / mauve – outer wing feathers, tail feathers
- Medium brown / mocha – hair (50–60 g for full volume)
- Black – beak, claw tips
- Very light pink or beige – blush details (optional)
Other:
- 10–12 mm safety eyes (green or similar), plus small white felt circles for eye backing (optional)
- 2.5–3.0 mm crochet hook
- Fiberfill stuffing
- Tapestry needle
- Stitch markers
- Optional: thin wire for poseable legs or wings
🧵 Abbreviations (US Terms)
MR – Magic Ring
sc – single crochet
inc – increase (2 sc in same st)
dec – decrease (sc2tog)
sl st – slip stitch
ch – chain
FO – fasten off
🧠 Head (Light Beige)
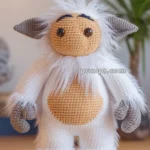
The head is intentionally larger than the body for the same proportion you see in the photo.
R1: MR, 6 sc
R2: inc ×6 (12)
R3: (1 sc, inc) ×6 (18)
R4: (2 sc, inc) ×6 (24)
R5: (3 sc, inc) ×6 (30)
R6: (4 sc, inc) ×6 (36)
R7–13: sc around (36)
👉 Insert safety eyes between Rounds 9–10, spaced 12–13 stitches apart for that wide-set, expressive look.
R14: (4 sc, dec) ×6 (30)
R15: (3 sc, dec) ×6 (24)
R16: (2 sc, dec) ×6 (18)
R17: (1 sc, dec) ×6 (12)
R18: dec ×6 (6)
FO, close the opening and stuff firmly.
Facial Details
- Cut or punch small white felt ovals and place behind the eyes before securing, so a white ring shows around the iris.
- With dark brown or maroon yarn, embroider a curved upper eyelid line above each eye (slightly drooping toward the outer corner for that intense, dreamy expression).
- Add a few tiny lower lashes at the outer edges if desired.
- Add soft blush on the cheeks with pink yarn or fabric pigment.
🐦 Beak (Black)
R1: MR, 4 sc
R2: inc ×4 (8)
R3–4: sc around (8)
R5: dec ×4 (4)
FO, lightly stuff, pinch into a pointed curve, and sew just under and between the eyes.
💇 Hair (Medium Brown / Mocha – Full Volume)
In the photo, the hair is a brown/taupe tone, distinct from the dusty rose feathers.
- Cut 60–80 strands of mocha yarn, each 12–14 inches (30–35 cm) long.
- Starting at the crown, attach strands using lark’s head knots in horizontal rows, working down toward the nape and around the sides of the head.
- Add extra density around the sides and back for full volume that drapes over the shoulders and partially over the wings.
- Separate plies or twist strands lightly to create loose, wild waves.
- Trim only the very ends if needed; keep the length long so it hangs past the shoulders like in the photo.
🪶 Neck Ruff (Cream – 8–10 Feathers)
This creates the pointed feather collar around the neck.
Make 8–10 small feathers:
For each feather:
ch 8
Row 1: sl st in 2nd ch from hook, sc 2, hdc 2, dc 2
FO and leave a tail.
Sew these feathers around the base of the head where it joins the body, points facing outward, forming a full circular collar.
🧍 Body (Light Beige)
You can use the same beige as the head or a slightly warmer beige if you want subtle contrast.
R1: MR, 6 sc
R2: inc ×6 (12)
R3: (1 sc, inc) ×6 (18)
R4: (2 sc, inc) ×6 (24)
R5–23: sc around (24)
R24: (2 sc, dec) ×6 (18)
R25: (1 sc, dec) ×6 (12)
R26: dec ×6 (6)
FO, stuff the body firmly.
Sew the head to the body securely before adding wings and legs.
🦵 Long Golden Bird Legs (Make 2 – Golden Yellow)
R1: MR, 6 sc
R2: inc ×6 (12)
R3: (1 sc, inc) ×6 (18)
R4–22: sc around (18)
Stuff very firmly from foot attachment point up toward the body. You may insert wire now if using.
FO, leaving a long tail for sewing.
Attach each leg centered under the body, pointing straight down (perpendicular to the body) so she stands tall and stable.
🐾 Talons (Make 4 Per Foot)
Each foot has 3 front claws and 1 rear claw. Work tips in black, bases in golden yellow.
R1: With black, MR, 4 sc
R2: inc ×4 (8)
R3: sc around (8)
R4: switch to golden yellow, sc around (8)
R5: inc ×4 (12)
R6–8: sc around (12)
R9: (2 sc, dec) ×3 (9)
R10–11: sc around (9)
FO, stuff the base, leave the black tip unstuffed so the claw naturally curves.
Sew three claws facing forward and one facing backward on each leg, just as in the reference.
🪽 Underwing Panels (Cream – Make 2)
These form the solid base of each wing.
ch 22
Row 1: sc in 2nd ch from hook and across (21)
Rows 2–30: ch 1, turn, sc across (21)
Now taper the tip:
Row 31: ch 1, turn, dec, sc 17, dec (19)
Row 32: ch 1, turn, dec, sc 15, dec (17)
Row 33: ch 1, turn, dec, sc 13, dec (15)
Row 34: ch 1, turn, dec, sc 11, dec (13)
Row 35: ch 1, turn, dec, sc 9, dec (11)
Row 36: ch 1, turn, dec, sc 7, dec (9)
Row 37: ch 1, turn, dec, sc 5, dec (7)
Row 38: ch 1, turn, dec, sc 3, dec (5)
Row 39: ch 1, turn, dec, sc 1, dec (3)
Row 40: ch 1, turn, sc3tog (1)
FO. Lightly stuff if you want more structure, or leave flat for a softer wing.
🪶 Individual Feathers (Cream, Golden, Dusty Rose)
Each feather uses the same base pattern; color changes define layers.
Per feather (all colors):
R1: MR, 4 sc
R2: inc ×4 (8)
R3–8: sc around (8)
R9: (2 sc, dec) ×2 (6)
R10–12: sc around (6)
FO, flatten with fingers.
Per wing, make:
- Golden yellow: 8–10 feathers
- Dusty rose/mauve: 4–5 feathers
- Cream: 5–6 feathers
Total: 17–21 feathers per wing for lush coverage.
🪽 Wing Assembly
- Lay a cream underwing panel flat.
- First layer: Sew cream feathers along the inner edge and lower part of the wing.
- Second layer: Sew golden feathers overlapping the cream, forming the main middle band.
- Third layer: Sew dusty rose feathers along the outer/top edge and tips for the distinctive colored edging you see in the photo.
- Curve the panel slightly as you sew for natural shaping.
Repeat for the other wing, mirroring the arrangement.
Attach wings to the sides of the body at roughly a 45° angle, angled slightly backward, so they frame the figure dramatically rather than lying flat.
🦚 Tail Feathers (Dusty Rose + Golden)
Tail feathers are a key visible feature and should match the wing style.
Make 4–5 feathers using the same feather pattern:
- 3–4 in dusty rose/mauve
- 1 in golden yellow (accent)
Sew these to the lower back in a downward fan shape.
🧷 Final Assembly
- Join Head & Body: Sew the head firmly onto the body, then attach the neck ruff around the join.
- Attach Legs: Sew the legs directly under the body, centered and pointing straight down. Test the standing balance as you go.
- Add Talons: Sew the claws onto the ends of the legs, three in front and one behind each leg.
- Attach Wings: Sew each completed wing onto the upper sides of the body at a backward-angled 45°, adjusting so they mirror each other.
- Attach Tail Feathers: Add the tail feather fan at the back.
- Finish Hair: Let the mocha hair fall over shoulders and back, adjust any twists, and trim only if needed.
- Final Touches: Deepen eyelid embroidery, adjust blush, and gently block wings and feathers if desired.
🌟 Your Finished Harpy
With mocha-brown hair, creamy body, long golden legs, sharply curved black-tipped talons, full layered wings in cream, gold, and dusty rose, plus a striking feathered neck ruff, your harpy now matches the visual character of the reference image while staying fully crochet-friendly and structurally sound.