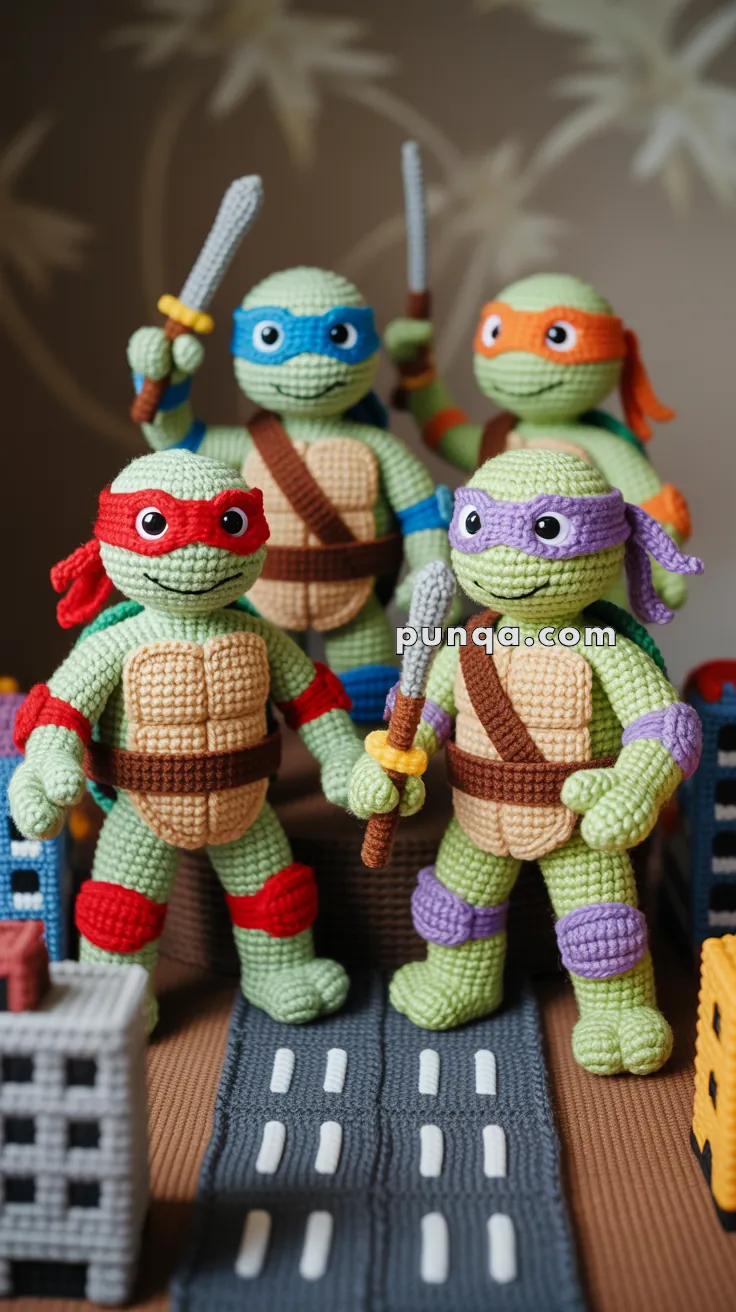
Cowabunga, crochet fans! Bring the action-packed world of the Amigurumi Ninja Turtles to life with this fun and adventurous pattern! Inspired by the beloved heroes in a half shell, this design captures their signature masks, expressive faces, and tiny turtle shells, making them the perfect addition to any collection. Whether you’re crafting for nostalgic fans, adding a playful touch to your decor, or simply enjoy making character-inspired amigurumi, this pattern lets you stitch up a squad of turtles bursting with personality! Perfect for brightening up any space, these crochet creations bring a touch of handmade superhero magic to every stitch. 🐢✨
Designed for customization, this pattern allows you to experiment with different shades of green, embroidered details, or even tiny accessories like miniature pizza slices or ninja weapons for extra flair. Craft a classic set with bold comic-style colors, create a pastel version for a softer aesthetic, or even stitch up a full team of action-ready amigurumi for an epic display! Whether gifted as a thoughtful keepsake, displayed as a fun accent, or made simply for the joy of crafting, these Amigurumi Ninja Turtles are a creative and exciting project—perfect for bringing a touch of handmade turtle power to every stitch! 🧶💖✨
🐢 Amigurumi Ninja Turtles Crochet Pattern 🥷🍕
Bring your favorite heroes in a half shell to life with this detailed amigurumi crochet pattern!
Each turtle is built from the same strong, sculpted base and comes to life through signature colors, expressive faces, and iconic weapons. With muscular limbs, dimensional shells, and bold masks, these turtles are designed to stand confidently on display — or leap into action in your collection.
✨ Skill Level
Intermediate — includes shaping, surface details, multi-part assembly, and small accessories.
📏 Finished Size
- Approx. 22 cm / 9 in tall using DK-weight yarn and a 3.0 mm hook
- Approx. 18 cm / 7 in tall using sport-weight yarn and a 2.5 mm hook
🧶 Materials
Yarn (DK-weight cotton recommended):
- Light green — 60 g (head, body, arms, legs)
- Beige / tan — 30 g (front shell / plastron)
- Brown — 40 g (back shell, belt, straps)
- Accent color — 15 g (blue, red, orange, or purple for mask & pads)
- Gray — 10 g (weapons)
- Yellow / black scraps — weapon grips, facial details
Notions:
- 10 mm safety eyes
- Fiberfill stuffing
- Tapestry needle
- Scissors
- Stitch marker
🪡 Abbreviations (US Terms)
MR – magic ring
sc – single crochet
inc – increase (2 sc in same stitch)
dec – decrease (sc2tog)
sl st – slip stitch
ch – chain
FLO – front loop only
FO – fasten off
🧠 Head (Light Green)
R1: MR 6 sc (6)
R2: inc × 6 (12)
R3: (1 sc, inc) × 6 (18)
R4: (2 sc, inc) × 6 (24)
R5: (3 sc, inc) × 6 (30)
R6: (4 sc, inc) × 6 (36)
R7–14: sc around (36)
R15: (4 sc, dec) × 6 (30)
R16: (3 sc, dec) × 6 (24)
R17: (2 sc, dec) × 6 (18)
Stuff firmly.
👀 Eye Placement & Spacing (Important)
Insert safety eyes between Rounds 8–9.
- Leave 8 stitches between the inner edges of the eyes
- This equals 9–10 stitches center-to-center
- The wide spacing creates the friendly, rounded expression seen in the finished turtles and allows room for the mask to sit correctly
Do not place the eyes too close together — narrow spacing will distort the face shape.
Finish head:
R18: (1 sc, dec) × 6 (12)
R19: dec × 6 (6)
FO, close.
Embroider a small curved black smile two rows below the eye line.
🟦 Mask & Eye Openings (Accent Color)
The mask is designed to sit slightly above the eyes, not tightly around them.
Ch 26
Row 1: sc across, ch 1, turn
Row 2: dec, sc 10, ch 5 (eye gap), skip 5, sc 10, dec
Row 3: sc across
FO
Mask Alignment
- The eye gap is intentionally wider than the eye spacing
- This allows the mask to rest naturally across the upper face
- Eyes remain fully visible beneath the mask edge
Tie mask around the head just above the eye line. Lightly tack the sides so it lies flat without pulling inward.
Mask tails:
Ch 35–40, sc back along chain. Attach at mask knot so tails hang past the belt line.
💪 Body (Light Green)
R1: MR 6 sc (6)
R2: inc × 6 (12)
R3: (1 sc, inc) × 6 (18)
R4: (2 sc, inc) × 6 (24)
R5: (3 sc, inc) × 6 (30)
R6: (4 sc, inc) × 6 (36)
R7: (5 sc, inc) × 6 (42)
R8–15: sc around (42)
R16: BLO sc around (42) — creates neck ridge
R17–18: sc around (42)
R19: (4 sc, dec) × 7 (35)
R20: (3 sc, dec) × 7 (28)
R21: (2 sc, dec) × 7 (21)
Stuff firmly. FO.
Attach head overlapping the neck ridge slightly for a seamless join.
🦵 Legs × 2 (Stocky)
R1: MR 8 sc (8)
R2: inc × 8 (16)
R3: (1 sc, inc) × 8 (24)
R4–12: sc around (24)
R13: (2 sc, dec) × 6 (18)
R14–15: sc around (18)
Stuff firmly. Flatten base slightly.
Attach legs with a 20–25° outward angle for a stable stance.
3D Toes
At the front edge, repeat ×3: insert hook, pull up loop, ch 2, sl st back into same stitch.
💪 Arms × 2 (with Fingers)
R1: MR 6 sc (6)
R2: inc × 6 (12)
R3–15: sc around (12)
R16: dec × 2 (10)
Stuff lightly.
Fingers
At hand end:
- sc 3, turn, sc 3 back, sl st next stitch → 1 finger
- Repeat twice (3 fingers total)
Attach arms angled 30–45° forward for action pose.
🟤 Elbow & Knee Pads (Accent Color)
Ch 8–10, join to ring.
Work 2–3 rounds sc.
Sew over joints.
🐢 Front Shell (Plastron)
Make 6 plates (Beige):
R1: MR 6
R2: inc × 6 (12)
R3: (1 sc, inc) × 6 (18)
R4–5: sc around (18)
FO, lightly stuff.
Backing oval:
- Ch 10, work oval base until approx. 24 sts wide
- Continue rows until approx. 30 rows long
Arrange plates in 2 columns × 3 rows and sew onto backing.
Attach plastron centered on front.
🟤 Back Shell
R1: MR 6
R2: inc × 6 (12)
R3: (1 sc, inc) × 6 (18)
R4: (2 sc, inc) × 6 (24)
R5: (3 sc, inc) × 6 (30)
R6: (4 sc, inc) × 6 (36)
R7–11: sc around (36)
R12: FLO sc around (36) — raised rim
R13: (4 sc, dec) × 6 (30)
R14: (3 sc, dec) × 6 (24)
Lightly stuff. FO.
Surface stitch a hex pattern using dark brown yarn.
🟤 Belt & Straps
Belt: ch 45, sc 1 row. Wrap around waist.
Cross straps: 2 × ch 30, sc 1 row. Sew in an “X” on back.
Buckle:
Ch 6, sc 3 rows.
Embroider initial (L, R, M, or D). Sew center front.
⚔️ Weapons
Leonardo – Twin Katanas ×2
Gray ch 14, sc back. Wrap handle yellow.
Raphael – Sai ×2
Gray ch 12, sc back.
At base: (sc 3, ch 4, sc back) ×2.
Michelangelo – Nunchucks
Handles: MR 6 sc, 8 rounds (make 2).
Connector: ch 12, sl st back.
Donatello – Bo Staff
Brown ch 35, sc back. Add yellow bands.
Tack weapons into fingers with matching thread.
🧩 Assembly Order
- Attach legs
- Sew plastron
- Add arms & pads
- Attach head
- Sew back shell
- Add belt & straps
- Tie mask & tails
- Secure weapons
🎉 Final Touches
- Steam-shape limbs for pose
- Firm stuffing ensures balance
- Optional wire in arms for poseability
🐢 Final Note
With expressive faces, wide-set eyes, properly aligned masks, sculpted shells, and fully formed fingers and toes, these turtles capture the bold personality and team energy fans love. Display them together, pose them mid-action, or gift them to a fellow fan — each one is unmistakably heroic and completely handmade.
Cowabunga! 🥷🍕


Such a lovely pattern!