Add a festive touch to your holiday table with the Christmas Tree Silverware Holder, a crochet project that’s both decorative and practical! 🎄🧶 Designed with a beautiful rounded tree silhouette, a soft raised border, and a sturdy utensil band, this charming piece brings handmade warmth to any Christmas dinner setting. It’s the perfect way to showcase your cutlery while adding a cozy, creative accent to your holiday décor.
Quick to work up and easy to style, this silverware holder not only keeps utensils neatly in place but also looks stunning alongside candles, greenery, and twinkle lights. Whether you’re hosting a big family gathering or creating a magical table for two, the Christmas Tree Silverware Holder is a joyful way to crochet celebration, charm, and a sprinkle of handmade magic—one loop at a time! 🧵✨🍽️
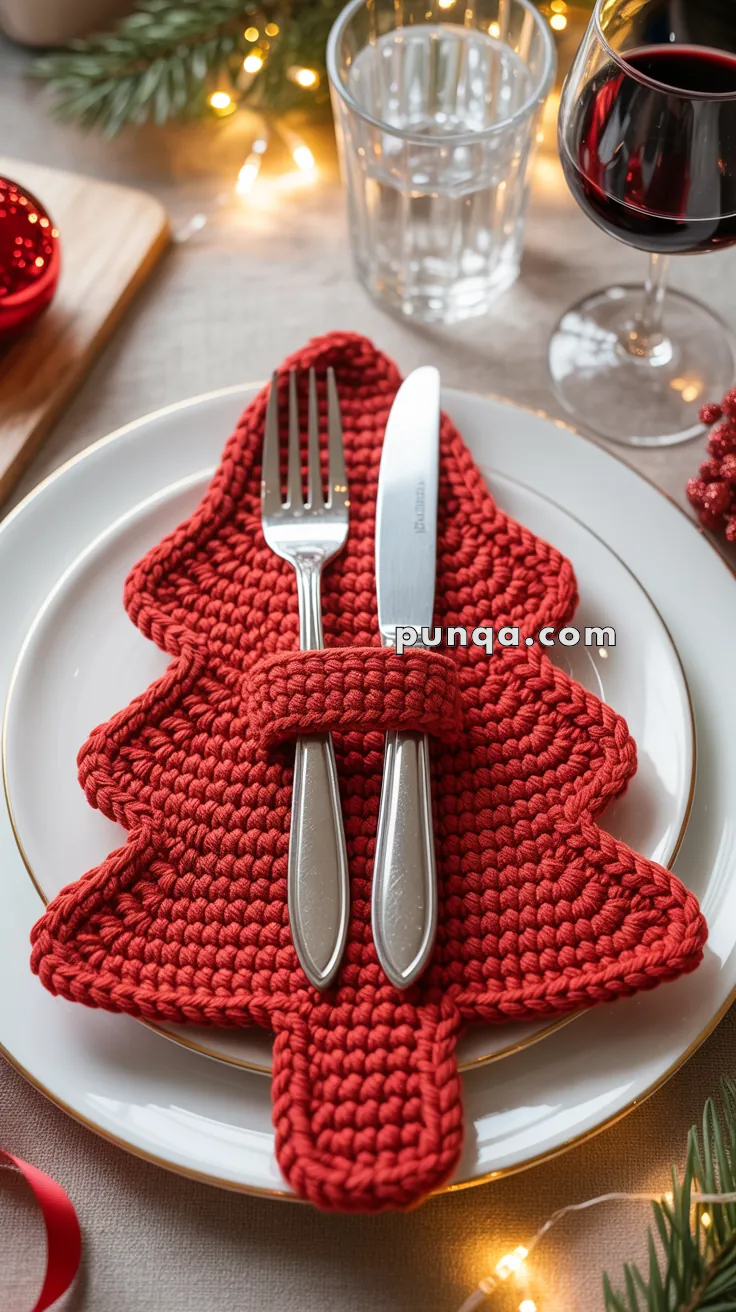
🎄 Crochet Christmas Tree Silverware Holder (Beginner-Friendly Pattern)
Bring cheerful handmade charm to your holiday table with this thick, beautifully rounded crochet Christmas Tree Silverware Holder. With its soft curved tiers, bold silhouette, and sturdy utensil band, it creates a warm and welcoming plate display. Whether you’re decorating a Christmas dinner setting, hosting guests, or gifting a handmade keepsake, this project is quick, satisfying, and festive.
✨ Skill Level
Beginner-friendly – simple single crochet shaping, easy seaming, and one decorative surface border.
🧶 Materials
Super bulky cotton rope-style yarn (5–6 mm thickness)
- Red: approx. 70–80 g (tree body)
- Red: approx. 15–20 g (utensil band)
- Hook: 5.0 mm
- Yarn needle
- Scissors
🧵 Abbreviations (US Terms)
sc – single crochet
inc – increase (2 sc in same stitch)
dec – decrease (sc2tog)
ch – chain
sl st – slip stitch
BLO – back loop only
FO – fasten off
🌲 Christmas Tree Body
The tree is worked from the trunk upward. The silhouette is softly rounded with gradual increases in the lower tiers and smooth decreases toward the tip.
🟤 Tree Trunk
R1: Ch 7, sc in 2nd ch and across (6)
R2–6: sc across (6)
R7: inc, 4 sc, inc (8)
🎄 Lower Tree Tier
R8: sc across (8)
R9: inc, 6 sc, inc (10)
R10–11: sc (10)
R12: inc, 8 sc, inc (12)
R13–14: sc (12)
R15: inc, 10 sc, inc (14)
🎄 Middle Tree Tier
R16–17: sc (14)
R18: inc, 12 sc, inc (16)
R19–20: sc (16)
R21: inc, 14 sc, inc (18)
🎄 Upper Tree Tier
The photographed piece shows a natural rounded slope rather than sharp triangular lines. These slow decreases recreate that shape.
R22–23: sc (18)
R24: dec, 14 sc, dec (16)
R25: dec, 12 sc, dec (14)
R26: dec, 10 sc, dec (12)
R27: dec, 8 sc, dec (10)
R28: dec, 6 sc, dec (8)
R29: dec, 4 sc, dec (6)
⭐ Tree Tip
R30: sc (6)
R31: dec, 2 sc, dec (4)
R32: sc (4)
FO and weave in ends.
✨ Decorative Raised Border (Optional but Beautiful)
This border recreates the clean, rope-like outline seen in the image.
- Attach yarn anywhere along the tree’s edge.
- Work 1 sl st in BLO around the entire tree.
- Add 2 sl st at outer curves for smooth rounding.
- Add the occasional sl st dec at inward dips to maintain shape.
FO and weave in ends.
🍽️ Utensil Holder Band
The band is wide, thick, and sits firmly across the trunk area.
🔴 Band Base
Ch 13
R1: sc in 2nd ch and across (12)
R2–12: sc across (12)
(Adjust rows if you want a tighter or looser band.)
🔧 Band Assembly
- Fold into a loop so short edges meet.
- Sew or sl st together.
- Turn seam to inside.
- Slide band onto the trunk area of the tree.
The band placement should sit at the narrow mid-section of the body, creating a secure slot for silverware.
🎁 Final Assembly & Styling
- Place the tree on a plate or charger.
- Slide fork and knife under the band.
- Position utensils so they sit centered and vertical.
- Style the surrounding table with candles, greenery, pinecones, or fairy lights for a cozy holiday setting.
This handmade accent instantly elevates any Christmas table and makes a beautiful keepsake your guests will love.