Get ready to cruise into holiday cheer with the Christmas Truck, a festive crochet pattern that’s full of nostalgic charm and handmade magic! 🚛🎄🧶 With its classic shape, bright red body, and a tiny Christmas tree nestled in the back, this adorable truck brings vintage vibes and cozy spirit to your seasonal décor. Whether it’s parked on a mantel, tucked into a gift basket, or used as a centerpiece, it’s sure to deliver smiles all season long.
Perfect for crocheters who love holiday projects and playful details, this pattern invites you to stitch up a scene straight out of a winter postcard. Add snowflakes, string lights, or even a little driver for extra personality. The Christmas Truck is a joyful way to stitch up tradition, warmth, and a sprinkle of handmade holiday magic—one loop at a time! 🧵✨🎁
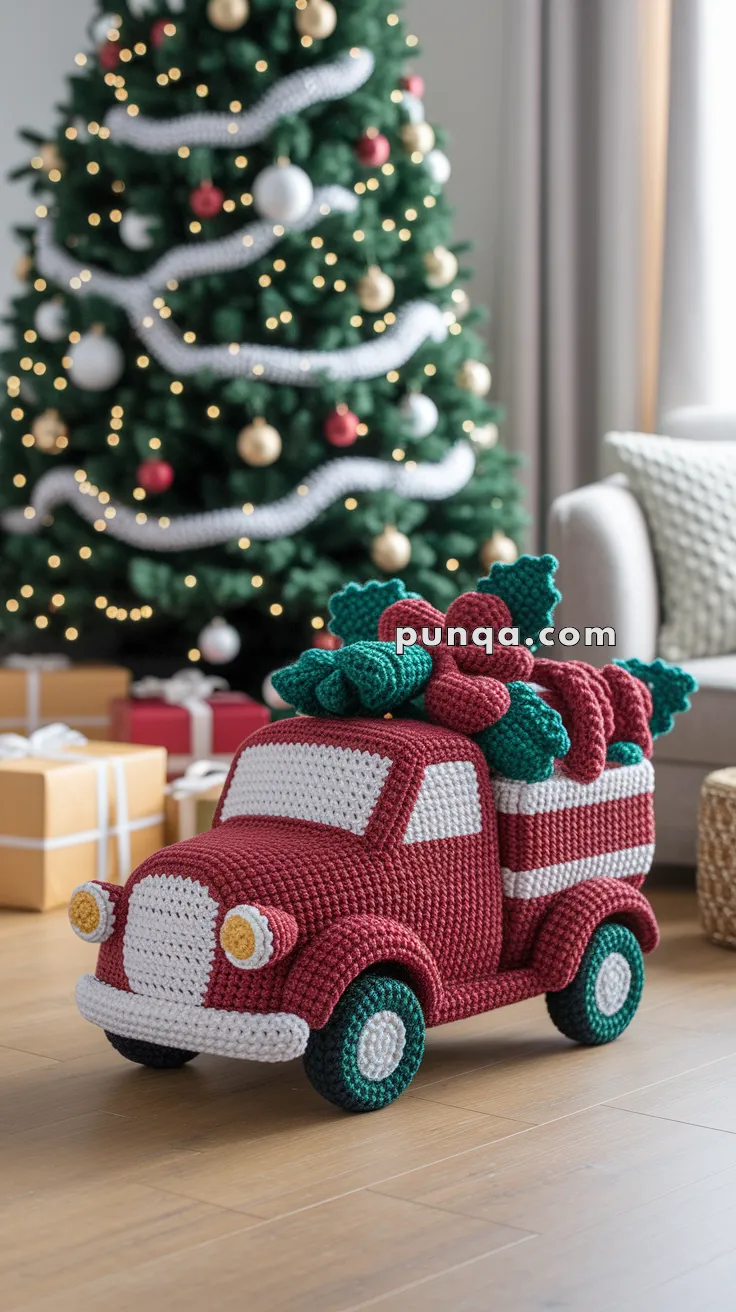
🎄Vintage Christmas Pickup Truck Crochet Pattern
Bring nostalgic holiday cheer to your home with this handcrafted vintage red pickup truck, loaded with green gifts and topped with matching burgundy bows! Every detail—from the rounded hood and wraparound white bumpers to the stacked bundles in the truck bed—makes this piece a heartwarming centerpiece for your Christmas decor.
✨ Skill Level
Advanced – involves shaping, seaming multiple 3D parts, and achieving the signature rounded “vintage cab” curve.
📏 Finished Size
Approximately 25–30 cm (10–12 inches) long when made with worsted-weight yarn and a 3.0 mm hook.
🧶 Materials
-
Yarn (Worsted Weight / Cotton or Acrylic):
-
Deep Red – 120 g (main body & cab)
-
White – 80 g (windows, grill, bumpers, hubcaps)
-
Dark Green/Teal – 80 g (tires & presents)
-
Yellow – small amount (headlights)
-
Burgundy/Wine Red – small amount (bows)
-
-
Hook: 3.0 mm
-
Stuffing: Polyester fiberfill
-
Extras: Yarn needle, stitch markers
-
Optional: Plastic canvas or cardboard (for base support)
🧵 Abbreviations (US Terms)
MR – Magic Ring
sc – Single Crochet
inc – Increase (2 sc in same stitch)
dec – Decrease (sc two together)
ch – Chain
sl st – Slip Stitch
BLO/FLO – Back/Front Loop Only
FO – Fasten Off
🚗 Chassis & Base
With red yarn:
1️⃣ Base Rectangle:
Ch 28.
Row 1: Sc in 2nd ch from hook and across (27).
Rows 2–8: Sc across (27).
Sc evenly around entire rectangle; 3 sc in each corner to round edges.
FO and set aside. (Insert a matching cardboard/plastic piece for sturdiness.)
🛞 Lower Body Shell
This forms the sides and running boards, including gentle arches for wheel wells.
Ch 84.
Rows 1–4: Sc across each row (83).
Row 5: Sc 14, dec x3, sc 18, dec x3, sc 14 — this creates the two wheel arches.
Rows 6–7: Sc evenly; make 1–2 extra decreases centered above each arch for depth.
FO. Wrap around base, aligning arches with wheels; sew edges together and to base.
Lightly stuff under the side panels for rounded running boards.
🚙 Rear Truck Bed (Solid Red)
Bed Floor:
Ch 22, sc 21 across.
Rows 2–10: Sc rows (21). FO.
Side Walls ×2:
Ch 22, sc 21 across.
Rows 2–8: Sc rows (21). FO.
Tailgate:
Ch 16, sc 15 across.
Rows 2–8: Sc rows (15). FO.
Assemble into a rectangular box and sew to back half of the chassis.
(Ensure walls are vertical and tailgate sits flush.)
🚘 Cab & Hood (Rounded Shape)
Hood (Red)
MR 6
R2: inc ×6 = 12
R3: (sc, inc) ×6 = 18
R4: (2 sc, inc) ×6 = 24
R5: (3 sc, inc) ×6 = 30
R6: (4 sc, inc) ×6 = 36
R7–10: Sc around (36).
FO. Stuff lightly to maintain that gentle dome.
Cab Body (Red)
MR 6
R2: inc ×6 = 12
R3: (sc, inc) ×6 = 18
R4: (2 sc, inc) ×6 = 24
R5–11: Sc around (24). FO.
Windshield Section (Red)
Ch 26.
Rows 1–2: Sc across (25).
Row 3: Dec, sc 9 twice, dec at end (23).
Rows 4–5: Sc across (23). FO.
🧩 Assembly:
Sew the cab back to the base just ahead of the truck bed.
Attach the hood in front, overlapping slightly for a continuous curve.
Pin and sew the windshield panel between hood and cab, shaping smoothly.
Stuff firmly from the underside.
(Tip: Adjust stuffing density at front and top to achieve the signature bulbous vintage curve.)
🪟 Windows & Grill (White)
Side Windows (×2)
Ch 9.
Rows 1–5: Sc 8 per row. FO.
Sew onto cab sides at a slight backward angle—the front edge should be lower, giving the windshield a natural slope.
Front Windshield
Ch 12.
Rows 1–6: Sc 11. FO.
Sew onto the slanted front panel of cab, leaving a narrow red frame.
Grill
Ch 8.
Rows 1–8: Sc 7.
Sc evenly around edges, working 3 sc in each corner for rounding.
(Optional: Add vertical slip-stitch lines for grill texture.)
Attach centrally under the windshield.
🧱 Bumpers (White)
Front Bumper
Ch 42, sc 41 across for 3 rows. FO.
Wrap around lower front edge from wheel to wheel. Sew in place.
Rear Bumper
Ch 36, sc 35 across for 3 rows. FO.
Attach across rear bottom under the tailgate.
💡 Headlights (Yellow + White)
Lens: MR 6 in yellow. FO.
Surround: MR 6 in white, (sc, inc) ×3 = 9. FO.
Sew yellow disc inside white ring.
Attach both headlights symmetrically on either side of grill.
🛞 Tires (Dark Green with White Hubs)
Hub (White):
MR 6 → (inc ×6) = 12 → (sc, inc) ×6 = 18. FO.
Tire (Green):
Join to hub. (2 sc, inc) ×6 = 24.
R5: BLO sc around (24) to form tread ridge.
R6: Sc around (24). FO, stuff lightly.
Sew evenly beneath wheel arches.
🎁 Cargo – Green Cylinder Presents
Make 3–4 cylinders in dark green, different lengths.
Cylinder:
MR 6 → (inc ×6) = 12 → (sc, inc) ×6 = 18.
Work even (R4–R14) = 18 sts. FO.
Make a second round base and sew to close one end. Stuff firmly.
Bows (Burgundy/Wine Red):
Ch 28, sl st back for a long cord.
Tie around each cylinder and knot into a bow.
For a festive look, make 2–3 leaves (ch 6, back along: sl st, sc, hdc, sc, sl st) and place under the knot.
🧩 Arrange cylinders in the truck bed: one long at the bottom, two medium stacked above. Stitch securely so they stay put.
🔧 Final Assembly
1️⃣ Attach cab and hood to front of chassis.
2️⃣ Sew wheels into wheel wells.
3️⃣ Add front & rear bumpers.
4️⃣ Secure truck bed to rear half of chassis.
5️⃣ Arrange and stitch cargo load in place.
6️⃣ Steam-shape hood and cab for smooth curves.
7️⃣ Optional: Add a small embroidered license plate or surface-stitched line along bumpers for extra realism.
🌟 Finishing Touches
-
Use your fingers to gently curve the hood and windshield area into that signature rounded vintage contour.
-
Position side windows slightly angled backward to mirror the photo’s perspective.
-
Keep bows deep burgundy to blend harmoniously with the truck’s red body.
-
Place your finished truck under your tree or on a mantel—it’s a nostalgic showpiece of handmade holiday joy.
❤️ Final Thoughts
This Christmas pickup truck combines charm and craftsmanship—complete with realistic shaping, gleaming white accents, and a perfectly balanced cargo bed of festive bundles.
Each stitch captures a little bit of vintage holiday spirit.
Crochet one this season and let your handmade truck deliver joy straight to your living room! 🚗🎁🎄